Free Halloween Granny Square Blanket Crochet Pattern
By Jan Bay
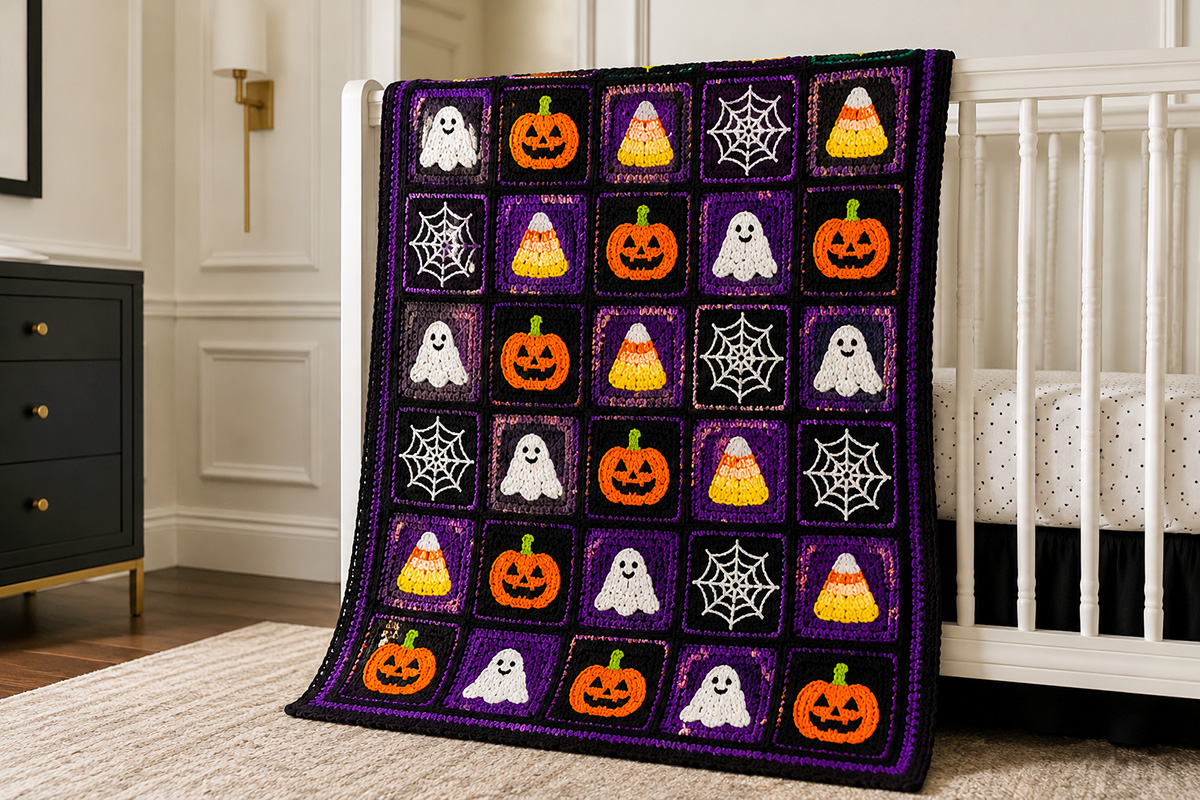
This free Halloween granny square blanket crochet pattern combines pumpkins, ghosts, spider webs and candy corn with simple coordinating squares for a colorful fall blanket. Crochet the individual Halloween squares, arrange them into the finished design, then join the motifs and add a clean border to complete the blanket.
Explore More Free Crochet Patterns
Supplies for This Crochet Pattern
Jump to a Section
How This Halloween Granny Square Blanket Pattern Is Built
This Halloween granny square blanket uses one consistent square size, then changes the center design with four Halloween motifs: pumpkins, ghosts, spider webs and candy corn. Keeping the square construction consistent makes the finished blanket easier to arrange, join and border.
The blanket shown here uses 30 squares arranged five across and six down. The motifs repeat across the blanket instead of appearing in rigid blocks, so the finished design has plenty to look at without feeling like a sampler of unrelated squares.
I like letting the black and deep purple backgrounds do some of the visual work. They give the orange pumpkins, white ghosts and bright candy corn enough contrast without needing complicated color changes inside every granny square.
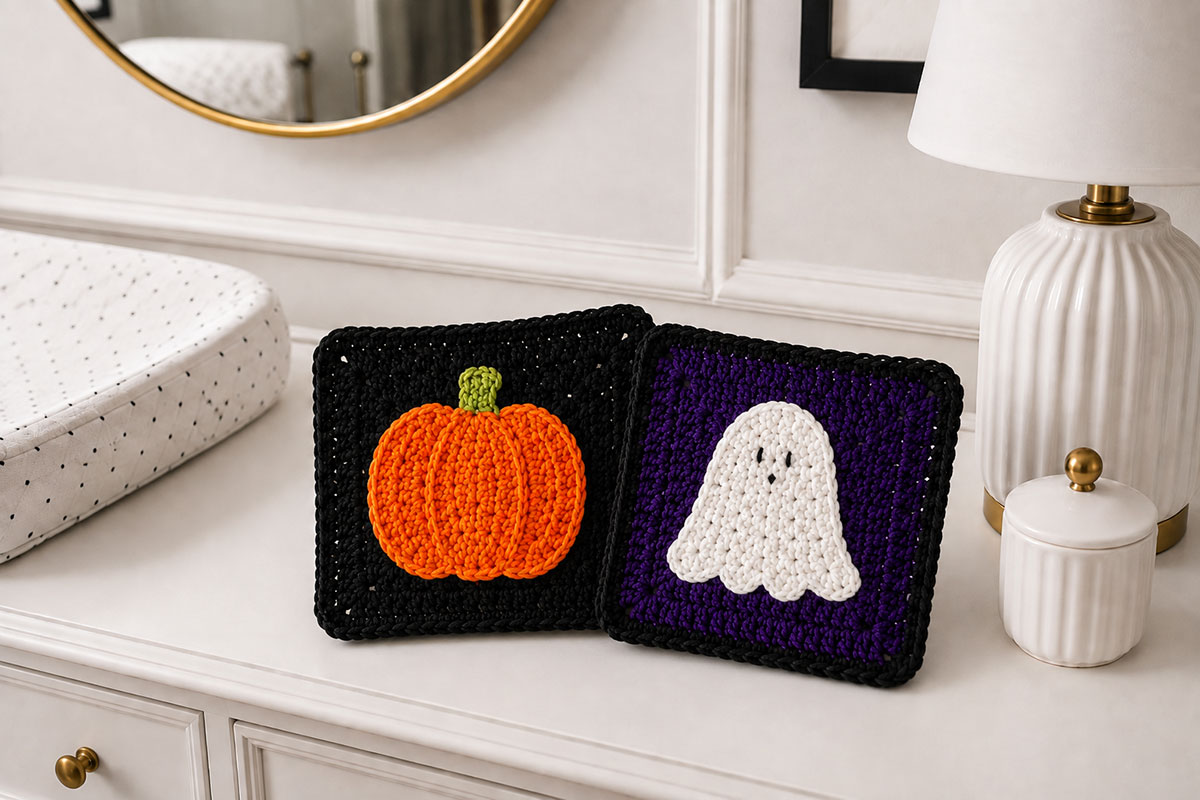
Each motif is added to a solid granny square base. The pumpkin, ghost and candy corn pieces are crocheted separately and sewn securely to the square. The spider web is stitched directly onto its square. This approach also makes it easier to replace one motif with another if you want more pumpkins, fewer ghosts or a different arrangement.
Finished Size
- Individual blocked square: approximately 6 1/2 inches square
- Blanket layout: 5 squares across by 6 squares down
- Joined blanket before border: approximately 32 1/2 inches wide by 39 inches long
- Expected finished blanket after border: approximately 34 1/2 to 35 1/2 inches wide by 41 to 42 inches long, depending on border depth and tension
Finished measurements can vary with yarn, hook size and tension. The exact size of each square matters more than matching a particular stitch gauge because all 30 squares need to line up cleanly when they are joined.
If you want a larger blanket, make additional squares in complete rows of five. One extra row adds approximately 6 1/2 inches to the length before the border. To make the blanket wider, add one square to every row and adjust the motif layout so the colors remain balanced.
Skill Level
Advanced beginner to intermediate. You should be comfortable making double crochet stitches, working into chain spaces, changing colors, crocheting simple pieces in rows and rounds, sewing appliqués to crochet fabric and joining completed squares.
The individual techniques are not difficult, but there are several of them. Finish one example of each motif before making the full quantity. That gives you a chance to adjust your hook or tension before you have a stack of squares that measure differently.
Gauge and Square Size
For this project, use the completed granny square as your gauge check.
- One finished and lightly blocked square should measure approximately 6 1/2 inches from side to side.
- All squares should be within about 1/4 inch of each other before joining.
If your square is much smaller, try a slightly larger hook. If it is much larger, try a smaller hook. Do not stretch one square heavily during blocking simply to make it match the others. A square that needs that much adjustment can pull against the seams later.
Supplies for the Halloween Granny Square Blanket
- Approximately 1,750 to 1,900 yards total of smooth worsted weight number 4 yarn
- Approximately 600 yards black
- Approximately 450 yards deep purple
- Approximately 300 yards pumpkin orange
- Approximately 250 yards white
- Approximately 100 yards golden yellow
- Small amount of green for pumpkin stems
- Small amount of black yarn or embroidery floss for ghost facial features
- 5 mm crochet hook, or the size needed to obtain the finished square measurement
- Tapestry needle
- Scissors
- Removable stitch markers
- Blocking mats and rust-resistant pins, optional but helpful
The yardage is intentionally generous because yarn use changes with tension, motif placement and the border. If you are choosing yarn from several dye lots, buy enough of the main black and purple colors at the beginning so those large areas stay consistent.
Abbreviations
- ch: chain
- dc: double crochet
- hdc: half double crochet
- sc: single crochet
- sl st: slip stitch
- st: stitch
- sts: stitches
- sp: space
- sc2tog: single crochet two stitches together
Before You Start the Squares
Use the same hook for all 30 granny square bases unless your tension changes noticeably between colors. Dark yarn can make stitches harder to see, so count the stitches along each side instead of relying only on appearance.
Weave in the square-base ends before adding the motifs. Leave the motif tails long enough to use for sewing whenever practical. It saves extra ends and gives the appliqués a secure attachment point.
The motifs should lie flat against the square rather than sitting like stuffed decorations. Do not add buttons, beads, plastic eyes or other hard pieces. The ghost face is embroidered, and the remaining motifs do not need separate embellishments.
Make the Solid Granny Square Bases
Make 30 solid granny square bases. Alternate black and deep purple so both colors are distributed throughout the finished blanket.
The square is worked in joined rounds. Chain 3 at the beginning of a round counts as one double crochet.
Round 1
Make a magic ring.
Ch 3, work 2 dc into the ring, ch 2.
Work 3 dc into the ring, ch 2 three more times.
Join with a sl st to the top of the beginning ch 3.
You should have four groups of 3 dc with four ch-2 corner spaces.
Round 2
Sl st across to the first ch-2 corner space.
Ch 3, dc in the same corner space, ch 2, work 2 dc in the same corner space.
Dc in each dc across the next side.
In the next ch-2 corner space, work 2 dc, ch 2, 2 dc.
Repeat across each remaining side, working one dc in every dc and 2 dc, ch 2, 2 dc in every corner space.
Join with a sl st to the top of the beginning ch 3.
Rounds 3 Through 6
Sl st across to the next ch-2 corner space.
Ch 3, dc in the same corner space, ch 2, work 2 dc in the same corner space.
Work one dc in every dc across the side.
In the next corner space, work 2 dc, ch 2, 2 dc.
Continue around in the same manner. Work one dc in each dc along every side and 2 dc, ch 2, 2 dc in each corner.
Join with a sl st to the beginning ch 3 at the end of each round.
After Round 6, you should have 23 dc along each side between the ch-2 corner spaces.
Fasten off and weave in the ends.
Check Every Square Before Adding a Motif
Lay several finished bases on top of each other. The edges and corners should line up without stretching.
If one square is noticeably larger or smaller, correct it before adding the motif. Reworking a single base now is much easier than trying to disguise an uneven row after the blanket is joined.
Lightly block the bases to approximately 6 1/2 inches square. Keep each corner square rather than pulling it into a sharp point.
Once the bases match, you are ready to turn them into the four Halloween squares that give the blanket its character.
Halloween Granny Square Blanket Motifs
The four motifs are deliberately simple enough to repeat across a full blanket, but each one has a different silhouette. Make 8 pumpkin squares, 8 ghost squares, 7 spider web squares and 7 candy corn squares for a total of 30 finished squares.
Center each appliqué before you sew it down. Place a removable stitch marker through the middle of the motif and the middle of the granny square first. That small step keeps pumpkins from drifting toward one corner and ghosts from looking as though they are floating off the edge.
Pumpkin Granny Square
Make 8 pumpkin granny squares.
The pumpkin is a flat appliqué sewn to the center of a finished granny square. The oval is intentionally simple so the orange shape reads clearly against the dark background. A few surface stitches create the pumpkin sections without adding extra bulk.
Orange Pumpkin
With pumpkin orange yarn, ch 9.
Round 1: Sc in the second ch from the hook, hdc in the next ch, dc in each of the next 4 ch, hdc in the next ch, then work 3 sc in the last ch.
Rotate the work so you can crochet along the unused loops on the opposite side of the starting chain.
Hdc in the next ch, dc in each of the next 4 ch, hdc in the next ch, then work 2 sc in the same starting chain that contains the first sc.
Join with a sl st to the first sc.
Fasten off, leaving a long tail for sewing.
The finished pumpkin should form a low oval rather than a perfect circle. Gently shape it with your fingers before attaching it to the square.
Pumpkin Stem
With green yarn, ch 4.
Sc in the second ch from the hook and in each of the next 2 ch.
Fasten off, leaving a tail for sewing.
Add the Pumpkin Details
Thread a length of orange yarn onto a tapestry needle.
Bring the yarn from the back of the pumpkin to the front near the top edge. Make one long surface stitch down the center of the pumpkin and return the needle to the back near the bottom edge.
Add one curved or slightly angled stitch on each side of the center line. These stitches suggest the pumpkin sections without covering the crochet texture.
Do not pull the surface stitches tightly. They should rest against the pumpkin and allow the appliqué to remain flat.
Attach the Pumpkin to the Square
Place the pumpkin in the center of a black or deep purple granny square. Leave an even amount of background visible around the motif.
Position the green stem behind the top edge of the pumpkin so approximately 3/4 inch remains visible.
Sew the stem securely to the square first.
Thread the long orange tail onto the tapestry needle. Begin at the lower edge of the pumpkin and whip stitch around the entire outer edge, catching the granny square beneath the appliqué with each stitch.
Continue around the pumpkin until you return to the starting point. Check the appliqué after every few stitches and keep the oval flat without pulling its edges inward.
Secure the yarn on the back of the square and weave in the end.
Ghost Granny Square
Make 8 ghost granny squares.
The ghost is worked flat in rows from the rounded head toward the wider body. The small scallops along the bottom create the floating ghost shape, while simple embroidery keeps the face soft and uncluttered.
Crochet the Ghost
With white yarn, ch 5.
Row 1: Sc in the second ch from the hook and in each remaining ch. You should have 4 sc.
Ch 1 and turn.
Row 2: Work 2 sc in the first st, sc in each of the next 2 sts, then work 2 sc in the last st. You should have 6 sc.
Ch 1 and turn.
Row 3: Sc in each of the 6 sts.
Ch 1 and turn.
Row 4: Work 2 sc in the first st, sc in each of the next 4 sts, then work 2 sc in the last st. You should have 8 sc.
Ch 1 and turn.
Rows 5 through 8: Sc in each of the 8 sts. Ch 1 and turn after Rows 5 through 7.
At the end of Row 8, ch 1 and turn.
Row 9: Work 2 sc in the first st, then sc in each of the remaining 7 sts. You should have 9 sc.
Ch 1 and turn.
Row 10: Sc in each of the 9 sts.
Turn the work without chaining.
Make the Scalloped Ghost Bottom
Work a sl st in the first st.
Work 3 dc in the next st.
Sl st in the next st.
Work 3 dc in the next st.
Sl st in the next st.
Work 3 dc in the next st.
Sl st in the next st.
Work 3 dc in the next st.
Sl st in the final st.
Fasten off, leaving a long tail for sewing.
Gently shape the upper corners of the ghost with your fingers so the head looks rounded rather than square.
Embroider the Ghost Face
Add the face before sewing the ghost to the granny square. It is much easier to hide the embroidery ends while the back of the appliqué is still accessible.
Thread black embroidery floss or smooth black yarn onto a tapestry needle.
Make one short vertical satin-stitch eye on each side of the face. Keep the eyes small and evenly spaced.
For the mouth, make one short horizontal stitch or a tiny downward curve centered below the eyes.
Keep the expression simple. Large facial features can make the small ghost look crowded once it is placed on the square.
Secure the embroidery ends on the back of the appliqué.
Attach the Ghost to the Square
Center the ghost on a black or deep purple granny square with the scalloped edge facing down.
Thread the long white yarn tail onto the tapestry needle. Begin near the lower edge and whip stitch around the entire ghost, following each lower scallop and continuing around both sides and the rounded head.
Continue until you return to the starting point. Keep the head and body flat as you work. If the appliqué begins to pucker, loosen the most recent stitches before continuing.
Secure the yarn on the back of the square and weave in the end.
When the pumpkin and ghost squares are finished, lay several of them together before continuing. The motifs do not need to be identical down to the stitch, but their overall size and placement should look consistent from square to square.
Spider Web Granny Square
Make 7 spider web granny squares.
The spider web is stitched directly onto a finished granny square instead of crocheting a separate appliqué. This keeps the square flat and gives the blanket a different kind of motif between the pumpkins, ghosts and candy corn.
Use a black or deep purple square and white yarn for the web. Smooth worsted weight yarn is easiest to control. Avoid fuzzy yarn because the web lines need to stay crisp enough to read from across the blanket.
Mark the Web Center
Lay the granny square flat with the right side facing up.
Find the visual center of the square and place a removable stitch marker there.
Cut approximately 3 yards of white yarn and thread it onto a tapestry needle. Do not knot the yarn.
Bring the needle from the back of the square to the front at the center point. Leave a 5 to 6 inch tail on the back for weaving in later.
Make the Eight Web Spokes
Take the yarn from the center toward the top edge and insert the needle approximately 1/2 inch before the outer edge of the square.
Bring the needle back to the center from the back of the work.
Make a second spoke from the center toward the bottom edge.
Return to the center and make one spoke toward the left edge.
Make another spoke toward the right edge.
Add four diagonal spokes between the first four lines. When finished, you should have eight spokes radiating from the center.
Keep the yarn resting on the surface of the crochet. Do not pull it tightly enough to draw the sides of the granny square inward.
Add the Web Rings
Bring the yarn to the front approximately 1/2 inch from the center along one spoke.
Pass the needle under the next spoke without piercing through the granny square.
Move to the next spoke and pass the yarn under that spoke.
Continue around all eight spokes until you return to the starting point. This forms the first web ring.
Move outward approximately 1/2 inch along one spoke and begin the second ring.
Work around all eight spokes again.
Make a third ring approximately 1/2 inch farther out.
If your square has enough open space, add a fourth ring approximately 1/2 inch from the outer ends of the spokes.
Allow the white yarn to curve gently between the spokes. A spider web looks more natural when the rings are not pulled into rigid geometric circles.
Secure the Spider Web
Turn the square over.
Bring the working yarn to the back close to one of the existing white stitches.
Weave the yarn through several crochet stitches on the back of the square. Change direction once before trimming the yarn.
Thread the beginning tail onto the tapestry needle and weave it securely into the back in the same way.
Lay the square flat again and check the edges. If the square curls inward, one or more web spokes are too tight. Use the tip of the tapestry needle to gently loosen the affected stitch until the square lies flat.
Do not add a separate crocheted spider to the web. The open web is easier to recognize across the finished blanket and keeps this square from becoming crowded.
Candy Corn Granny Square
Make 7 candy corn granny squares.
The candy corn is worked flat in rows from the narrow white tip to the wider yellow base. Each color section is large enough to remain visible after the appliqué is sewn onto the granny square.
White Tip
With white yarn, ch 3.
Row 1: Sc in the second ch from the hook and in the next ch. You should have 2 sc.
Ch 1 and turn.
Row 2: Work 2 sc in the first st and 2 sc in the last st. You should have 4 sc.
Ch 1 and turn.
Row 3: Sc in each of the 4 sts.
Change to orange in the final stitch of Row 3.
Cut the white yarn, leaving a tail long enough to weave in.
Ch 1 and turn.
Orange Center
Row 4: With orange yarn, work 2 sc in the first st, sc in each of the next 2 sts, then work 2 sc in the last st. You should have 6 sc.
Ch 1 and turn.
Row 5: Sc in each of the 6 sts.
Ch 1 and turn.
Row 6: Work 2 sc in the first st, sc in each of the next 4 sts, then work 2 sc in the last st. You should have 8 sc.
Change to golden yellow in the final stitch of Row 6.
Cut the orange yarn and leave a tail for weaving in.
Ch 1 and turn.
Yellow Base
Row 7: With golden yellow yarn, sc in each of the 8 sts.
Ch 1 and turn.
Row 8: Work 2 sc in the first st, sc in each of the next 6 sts, then work 2 sc in the last st. You should have 10 sc.
Ch 1 and turn.
Row 9: Sc in each of the 10 sts.
Do not fasten off.
Edge the Candy Corn
Ch 1.
With golden yellow, work 1 sc in the end of each of Rows 9, 8 and 7 along the first sloping side. On the final pull-through of the sc in the end of Row 7, change to orange. Cut the yellow yarn, leaving a tail for weaving in.
With orange, work 1 sc in the end of each of Rows 6, 5 and 4. On the final pull-through of the sc in the end of Row 4, change to white. Cut the orange yarn, leaving a tail for weaving in.
With white, work 1 sc in the end of each of Rows 3, 2 and 1.
Across the narrow tip, work 1 sc in each of the 2 unused loops of the starting-chain stitches.
Continue down the opposite side with white, working 1 sc in the end of each of Rows 1, 2 and 3. On the final pull-through of the sc in the end of Row 3, change to orange. Cut the white yarn, leaving a tail for weaving in.
With orange, work 1 sc in the end of each of Rows 4, 5 and 6. On the final pull-through of the sc in the end of Row 6, change to golden yellow. Cut the orange yarn, leaving a tail for weaving in.
With golden yellow, work 1 sc in the end of each of Rows 7, 8 and 9, then work 1 sc in each of the 10 stitches across the yellow base.
Join with a sl st to the first edging stitch. You should have 30 edging sc total.
Fasten off, leaving a long yellow tail to sew the yellow base section to the granny square.
The finished motif should have a clear triangular shape with a slightly rounded tip. If the edging makes the sides ripple, check that you worked one sc in each row end before changing the stitch count.
Finish the Color Changes
Turn the candy corn over.
Thread each short white, orange and yellow yarn tail onto the tapestry needle.
Weave each short tail back through stitches of the same color whenever possible. Leave the long final yellow tail available for sewing the yellow base section to the granny square.
Trim the woven tails after changing direction at least once.
Attach the Candy Corn to the Square
Place the candy corn in the center of a black or deep purple granny square with the white tip pointing upward.
Leave enough dark background around the appliqué that the triangular shape is easy to see.
Use short lengths of matching yarn to sew around the entire outer edge of the candy corn.
Begin at one lower corner. Use yellow yarn across the yellow base, orange yarn beside the orange section and white yarn around the white tip. Continue down the opposite side until the entire perimeter is secured and you return to the lower edge.
Keep the appliqué flat while you sew. Do not pull the sides inward to sharpen the point.
Secure each sewing yarn on the back of the granny square and weave in all remaining ends.
Check All 30 Halloween Squares
Before joining the blanket, count the finished squares:
- 8 pumpkin granny squares
- 8 ghost granny squares
- 7 spider web granny squares
- 7 candy corn granny squares
You should have 30 squares total.
Place all 30 squares right side up on a large flat surface. Check that every motif is secure and that no yarn tails remain loose.
Measure several squares from each motif group. Lightly block any square that needs a small adjustment so the finished pieces remain close to 6 1/2 inches square.
Do not begin joining until the squares are dry and lie flat. Once the seams are added, correcting one undersized or distorted square becomes much more difficult.
Blanket Layout
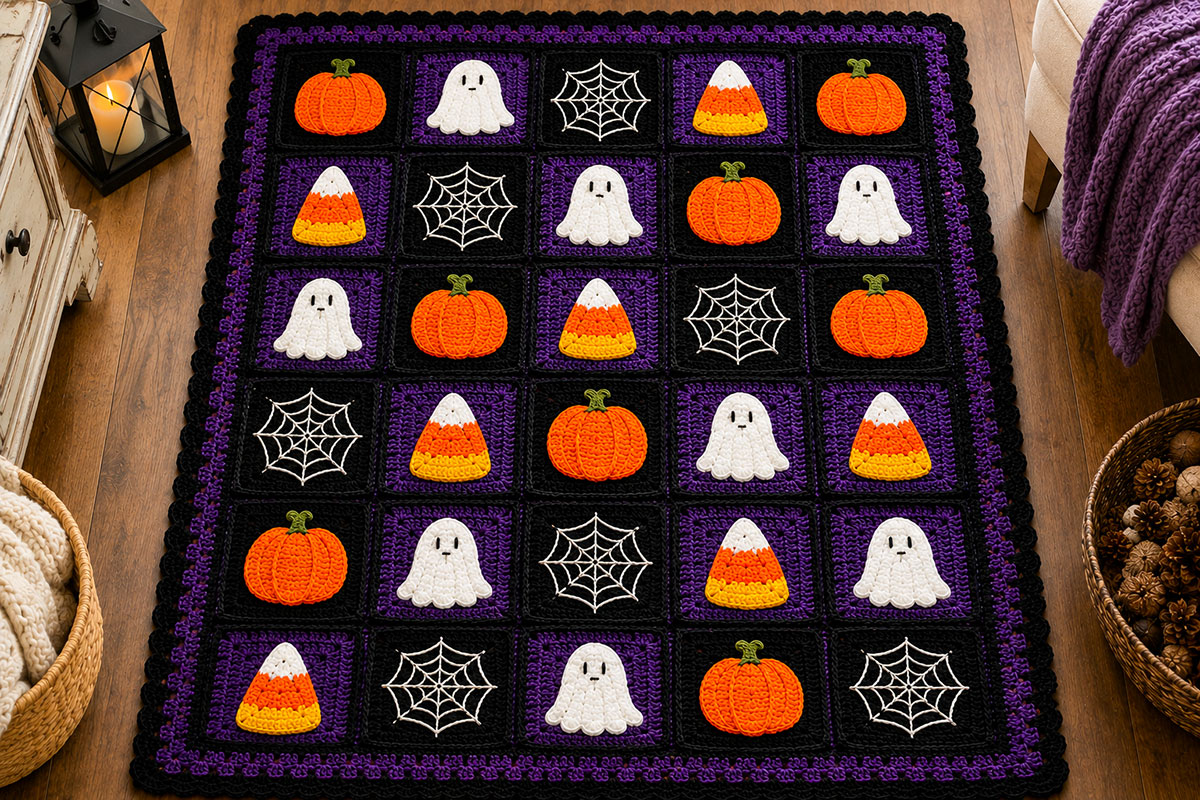
Arrange the 30 finished squares in six rows of five squares. Lay the entire blanket out before joining anything. This gives you a chance to balance the orange, white and yellow motifs and keep too many similar shapes from landing beside each other.
Use the following arrangement for the blanket shown in this pattern:
- Row 1: Pumpkin, Ghost, Spider Web, Candy Corn, Pumpkin
- Row 2: Candy Corn, Spider Web, Ghost, Pumpkin, Ghost
- Row 3: Ghost, Pumpkin, Candy Corn, Spider Web, Pumpkin
- Row 4: Spider Web, Candy Corn, Pumpkin, Ghost, Candy Corn
- Row 5: Pumpkin, Ghost, Spider Web, Candy Corn, Ghost
- Row 6: Candy Corn, Spider Web, Ghost, Pumpkin, Spider Web
This arrangement uses all 30 squares exactly:
- 8 pumpkin squares
- 8 ghost squares
- 7 spider web squares
- 7 candy corn squares
If you alternated black and deep purple backgrounds while making the squares, adjust individual positions as needed so the dark colors also move across the blanket instead of forming large blocks.
Do not worry if a pumpkin points a little differently from the one beside it or one ghost leans slightly to the side. Those small changes keep the finished blanket from looking stamped out.
Mark the Rows Before Moving the Squares
Once you like the arrangement, place a removable stitch marker in the first square of each row.
Use one marker for Row 1, two markers for Row 2, three for Row 3 and so on. Another option is to thread a short piece of scrap yarn through the corner of each first square and tie the corresponding number of knots in it.
Stack each row from right to left so the first square is on top. Keep the six row stacks separate until you are ready to join them.
Take a quick photo of the full arrangement before stacking the squares. It is an easy reference if two stacks get moved while you work.
Joining the Halloween Granny Squares
Join the squares with black yarn using a slip stitch seam. The dark seam becomes a narrow frame around each Halloween motif and ties the black and purple backgrounds together.
Work all five squares in each row together first. Then join the six completed rows.
Join the Squares Into Rows
Place the first two squares of Row 1 together with wrong sides facing each other and right sides facing outward.
Line up the corner spaces and the corresponding stitches along both edges.
Insert the hook through the matching ch-2 corner space on both squares.
Join black yarn with a sl st.
For the next stitch, insert the hook through both loops of the matching edge stitch on each square and work a sl st.
Continue across the entire edge. For every stitch, pass the hook through both loops of one matching stitch on each square before making the sl st. Finish by working one sl st through the matching ch-2 corner spaces at the opposite end.
Keep the slip stitches relaxed. A tight seam can shorten the joined edge and cause the blanket to ripple.
Fasten off when you reach the opposite corner.
Open the two squares and lay them flat.
Add the third square to the right side of the second square in the same way.
Continue until all five squares in Row 1 are joined.
Repeat for Rows 2 through 6.
Check Each Completed Row
Lay each five-square strip flat before joining the rows together.
The strip should form a straight rectangle without curving toward the seam side.
If one seam pulls noticeably tighter than the others, remove it and work it again with looser slip stitches. Correcting one seam now prevents that tension from being repeated across the full blanket.
Join the Six Rows
Place Row 1 and Row 2 together with wrong sides facing each other.
Match every vertical square seam before you begin. Place a removable stitch marker where each pair of square corners meets.
Join black yarn at the first outer corner.
Slip stitch through matching stitches on both rows, just as you did when joining individual squares.
When you reach an intersection between four squares, insert the hook through the joined corner spaces of both row strips and make one sl st through the aligned corner spaces. Do not add a chain at the intersection.
Continue across the full width of the blanket.
Fasten off and open the joined rows flat.
Join Row 3 to Row 2, then continue until all six rows are connected.
Weave in the joining tails before starting the border.
Check the Joined Blanket Before Adding the Border
Spread the blanket on a flat surface.
Look at the outside edges first. They should form four reasonably straight sides with four clear corners.
Next, check the square intersections. The corners should meet without large gaps.
A tiny opening at a four-square intersection can be closed with the joining yarn and a tapestry needle. Make one or two small stitches through the nearby corner spaces, secure the yarn on the back and weave in the tail.
Do not use the border to correct a badly uneven seam. The border follows the existing edge, so any major pull or ripple will still be visible afterward.
Crochet the Blanket Border
The border uses three simple rounds. Black creates a clean frame around the joined squares, purple adds a narrow color band, and the final black round finishes the edge without competing with the Halloween motifs.
Border Round 1
With the right side of the blanket facing you, join black yarn in any outer ch-2 corner space.
Ch 1.
Work 3 sc in the same outer corner space.
Work 1 sc in each of the 23 dc along the outer edge of the first square.
At a seam between two squares, work 1 sc through the two joined corner spaces together. Then continue with 1 sc in each of the 23 dc along the next square.
Repeat across the side. A side containing five squares has 119 sc between the two outer corner groups. A side containing six squares has 143 sc between the two outer corner groups.
Work 3 sc in each outer blanket corner.
Continue around all four sides in the same manner.
Join with a sl st to the first sc.
You should have 536 sc total.
Do not turn.
Border Round 2
Change to deep purple.
Ch 2. The ch 2 does not count as a stitch.
Hdc in the same stitch as the join.
Work 1 hdc in each remaining stitch around, except work 3 hdc in the center stitch of each 3-sc corner group instead of 1 hdc.
Join with a sl st to the first hdc. You should have 544 hdc.
Do not turn.
Border Round 3
Change back to black.
Ch 1. The ch 1 does not count as a stitch.
Sc in the same stitch as the join.
Work 1 sc in each remaining stitch around, except work 3 sc in the center stitch of each 3-hdc corner group instead of 1 sc.
Join with a sl st to the first sc. You should have 552 sc.
Fasten off.
Keep the Border Flat
After each border round, lay one corner of the blanket flat and look at the edge.
If the border begins to flare outward, you may have too many stitches along that side. If the edge pulls inward, you may have too few.
The outer blanket edges come from Round 6 of the granny squares, so use the stated Border Round 1 stitch placement instead of estimating stitches along the edge.
If the stitch counts are correct but the border still waves or pulls inward, check your tension before changing the stitch count.
Final Blocking
Weave in every remaining yarn end before blocking.
Lay the blanket flat on blocking mats or another clean surface that can hold pins.
Shape the four corners first.
Then straighten each side without stretching the granny squares beyond their finished measurements.
Lightly mist the blanket with water if that method is suitable for your yarn, or follow the care instructions supplied by the yarn manufacturer.
Allow the blanket to dry completely before removing the pins.
After blocking, the finished blanket is expected to measure approximately 34 1/2 to 35 1/2 inches wide by 41 to 42 inches long. Do not stretch the blanket simply to reach a particular number. The actual finished measurement depends on your square size, border depth and tension.
How to Change the Blanket Size
The 5 by 6 square layout creates a joined panel approximately 32 1/2 inches wide by 39 inches long before the border. After the three border rounds, the finished blanket is expected to measure approximately 34 1/2 to 35 1/2 inches wide by 41 to 42 inches long, depending on border depth and tension. You can change the dimensions without changing any of the four motif patterns.
The easiest method is to add or remove complete rows and columns of 6 1/2 inch squares.
Smaller Blanket
For a smaller project, arrange 20 squares in four rows of five.
With 6 1/2-inch squares, four rows of five create a joined panel approximately 32 1/2 inches wide by 26 inches long before the border. Add twice the depth of your finished border to each overall dimension to estimate the final size.
For 20 squares, make:
- 5 pumpkin squares
- 5 ghost squares
- 5 spider web squares
- 5 candy corn squares
Larger Throw
For a larger throw, arrange 42 squares in six rows of seven.
Make approximately equal numbers of all four motifs. Because 42 does not divide evenly by four, two motifs will appear one additional time.
A balanced combination is:
- 11 pumpkin squares
- 11 ghost squares
- 10 spider web squares
- 10 candy corn squares
Spread the completed squares on the floor or a large table before joining. Move individual motifs until no single design or color dominates one section of the blanket.
Use Your Actual Square Measurement
If your blocked squares do not measure exactly 6 1/2 inches, use your own measurement to estimate the finished blanket.
Multiply the width of one blocked square by the number of columns. Multiply the height of one blocked square by the number of rows. The slip-stitch seams add little measurable width. After the squares are joined, measure the depth of the completed border and add twice that amount to both overall dimensions.
For example, six-inch squares arranged five across will create approximately 30 inches of crochet before the outer border is added.
This calculation is more reliable than changing hook size simply to reach the measurement shown in the pattern.
Ways to Change the Halloween Motif Mix
You do not have to use equal numbers of pumpkins, ghosts, webs and candy corn. The blanket construction stays the same as long as you finish the number of squares required for your chosen layout.
For a pumpkin-heavy blanket, replace several candy corn squares with additional pumpkins. An almost black-and-white version can use more ghosts and spider webs with fewer orange motifs.
You can also leave several granny squares without appliqués. Plain black and purple squares give the eye a resting place between detailed motifs and can make a larger blanket quicker to finish.
If you substitute another appliqué, keep it comfortably inside the granny square. A motif that reaches the joining seam can become distorted when the squares are connected.
The finished appliqué should also remain fairly flat. Thick stuffed pieces change how the blanket folds and can make the surface feel uneven.
What holds the design together is not perfect repetition. It is the consistent square size, limited color palette and simple black joining line around each motif.
A pile of Halloween squares can look busy when they are spread out separately. Once the black seams frame them and the border surrounds the full grid, the individual motifs settle into a much more unified blanket.
Choosing Colors Without Losing the Halloween Look
Orange, black, purple and white make the theme recognizable immediately, but there is room to adjust the palette.
For a darker blanket, use mostly black square bases with deep purple appearing only in selected squares and the second border round.
For more color, alternate black and purple bases and let the yellow candy corn sections provide small bright accents.
You can also replace purple with charcoal gray. Keep enough contrast between each background and its appliqué so the pumpkin, ghost and web shapes remain easy to see.
Before making all 30 squares, place short lengths of the chosen yarn colors beside each other. Colors that look distinct in separate skeins can become surprisingly similar once they are crocheted into small areas.
Common Problems and Simple Fixes
The Granny Squares Are Different Sizes
Measure the square bases before attaching any appliqués.
If the difference is less than about 1/4 inch, light blocking can often bring them into alignment. If a square is considerably larger or smaller, remake it with adjusted tension or a different hook size.
Do not depend on a tight joining seam to pull an oversized square into place. That transfers the problem into the neighboring squares.
The Appliqué Curls Away From the Square
First check the edging stitches around the appliqué. Too many stitches can make an edge ripple, while too few can make it curl inward.
Next check the sewing tension. Loosen any attachment stitches that pull the granny square toward the center of the motif.
A flat motif should rest naturally against the square before it is sewn down.
The Spider Web Pulls the Square Inward
The web spokes are too tight.
Turn the square over and use the tip of a tapestry needle to ease a small amount of yarn back into each tight spoke. Work gradually around the square until the edges lie flat again.
The decorative yarn needs only enough tension to sit neatly against the crochet surface.
The Joined Rows Look Wavy
Check the slip stitch seams first.
A joining seam that is worked much tighter than the granny squares can shorten the edge. Remove that seam and join the squares again with relaxed slip stitches.
Also check that corresponding stitches were joined to each other. Skipping a stitch on one square can pull the seam sideways.
The Border Is Ruffling
Count the affected border round first. Round 1 should have 536 sc, Round 2 should have 544 hdc and Round 3 should have 552 sc.
If the count is too high, remove the affected round and correct the extra stitches. If the count is correct, keep the stated stitch count and redo the round with more even tension rather than removing stitches from the straight sides.
The Border Is Pulling the Blanket Inward
Count the affected round first. Round 1 should have 536 sc, Round 2 should have 544 hdc and Round 3 should have 552 sc.
If a stitch was skipped, remove the affected round and correct the count. If the count is correct, redo the round with more relaxed tension.
Finishing Details That Make the Blanket Neater
Turn the finished blanket over and inspect the back in good light.
Trim only yarn ends that have already been woven securely through several stitches. Do not cut short tails close to a knot.
Check every appliqué around its full edge. Add a small securing stitch anywhere a finger can easily slide beneath a motif.
Look at the four-square intersections in the joining seams. Close any visible gap with matching yarn and a tapestry needle.
Finally, check the border corners. Each one should lie flat without twisting or forming a pronounced point.
These small finishing steps matter on a granny square blanket because the eye naturally follows the grid. Straight seams and tidy corners make all of the different Halloween motifs feel like one finished project.
Caring for the Finished Crochet Blanket
Follow the washing and drying instructions on the yarn label because fiber content determines the safest care method.
If the yarn is machine washable, place the blanket in a large mesh laundry bag or wash it by itself on the recommended gentle setting. Avoid washing it with garments that have hooks, zippers or other hardware that can catch the crochet stitches.
After washing, reshape the blanket while it is damp. Straighten the seams and smooth the appliqués with your hands.
Allow the blanket to dry according to the yarn manufacturer's instructions before folding or storing it.
Do not iron acrylic yarn unless the manufacturer specifically permits it. Excess heat can permanently flatten or damage synthetic fibers.
More Seasonal Crochet Projects
If you want another fall project after finishing the blanket, the Halloween crochet patterns collection brings the seasonal projects together in one place.
For another character project, try the free crochet scarecrow pattern. It uses a completely different construction and makes a good change after working a stack of granny squares.
You can also browse the free crochet baby blanket patterns for more blanket shapes, stitch patterns and joining ideas.
There are more projects gathered on the free baby crochet patterns page when you are ready to move beyond blankets.
Frequently Asked Questions
How many granny squares do I need for this Halloween blanket?
The pattern uses 30 granny squares arranged five across and six down. It includes 8 pumpkins, 8 ghosts, 7 spider webs and 7 candy corn squares.
How large is each Halloween granny square?
Each square should measure approximately 6 1/2 inches after light blocking. Keeping the squares close to the same size is more important than matching the measurement exactly.
Can I make the blanket with only pumpkin granny squares?
Yes. Make 30 pumpkin squares and use the same joining and border instructions. You can also combine two motifs instead of all four.
Can I make the Halloween granny square blanket larger?
Yes. Add complete rows or columns of squares. A six-row by seven-column layout uses 42 squares and makes a larger throw.
Do I have to block the granny squares before joining?
Blocking is helpful because it makes differences in square size easier to see and correct before joining. Light blocking is usually enough. Follow the care recommendations for the yarn you use.
Can I crochet the motifs directly into the granny squares?
You can use a different square construction if you prefer, but this pattern uses flat appliqués for the pumpkin, ghost and candy corn. The spider web is embroidered directly onto the square. Keeping one consistent granny square base makes the final joining more predictable.
What yarn works best for the Halloween granny square blanket?
A smooth worsted weight number 4 yarn works well because it gives the granny squares structure and keeps the appliqué details visible. Use the same yarn weight throughout the blanket so the finished squares remain compatible.
Can I use a different joining method?
Yes. A whip stitch, single crochet join or another granny square joining method can replace the slip stitch seam. Remember that a different join can change the finished dimensions and the appearance of the grid between the squares.
Why are the pumpkin, ghost and candy corn motifs sewn on instead of stuffed?
Flat motifs keep the blanket surface more even and allow it to fold naturally. The spider web is stitched directly onto its square for the same reason.
If You Make This Blanket for a Baby
A handmade Halloween blanket can be used for supervised cuddling, stroller outings, tummy time on the floor or seasonal photos, but it should not be placed in an infant sleep space.
The U.S. Consumer Product Safety Commission recommends keeping an infant's crib, bassinet or play yard bare except for a fitted sheet. Blankets, pillows and other soft items should stay out of the sleep space. You can read the current guidance on the CPSC Safe Sleep page.
Before giving the blanket to a baby or young child, check every pumpkin, ghost and candy corn appliqué. Each motif should be sewn securely around its full edge, and all yarn ends should be woven in so there are no loose loops or long strands.
The embroidered ghost faces avoid buttons, beads and plastic eyes. Keep any substitutions flat and securely stitched as well.
Inspect the blanket again after washing. Pay particular attention to the appliqué edges, spider web embroidery and square intersections. Repair a loose section before the blanket is used again.
Keep the Motifs Consistent Across the Blanket
Thirty handmade squares will never look as if they came from a machine, and they should not. The goal is to keep the important measurements consistent while allowing small differences in the individual pumpkins, ghosts and candy corn.
Use the center of each granny square as your reference point rather than measuring from one outer edge. The joining process can change an edge slightly, while the center stays easy to locate.
Center the Appliqués Before Sewing
Fold a granny square gently in half from side to side and then from top to bottom. Do not crease it. The intersection of those two folds marks the center.
Find the visual center of the appliqué and place it over that point.
Insert one removable stitch marker through both layers at the center. Add a second marker near the top of the motif if it has a clear direction, such as the pumpkin stem, ghost head or candy corn tip.
Step back and look at the square before sewing. A motif can measure correctly and still look off-center because one side has more visual weight than the other.
Move it slightly if needed. Once it looks centered, keep the markers in place while you begin sewing around the edge.
Do Not Sew the Motifs Too Tightly
The sewing yarn should hold the appliqué against the granny square without gathering either layer.
Take small stitches approximately 1/4 inch apart around the outer edge. Work closer together around tight curves and corners when necessary.
After every few stitches, lay the square flat and smooth it with your hand.
If the square begins to cup beneath the motif, loosen the last few stitches. Pulling the appliqué tightly against the background will not make it more secure. It will only distort the square.
Use Matching Yarn Where It Will Show
Use orange yarn around the pumpkin, white around the ghost and matching colors along the candy corn sections whenever the sewing stitches could be visible from the front.
On the back, neatness matters more than making every stitch invisible. Short, secure stitches are better than carrying a long strand across the back of the square.
Do not carry sewing yarn from one side of an appliqué to the other across an open area. Fasten it, weave it in and start again where needed.
Make One Finished Sample of Each Motif First
Before making all 30 decorated squares, complete one pumpkin, one ghost, one spider web and one candy corn square from beginning to end.
Place the four finished samples side by side.
Check three things:
- The appliqués occupy a similar amount of space on their squares.
- The motifs leave a clear border of background color around their edges.
- None of the decorative work changes the 6 1/2 inch square measurement noticeably.
If one motif looks much larger than the others, adjust it now rather than repeating the same proportion several times.
Work the Blanket in Batches
This pattern is easier to manage if you make similar pieces together instead of completing one entire square at a time from start to finish.
A practical order is:
- Crochet all 30 granny square bases.
- Measure and lightly block the bases.
- Make all 8 pumpkins.
- Make all 8 ghosts and embroider their faces.
- Stitch the 7 spider webs.
- Make all 7 candy corn appliqués.
- Attach the pumpkin, ghost and candy corn motifs.
- Arrange all 30 squares.
- Join the squares into rows.
- Join the rows and add the border.
Working this way also makes small differences easier to catch. If the first three pumpkins are becoming wider than the sample, you will see it before all eight are finished.
Keep each motif group in a separate bag or basket while you work. A scrap of paper marked with the required quantity is enough to prevent the familiar question of whether you have already made six ghosts or seven.
Yarn Substitutions and Color Changes
You can use a different worsted weight number 4 yarn without changing the pattern, but make a complete granny square before buying the full amount. Two yarns labeled with the same weight can produce noticeably different fabric.
Measure the sample after it has relaxed. If the square is close to 6 1/2 inches and the fabric feels comfortable, continue with that yarn. If the square is too dense, increase the hook size slightly. If the stitches feel loose and the square grows too large, try a smaller hook.
Use the same yarn line for the main square colors when practical. That keeps the thickness, stretch and surface texture consistent across the blanket.
The appliqué colors can be more flexible. A slightly different orange or yellow can add interest as long as the yarn is close to the same thickness and does not make the motif noticeably heavier than the square beneath it.
Keep Enough Contrast Between the Motif and Background
Before committing to a color combination, crochet a small swatch or place a finished motif on top of the intended granny square.
The pumpkin should remain clearly visible against its background. The white ghost needs enough contrast around its entire outline. The candy corn should not disappear into a background that is too close to orange or yellow.
The spider web needs the greatest contrast because it is made from narrow lines rather than a solid shape.
If you replace black with charcoal, for example, check the white web from several feet away. If the design is still easy to recognize, the contrast is sufficient.
Working Comfortably With Black and Deep Purple Yarn
Dark yarn can hide individual stitches, especially when several double crochet stitches sit close together. Good lighting helps, but there are a few other ways to make the square construction easier to follow.
Place a stitch marker in each corner space as you work the first few dark squares. The markers make it much easier to identify the corners when you reach the next round.
Count the stitches along each side before joining the round. It takes less time to correct a missed stitch immediately than to discover the problem after several more rounds.
A light-colored towel or piece of fabric beneath the work can also help the stitch openings stand out while you crochet with black yarn.
If you lose your place, do not keep crocheting and hope the next corner appears where expected. Stop, spread the square flat and identify the previous corner before continuing.
Make the Reverse Side Neat Too
The front carries all of the Halloween detail, but the back should still feel tidy and comfortable.
When you weave in yarn tails, run the needle through several stitches of the same color and then change direction. Avoid leaving short ends that can work loose after washing.
Keep embroidery knots and fastening points small. A thick cluster of yarn behind one ghost eye or spider web spoke can create a noticeable bump.
After attaching each appliqué, turn the square over and look for long strands crossing the back. If you find one, redo that section with shorter securing stitches instead.
The spider web squares deserve an extra check because most of their decorative yarn passes through or around the square itself. Make sure the working yarn has not caught a loose loop on the back.
Final Pattern Checklist
Before you finish the project, use this checklist to make sure all of the pieces, seams and finishing details are complete.
- 30 granny square bases are finished and close to 6 1/2 inches square.
- 8 pumpkin motifs are securely attached.
- 8 ghost motifs are securely attached with embroidered faces.
- 7 spider webs are stitched directly onto their squares and lie flat.
- 7 candy corn motifs are securely attached.
- All six rows contain five squares.
- The square arrangement matches the planned layout or your chosen variation.
- All vertical square seams are complete.
- All six rows are joined.
- The three border rounds are complete.
- All yarn tails are woven in securely.
- All removable stitch markers and any scrap-yarn row markers have been removed.
- The appliqué edges have been checked for loose sections.
- The spider web embroidery has been checked for loose loops.
- The blanket has been lightly blocked or shaped as appropriate for the yarn.
- All blocking pins have been removed after the blanket is completely dry.
If the blanket passes those checks and lies flat, it is finished.
Keep Leftover Yarn for Future Repairs
Save a small amount of each yarn color after the blanket is complete. You do not need much. A few yards of black, purple, orange, white, yellow and green can be useful if a seam or appliqué edge needs attention later.
Store the yarn with a note identifying the blanket and, if you still have it, the yarn brand and color name. Matching an exact shade later can be difficult even when the replacement yarn comes from the same product line.
The black joining yarn is especially useful to keep because it can repair both an internal seam and part of the outer border without introducing a new color.
Make the Color Changes Look Neater
The candy corn is the only appliqué in this pattern that changes color while you crochet, so it is worth taking a little extra care at those two transitions.
Change Color in the Final Stitch
Work the final single crochet of the white section until two loops remain on the hook.
Drop the white yarn.
Place the orange yarn over the hook and pull it through the two remaining loops.
The final stitch is completed with the new color already in position for the next row.
Use the same method when changing from orange to yellow.
This keeps the new color from forming an obvious bump at the beginning of the next row.
Do Not Carry the Unused Yarn
Cut the previous color after each section instead of carrying it along the side of the candy corn.
The appliqué is small enough that carrying three colors adds more bulk than convenience. Separate tails also let you weave each color into matching stitches on the back.
Keep the Row Ends Firm but Flexible
The first and last stitches of each row form the sloping sides of the candy corn. Do not tug those stitches tightly after turning.
If the edge becomes too firm, the appliqué can curl before the final edging round is added.
After Row 9, smooth the piece flat with your fingers. The sides should widen gradually from the white tip to the yellow base.
How to Replace a Motif Without Taking the Blanket Apart
One advantage of sewing the pumpkin, ghost and candy corn onto completed granny squares is that an appliqué can be replaced without removing the square from the blanket.
If a motif becomes damaged, turn the blanket over and locate the sewing stitches that hold that appliqué in place.
Use small scissors or a seam ripper to cut only the attachment yarn. Do not cut into the granny square stitches beneath it.
Remove the old appliqué and pull out the remaining sewing yarn.
Make a replacement motif from the original instructions and position it over the same center point.
Sew the replacement around its full edge with matching yarn.
This method is particularly useful for the pumpkin and candy corn because the appliqué itself can be replaced while the joined blanket remains intact.
The spider web is different because it is stitched directly through the granny square. If one web strand loosens, repair that individual spoke or ring instead of removing the whole design.
Check the Blanket After the First Wash
The first wash is a good time to inspect the places that received the most hand sewing.
Lay the clean blanket flat and check every appliqué edge.
Look closely at the pumpkin stems, ghost scallops and candy corn tips. Those small projections can loosen before the larger flat sections do.
Run a finger gently beneath the edge of each motif. If more than a small section lifts away from the granny square, add a few matching attachment stitches.
Check the spider web spokes next. None should form a loose loop above the crochet surface.
Finally, inspect the joining seams where four granny squares meet. These intersections carry several layers of crochet and can reveal a loose yarn tail more quickly than the straight seams.
Make any repairs before folding the blanket away.
For more seasonal ideas, continue with the Halloween crochet patterns collection. If you would rather start another blanket, browse the free crochet baby blanket patterns for a different construction and stitch style.
The Halloween granny square blanket gives you a repeatable base, four very different motifs and enough flexibility to change the arrangement without changing the pattern itself. Once those 30 squares are joined and framed with the final border, all of those small individual pieces become one complete Halloween crochet project.
When you click on links to various merchants on this site and make a purchase, this may result in this site earning a commission. This does not affect the price you pay.

UBGI Gold Standard 2026
Reviewed under the site's
editorial checklist.
Photos, decorating ideas, party setups and reader submissions are shared for inspiration unless a page is specifically presented as a pattern, tutorial, reference guide or step-by-step project. Follow the instructions, measurements, safety guidance and manufacturer directions provided for the particular project or product.
About Jan | Contact | Baby Nursery Ideas (Blog) | Site Map | Privacy Policy | Disclosure Policy | Disclaimer | Affiliate Disclosure | Earnings Disclosure | Facebook | Pinterest
I am a participant in the Amazon Services LLC Associates Program, an affiliate advertising program designed to provide a means for us to earn fees by linking to Amazon. As an Amazon Associate I earn from qualifying purchases.
Copyright © 2006-2026. All Rights Reserved.