Free Opossum Crochet Pattern for a Mama and Baby Possum Lovey
By Jan Bay
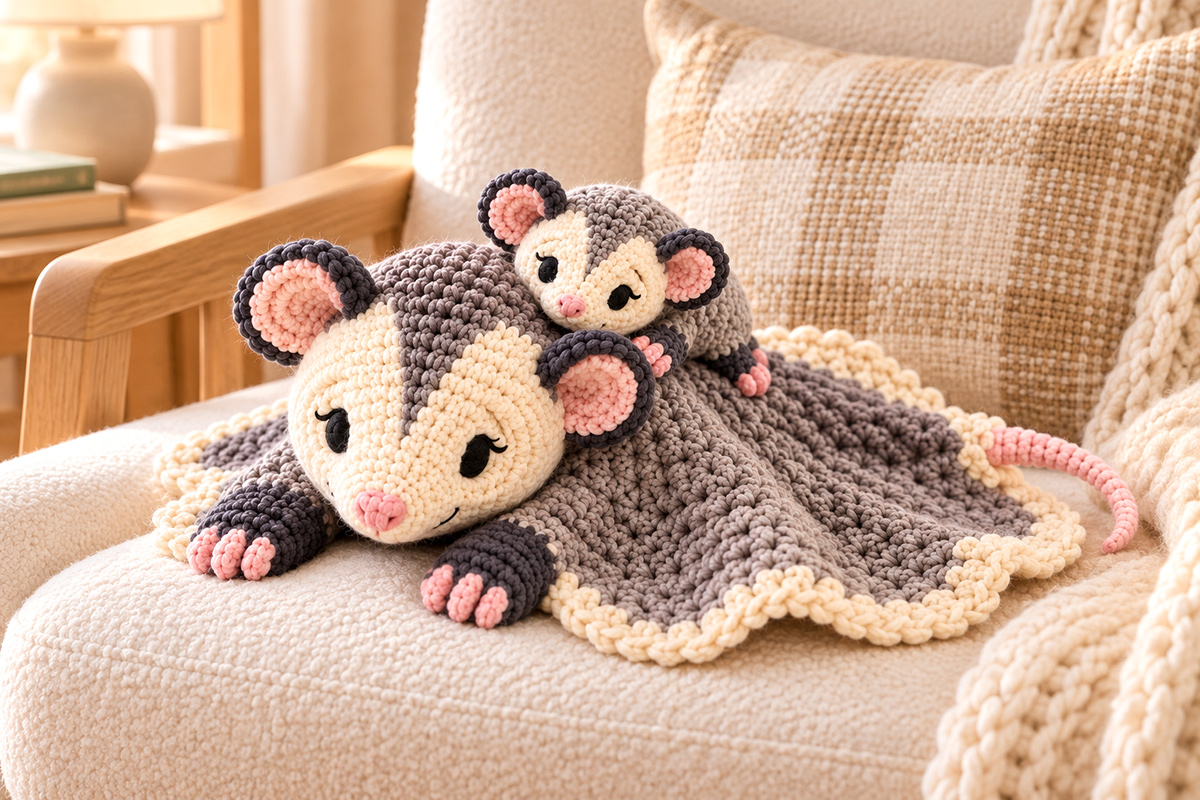
This free opossum crochet pattern makes a sweet mama-and-baby lovey with a softly draped blanket body, embroidered faces, and a little baby permanently stitched onto Mama's back. The thin curved pink tail and cream-and-gray coloring keep the possum features recognizable while giving this often misjudged forest animal a soft, lovable look that fits right into a baby's woodland nursery.
Explore More Free Crochet Baby Patterns
Woodland Nursery Patterns for Quilts, Loveys & Handmade Decor
See Supplies for This Project Here.
Jump to the Opossum Lovey Pattern
Why This Free Opossum Crochet Pattern Has One Baby on Mama's Back
I kept this mama possum lovey fairly simple on purpose. Mama has the broad blanket-style body you expect from my usual loveys, while the little one riding on her back gives the pattern something unexpected, a little extra personality. Baby is stitched firmly in place, so there isn't a separate little possum to keep up with. The finished piece stays together as one lovey.
The tail needed a little restraint too. Mama gets one thin blush-pink tail that extends from the back in a soft outward curve with just a slight lift near the tip. Baby doesn't need one. Between the pointed cream face, round pink-lined ears, gray crown and that single tapered tail, there's already plenty here to say "opossum."
I also chose embroidered eyes for both faces. There are no plastic safety eyes, buttons or other facial pieces to attach.
Supplies
Yarn: #6 super-bulky chenille or another soft yarn that gives you the same gauge.
Medium gray: approximately 350 yards for the blanket, Mama's back, crown and Baby's body.
Cream: approximately 140 yards for the faces and scalloped edging.
Dark charcoal gray: approximately 75 yards for the ear rims, Mama's front legs and Baby's small legs.
Blush pink: approximately 55 yards for the ear centers, nose details, paw embroidery and Mama's tail.
Black medium-weight yarn: a small amount for the embroidered eyes and mouth details.
Hooks: 6.5 mm for the blanket, 5.5 mm for the stuffed pieces and 5.0 mm for Mama's thinner tail.
Also needed: polyester fiberfill, yarn needle, stitch markers, scissors, straight pins and measuring tape.
The yardages above are calculated amounts with some allowance built in. Chenille yarns can vary quite a bit in thickness, so I'd rather have a little left than come up short halfway through Mama's head.
Finished Size and Gauge
Blanket before edging: expected to measure approximately 18 inches wide by 18¼ inches long at the stated gauge.
Blanket after scalloped edging: approximately 20 inches across at the widest points.
Mama's head: expected to measure approximately 7 to 7½ inches long and about 5 inches across the widest part.
Mama's raised back: approximately 6½ to 7 inches long, 5½ inches wide and no more than about 2 inches high after light stuffing.
Baby: expected to measure approximately 5½ inches from nose to rump after assembly.
Mama's tail: approximately 5 to 5½ inches from attachment point to tip before it is curved and tacked into position.
Blanket gauge with 6.5 mm hook: 8 hdc = 4 inches and 7 rows = 4 inches.
Stuffed-piece gauge with 5.5 mm hook: approximately 9 sc = 4 inches and 9 to 10 rounds = 4 inches.
Gauge matters most on the blanket. If your stuffed pieces are a little firmer or slightly smaller, that's fine as long as the stitches stay tight enough that the stuffing doesn't show through.
Abbreviations
US crochet terms are used throughout.
ch = chain
st/sts = stitch/stitches
sl st = slip stitch
sc = single crochet
hdc = half double crochet
inc = work 2 sc in the same stitch
dec = invisible single-crochet decrease over the next 2 stitches
MR = magic ring
rnd = round
FO = fasten off
Pattern Notes
The blanket is worked flat in rows. Mama's low raised back is made separately from two shaped gray panels, lightly stuffed and sewn to the blanket. Her head and front legs are added around that raised section. Mama's tail is attached at the rear-right blanket edge just inside the cream scalloped border.
Baby is made separately and then permanently stitched to Mama's back. Don't substitute Velcro, snaps or buttons. They aren't needed here.
Work the stuffed pieces in continuous rounds unless the instructions say otherwise. Place a marker in the first stitch of each round and move it up as you work.
The ch-1 turning and setup chains do not count as stitches. When working flat rows, make the first sc or hdc in the first stitch of the previous row.
Don't overstuff Mama's back. It should look like a gentle rise under Baby, not like a round stuffed-animal torso. Keep the front legs softly stuffed at the paw ends and flatter near the attachment edge so they'll lie naturally on the blanket.
Use yarn embroidery for every facial detail. No plastic eyes are used in this pattern.
If this lovey is being made for a baby, keep it out of a crib, bassinet or play yard during sleep. The U.S. Consumer Product Safety Commission says an infant sleep space should remain bare except for a fitted sheet. You can read the CPSC safe-sleep guidance here.
This pattern has been mathematically reviewed against the finished example image, but it has not been physically test-crocheted. Check your measurements as you work, especially before permanently attaching Baby and Mama's tail.
Mama Opossum
Mama's Raised Back
Use medium gray and the 5.5 mm hook. Make two identical panels.
Row 1: Ch 8. Sc in second ch from hook and in each ch across. (7 sc)
Row 2: Ch 1, turn. Inc in first st, sc in next 5 sts, inc in last st. (9 sc)
Row 3: Ch 1, turn. Inc in first st, sc in next 7 sts, inc in last st. (11 sc)
Row 4: Ch 1, turn. Inc in first st, sc in next 9 sts, inc in last st. (13 sc)
Rows 5-12: Ch 1, turn. Sc in each st across. (13 sc)
Row 13: Ch 1, turn. Dec, sc in next 9 sts, dec. (11 sc)
Row 14: Ch 1, turn. Dec, sc in next 7 sts, dec. (9 sc)
Row 15: Ch 1, turn. Dec, sc in next 5 sts, dec. (7 sc)
FO. Make the second panel the same way.
Place the two panels together with the edges aligned. Whipstitch around the perimeter with medium-gray yarn. Before closing the final 2 inches, add just enough stuffing to lift the center about 1½ to 2 inches. Finish closing and weave in the yarn end.
Set this piece aside. It will be sewn to the blanket during final assembly.
Mama's Head
Use cream and the 5.5 mm hook. Begin at the nose end. The gradual increases make the face narrower at the muzzle and fuller toward the back of the head.
Rnd 1: Work 6 sc in MR. (6)
Rnd 2: Inc in each st around. (12)
Rnd 3: Sc in each st around. (12)
Rnd 4: *Sc in next st, inc in next st; repeat from * around. (18)
Rnd 5: Sc in each st around. (18)
Rnd 6: *Sc in next 2 sts, inc in next st; repeat from * around. (24)
Rnd 7: Sc in each st around. (24)
Rnd 8: *Sc in next 3 sts, inc in next st; repeat from * around. (30)
Rnds 9-10: Sc in each st around. (30)
Rnd 11: *Sc in next 4 sts, inc in next st; repeat from * around. (36)
Rnd 12: Sc in each st around. (36)
Rnd 13: *Sc in next 4 sts, dec; repeat from * around. (30)
Rnd 14: *Sc in next 3 sts, dec; repeat from * around. (24)
Rnd 15: *Sc in next 2 sts, dec; repeat from * around. (18)
Stuff the head now. Keep the muzzle firm enough to hold its shape but don't pack it so tightly that the face becomes round.
Rnd 16: *Sc in next st, dec; repeat from * around. (12)
Rnd 17: Dec around. (6)
FO, leaving a long cream sewing tail. Thread the tail through the remaining 6 stitches, pull the opening closed and take one small securing stitch. Do not cut the remaining tail; keep it for attaching Mama's head during final assembly.
Mama's Gray Crown
Use medium gray and the 5.5 mm hook.
Row 1: Ch 5. Sc in second ch from hook and across. (4)
Row 2: Ch 1, turn. Inc, sc in next 2 sts, inc. (6)
Row 3: Ch 1, turn. Sc across. (6)
Row 4: Ch 1, turn. Inc, sc in next 4 sts, inc. (8)
Rows 5-7: Ch 1, turn. Sc across. (8)
Row 8: Ch 1, turn. Dec, sc in next 4 sts, dec. (6)
Row 9: Ch 1, turn. Sc across. (6)
Row 10: Ch 1, turn. Dec, sc in next 2 sts, dec. (4)
FO, leaving a long sewing tail.
Pin the narrow end of the crown toward the upper muzzle and center the wider section over the top of the head. The crown should run straight back between the ears. Sew around the outside edge with small stitches using medium-gray yarn.
Mama's Ears
Use blush and dark charcoal. Make two.
Rnd 1: With blush, work 6 sc in MR. (6)
Rnd 2: Inc in each st around. (12)
Rnd 3: Change to dark charcoal. *Sc in next st, inc in next st; repeat from * around. (18)
FO with a long tail for sewing.
Pin the ears on opposite sides of the head with the lower edge of each ear slightly behind the eye line. Let the pink centers face slightly forward instead of straight out to the sides. Stitch securely around the lower half of each ear.
Mama's Embroidered Face
Place the eye centers between Rnds 7 and 8 of the head, approximately 7 stitches apart when measured across the front of the face.
With black yarn, make each eye as a small filled oval using several close satin stitches. Add one short outward lash at the upper outside edge. Keep the embroidery soft and simple. The eyes shouldn't become large cartoon circles.
Use blush yarn to cover the center of the starting magic ring with a small rounded-triangle nose. Add a short black vertical stitch under the nose and a shallow curved mouth.
Step back and look at the face before knotting the final embroidery thread. The pointed cream muzzle and wide ears should still be the first features you see.
Mama's Front Legs
Use dark charcoal and the 5.5 mm hook. Make two.
Rnd 1: Work 6 sc in MR. (6)
Rnd 2: Inc in each st around. (12)
Rnds 3-8: Sc in each st around. (12)
Rnd 9: *Sc in next st, dec; repeat from * around. (8)
Rnd 10: Sc in each st around. (8)
Lightly stuff the lower half of the leg. Leave the upper portion soft and fairly flat. Flatten the open end and FO with a long sewing tail.
With blush yarn, make three small raised oval toe pads across the rounded end of each paw. For each toe pad, work 4 to 5 close satin stitches over the same short span so the blush yarn builds into a soft rounded bump like the finished example. Keep all three pads attached directly to the paw surface rather than making separate crocheted toes.
Baby Opossum
Baby is intentionally much smaller than Mama and has no visible tail. Once assembled, she will be permanently stitched to Mama's raised back.
Baby's Body
Use medium gray and the 5.5 mm hook.
Rnd 1: Work 6 sc in MR. (6)
Rnd 2: Inc in each st around. (12)
Rnd 3: *Sc in next st, inc in next st; repeat from * around. (18)
Rnds 4-6: Sc in each st around. (18)
Rnd 7: *Sc in next st, dec; repeat from * around. (12)
Stuff lightly. Keep Baby's body soft enough to settle against Mama's back rather than becoming a firm round ball.
Rnd 8: Dec around. (6)
FO, leaving a long medium-gray sewing tail. Thread the tail through the remaining 6 stitches, pull the opening closed and take one small securing stitch. This Rnd 8 closure is Baby's front or neck end; the starting magic ring is the rump. Keep the remaining tail for attaching Baby's head.
Baby's Head
Use cream and the 5.5 mm hook.
Rnd 1: Work 6 sc in MR. (6)
Rnd 2: Inc in each st around. (12)
Rnd 3: Sc in each st around. (12)
Rnd 4: *Sc in next st, inc in next st; repeat from * around. (18)
Rnds 5-6: Sc in each st around. (18)
Rnd 7: *Sc in next st, dec; repeat from * around. (12)
Stuff lightly, keeping the muzzle tapered and the back of the head rounded.
Rnd 8: Dec around. (6)
FO and close.
Baby's Gray Crown
Use medium gray.
Row 1: Ch 4. Sc in second ch from hook and across. (3)
Row 2: Ch 1, turn. Inc, sc in next st, inc. (5)
Rows 3-4: Ch 1, turn. Sc across. (5)
Row 5: Ch 1, turn. Dec, sc in next st, dec. (3)
Row 6: Ch 1, turn. Sc across. (3)
FO with a sewing tail. Center the crown over Baby's head just as you did on Mama, with the narrow end pointing toward the muzzle. Pin it in place, then sew around the outside edge with small stitches using medium-gray yarn.
Baby's Ears
Make two.
Rnd 1: With blush, work 6 sc in MR. (6)
Rnd 2: Change to dark charcoal and inc in each st around. (12)
FO with a sewing tail.
Sew one ear to each side of Baby's head slightly behind the eye line.
Baby's Legs and Paws
Use dark charcoal. Make four.
Rnd 1: Work 6 sc in MR. (6)
Rnds 2-4: Sc in each st around. (6)
Do not stuff. Flatten the open end and FO with a long sewing tail.
With blush yarn, make three small raised oval toe pads across the end of each paw. Use 3 to 4 close satin stitches over the same short span for each pad so the toes stay smaller than Mama's but still have the softly raised look shown in the finished example.
Baby's Face
Place Baby's eye centers between Rnds 5 and 6, approximately 5 stitches apart across the front.
Embroider each eye with black yarn using a few close satin stitches to make a small oval. Add one tiny outward lash if you want Baby to match Mama exactly.
Cover the center of the starting magic ring with a small blush nose. Add a short black stitch below it and a tiny curved mouth.
Assemble Baby Before Attaching Her to Mama
Place Baby's head against the Rnd 8 front or neck end of her gray body so the rear lower portion of the head overlaps the body by about 1¼ inches. Tip the muzzle slightly downward. Pin the head in place, then use the long medium-gray sewing tail left at the neck to sew around the full contact area. After joining, Baby should measure close to 5½ inches from nose to rump.
Sew the two front legs just behind the head. Position the two rear legs near the back third of the body.
Do not add a tail to Baby.

Lovey Blanket
Use medium gray and the 6.5 mm hook.
Foundation: Ch 37.
Row 1: Hdc in second ch from hook and in each ch across. (36 hdc)
Rows 2-32: Ch 1, turn. Hdc in each st across. (36 hdc)
Work all 32 rows. At the stated gauge, the gray section is expected to measure about 18 inches wide by 18¼ inches long. If your measurement is substantially different, correct the gauge before adding the edging rather than changing the row count, because the border below is calculated for 32 rows.
Cream Scalloped Edging
FO medium gray and secure the yarn end. Continue with cream for the edging.
Edging Rnd 1: Join cream in the first stitch of the top edge. Ch 1 and work 3 sc in the same stitch. Sc in each of the next 17 sts, skip the next st, sc in each of the next 16 sts, then work 3 sc in the last stitch of the top edge. Work 33 sc evenly down the first side by working 1 sc in each of the first 15 row-end spaces, 2 sc in the next row-end space, and 1 sc in each of the remaining 16 row-end spaces. Work 3 sc in the first stitch of the bottom edge. Sc in each of the next 17 sts, skip the next st, sc in each of the next 16 sts, then work 3 sc in the last stitch of the bottom edge. Work 33 sc evenly up the final side in the same way: 1 sc in each of the first 15 row-end spaces, 2 sc in the next row-end space, and 1 sc in each of the remaining 16 row-end spaces. Join with sl st to the first sc. (144 sc)
Edging Rnd 2: Sl st to the center sc of the first corner's 3-sc group. Ch 1 and work 5 hdc in that same center corner stitch. Across the top edge, *skip next sc, sc in next sc, skip next sc, 5 hdc in next sc; repeat from * 8 times. Skip next sc, sc in next sc, skip next sc, then work 5 hdc in the center sc of the next corner's 3-sc group. Work the next two sides the same way, ending each side with 5 hdc in the center sc of the next corner. On the final side, *skip next sc, sc in next sc, skip next sc, 5 hdc in next sc; repeat from * 8 times. Skip next sc, sc in next sc, skip next sc, then join with sl st to the first hdc of the starting corner shell. FO. (36 scallops total: 8 along each side and 1 at each corner)
Lay the blanket flat and smooth the scallops into place with your hands. You don't need to stretch them into perfect little fans. A softer edge suits this lovey.
Mama's Thin Curved Tail
Use blush and the 5.0 mm hook. This smaller hook is intentional. Mama's tail should stay noticeably thinner than her legs and ears.
Rnd 1: Work 5 sc in MR. (5)
Rnds 2-4: Sc in each st around. (5)
Rnd 5: Inc in first st, sc in next 4 sts. (6)
Rnds 6-8: Sc in each st around. (6)
Rnd 9: Inc in first st, sc in next 5 sts. (7)
Rnds 10-12: Sc in each st around. (7)
Rnd 13: Inc in first st, sc in next 6 sts. (8)
Rnd 14: Sc in each st around. (8)
Check the length. The tail should be about 5 to 5½ inches. If yours is shorter because of gauge, add no more than two additional rounds of 8 sc.
Stuff only the wider base half and use very small wisps of stuffing. Leave the narrow end soft. FO with a long sewing tail.
Do not put wire, pipe cleaner or any other stiffener inside the tail.
The final shape is set during assembly. Mama's tail should leave the rear-right edge of the blanket just inside the cream scalloped border and extend outward in one gentle arc, with only a slight upward turn near the final inch. Don't curl it back toward the blanket, and don't make a coil or corkscrew.
Assembly and Finishing
Before you start the final assembly, you should have 19 crocheted pieces: 2 Mama back panels already joined as one stuffed back, 1 Mama head, 1 Mama crown, 2 Mama ears, 2 Mama front legs, 1 Baby body, 1 Baby head, 1 Baby crown, 2 Baby ears, 4 Baby legs, 1 blanket and 1 Mama tail. Baby does not have a tail.
1. Position Mama's Raised Back
Lay the blanket flat with one edge designated as the front.
Center Mama's gray raised-back piece from left to right. Run its long axis from front to back. Place the front end approximately 4½ inches back from the front blanket edge.
Pin it in place before sewing. The rear of the body should leave plenty of gray blanket showing behind it.
Using medium-gray yarn, sew all the way around the lower panel of the raised-back piece approximately ¼ inch inside its joined perimeter, catching the blanket underneath with each stitch. Keep the upper panel and stuffing free so the center retains its low rounded rise.
2. Attach Mama's Head
Place Mama's head at the front end of the raised back with her muzzle pointing toward the front edge of the blanket. The back of the head should overlap the front end of the body slightly.
The head should sit low. Don't stand it upright like an amigurumi animal.
Pin first, then use the long cream sewing tail left on Mama's head to sew the lower back portion of the head securely to both the raised body and the blanket underneath. Check the example image as you work. Mama's face should appear to rest naturally at the front of the lovey. Secure the yarn after the seam is complete and weave in the remaining end.
3. Attach Mama's Front Legs
Place one leg on each side below the head. Angle the paws slightly outward and forward.
Sew the flattened upper end of each leg securely underneath the lower sides of Mama's head and into the blanket. Leave most of each leg free so the paws lie softly on the blanket.
4. Permanently Attach Baby to Mama's Back
Place Baby lengthwise on top of Mama's raised gray back with Baby's head toward Mama's head.
With Mama's muzzle pointing toward you, shift Baby approximately ¾ inch toward your right. Her face should peek forward just behind the ear on that side rather than sitting directly on top of Mama's head. This matches the finished example.
Leave about 1¼ inches between the front of Baby's body and the seam where Mama's head joins her back.
Pin Baby in place and check the silhouette from the front and from both sides before sewing.
Using medium-gray yarn, sew Baby's belly to Mama's back with two secure parallel lines of stitching running lengthwise from front to back along the underside of Baby's body. Keep the two lines about ½ to ¾ inch apart and make each approximately 2½ inches long. Catch the lower crochet fabric of Baby's body and Mama's raised-back piece without pulling the stitches tightly enough to flatten either piece.
Next, secure both rear paws to Mama's back. Tack the lower portion of Baby's front paws into position too, while leaving the ends visible so she still looks as though she's holding on.
Baby should not wobble, tip sideways or lift away from Mama's back when the lovey is picked up.
5. Attach and Shape Mama's Tail
With Mama's muzzle pointing toward you, place the wide end of the blush tail at the rear third of the blanket's right side edge, immediately inside the cream scalloped border. Sew the tail base securely through the gray blanket edge and catch the adjacent cream edging stitches in several passes so the tail appears to grow from the blanket edge as it does in the finished example.
Angle the tail outward from the edge as you sew the base. Let the remaining length follow one shallow natural curve away from the blanket. The final inch can turn upward slightly.
Add one discreet securing stitch through the tail about 1 to 1½ inches from its base and into the gray blanket just inside the cream border. This holds the starting angle without fastening the whole tail flat. Leave the remainder of the tail free.
Don't force a tight bend into it. The finished tail should look slender, tapered and softly arched, not curled, coiled or wavy.
6. Final Attachment Check
Check every sewn attachment before use. Gently tug Mama's raised back, head, crown, both ears, both front legs and tail. Then check Baby's head-to-body seam, crown, both ears, all four legs and the two belly seams attaching Baby to Mama. Nothing should loosen, shift noticeably or open a visible gap at a seam.
Check Baby again from the side. Her belly should sit against Mama's back, but her head and the ends of her front paws should remain raised enough to give her that riding-on-Mama look from the main page image.
Weave in every yarn end through several stitches before trimming it. With chenille yarn, I prefer a longer woven-in tail rather than clipping close to the knot. Remove every straight pin and stitch marker, then check the entire lovey once more before use.
What the Finished Lovey Should Look Like
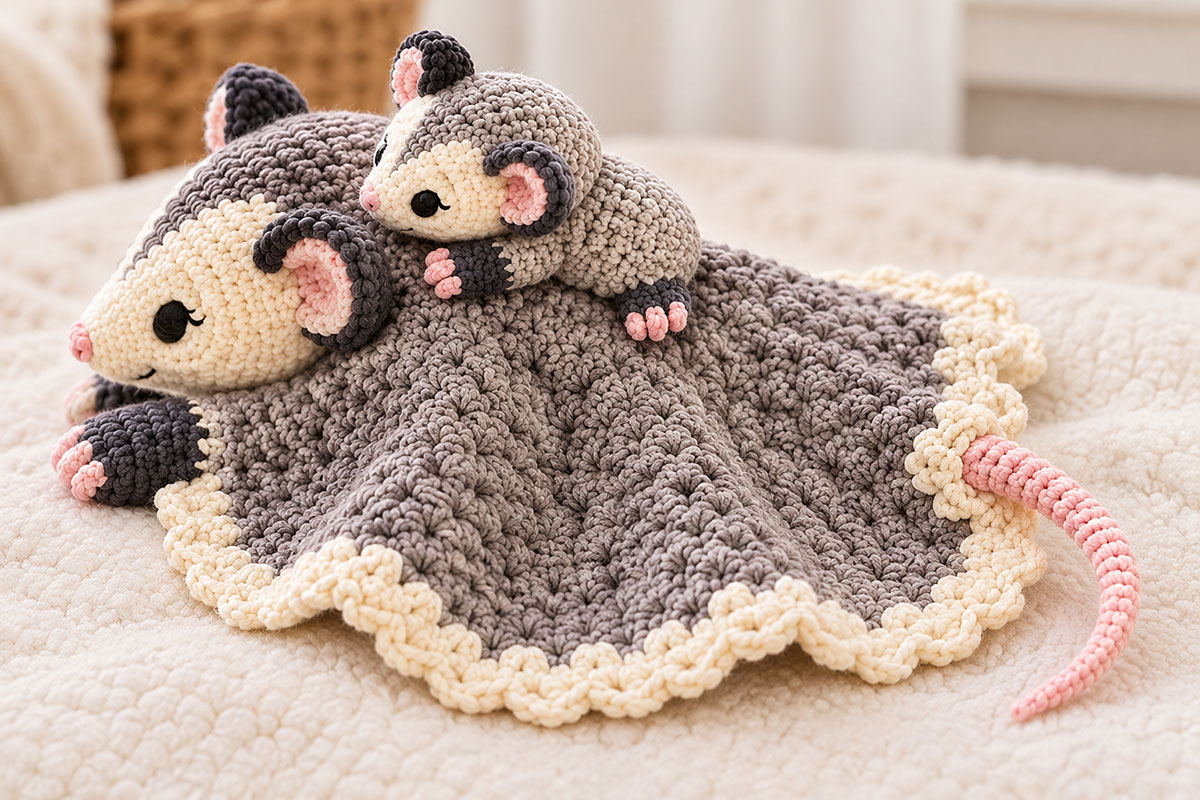
From the front, Mama should be the obvious focal point: pointed cream face, gray crown, large pink-lined ears and two dark paws stretched forward. Baby should appear just behind her, small enough that there's no question which one is Mama.
From the side, Baby should look like she's actually riding on the raised gray back instead of sitting on a flat square of crochet.
From the back, there should be only one visible tail. It belongs to Mama, and it should look thin, tapered and softly curved.
If yours matches those three views, you've got the design.
If you'd like another animal after this one, the crochet animal lovey patterns page keeps the other lovey designs together in one place.
When you click on links to various merchants on this site and make a purchase, this may result in this site earning a commission. This does not affect the price you pay.

UBGI Gold Standard 2026
Reviewed under the site's
editorial checklist.
Photos, decorating ideas, party setups and reader submissions are shared for inspiration unless a page is specifically presented as a pattern, tutorial, reference guide or step-by-step project. Follow the instructions, measurements, safety guidance and manufacturer directions provided for the particular project or product.
About Jan | Contact | Baby Nursery Ideas (Blog) | Site Map | Privacy Policy | Disclosure Policy | Disclaimer | Affiliate Disclosure | Earnings Disclosure | Facebook | Pinterest
I am a participant in the Amazon Services LLC Associates Program, an affiliate advertising program designed to provide a means for us to earn fees by linking to Amazon. As an Amazon Associate I earn from qualifying purchases.
Copyright © 2006-2026. All Rights Reserved.