Free Crochet Skunk Lovey Pattern with Fluffy Striped Tail
By Jan Bay
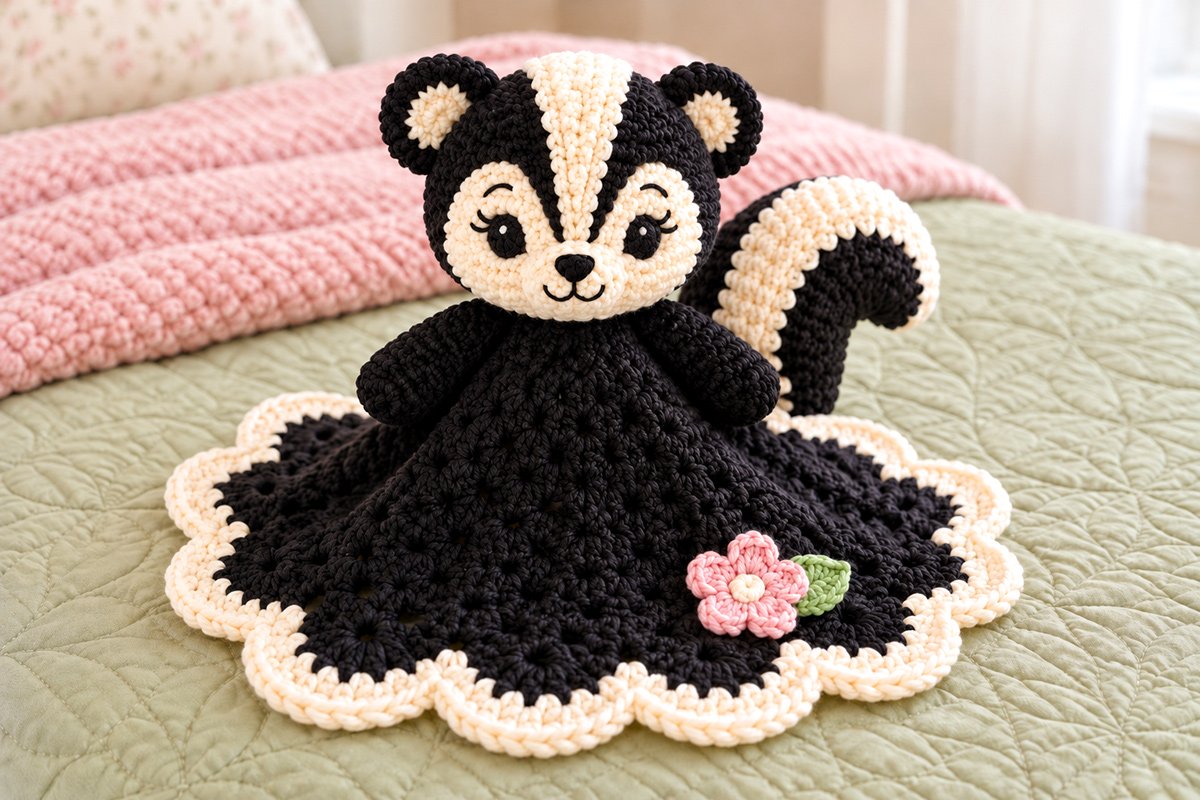
This free crochet skunk lovey pattern brings a sweet little woodland character to a handmade baby gift. Her rounded face has bright embroidered eyes, soft cream markings, and a friendly smile. A black crocheted blanket with cream scalloped edging forms her body, while a dusty-pink flower adds a gentle touch of color. Turn her around and you'll see the long, fluffy-looking striped tail that makes this little skunk especially charming.
Explore More Free Crochet Baby Patterns
See Supplies for This Project Here.
Jump to the Free Crochet Skunk Lovey Pattern
Free Crochet Skunk Lovey Pattern: Before You Begin
This little skunk is made differently from a lovey with a flat square blanket. The black body starts at the neckline and gradually spreads into a round, softly flared blanket. Her head and arms are sewn to the top, while the back gets its own ivory stripe and curved skunk tail.
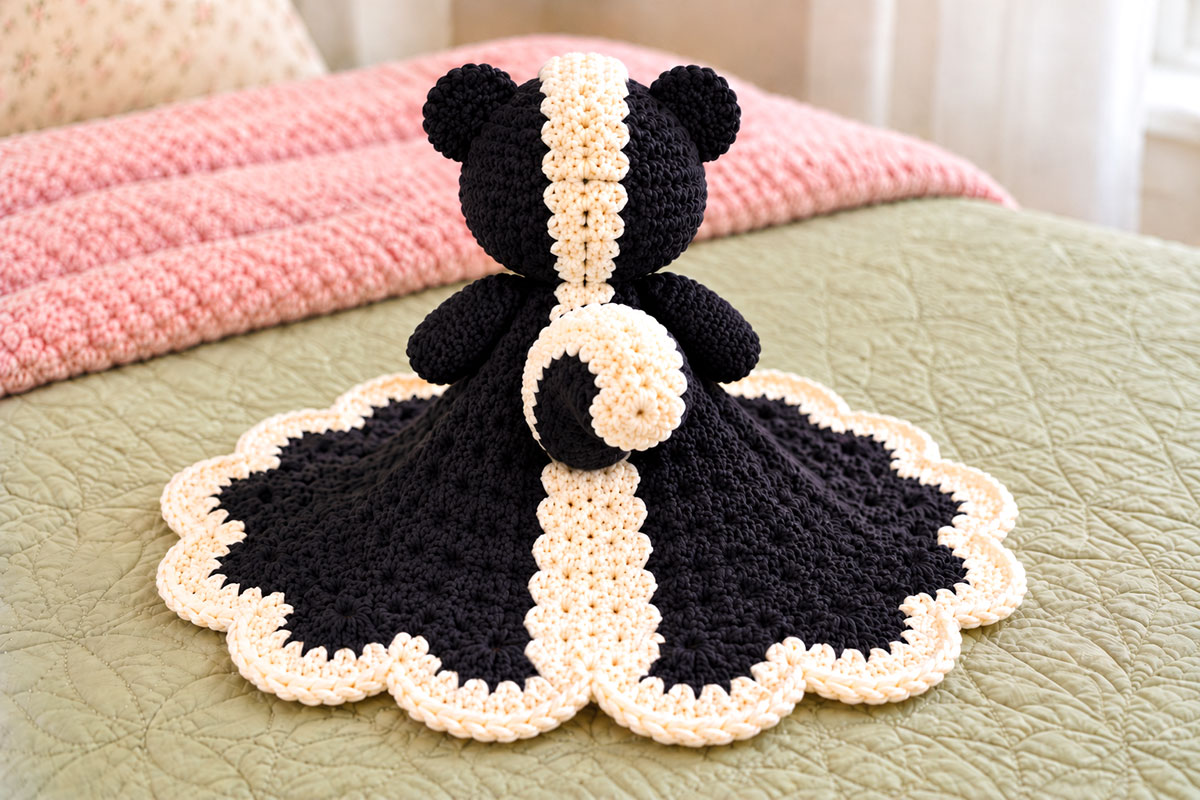
The tail is worth the extra bit of work. Without it, our little skunk could almost pass for a bear. With that big striped tail curling behind her, there's no mistaking who she is.
You'll be working with two hook sizes. Use the larger hook for the blanket so it can drape, and the smaller hook for the head, arms, ears and tail. Those stuffed pieces need tighter stitches so the filling stays inside.
Skill level: Intermediate. This pattern is best for crocheters comfortable with working in rounds, increases and decreases, simple short-row shaping, embroidery and sewing crocheted pieces together. The blanket uses familiar stitches, while the shaped tail and final assembly require a little more attention.
Materials and Supplies
Yarn: Medium-weight, category 4, smooth washable yarn. Use the same yarn weight throughout the project.
- Black: approximately 450–550 yards, including the blanket, head, arms, ears and tail.
- Warm ivory: approximately 125–175 yards for the facial markings, edging, back stripe and tail stripe.
- Dusty blush pink: approximately 10–15 yards for the flower.
- Soft sage green: approximately 5–10 yards for the leaf.
These yardage amounts are planning estimates rather than measured consumption. Your gauge, yarn brand and finished blanket size will affect how much yarn you use.
Other supplies:
- 5.5 mm (I/9) crochet hook for the blanket and scalloped edging.
- 4 mm (G/6) crochet hook for the smaller pieces.
- Black and ivory embroidery thread or firmly secured strands of smooth yarn for the facial embroidery.
- Small amount of washable polyester fiberfill.
- Yarn needle.
- Stitch markers.
- Scissors.
- Measuring tape.
Use smooth yarn rather than faux fur or a shedding novelty yarn. We can give the tail a full, textured shape with ordinary crochet stitches, and the finished surface will be much easier to inspect for loose fibers.
Expected finished measurements:
- Lovey blanket: approximately 21–23 inches across, including the scallops.
- Skunk head: approximately 4–4.5 inches wide.
- Arms: approximately 2.5–3 inches long.
- Tail: approximately 7–8 inches along its main body, with extra length along the outside of the curve.
Those dimensions are estimates based on the stitch counts and gauge below. Check your own measurements as you work. The finished example has a generous circular blanket, so don't expect it to be as small as a typical 12-inch lovey.
Gauge, Stitches and Abbreviations
Approximate gauge with 5.5 mm hook:
- 13 double crochet stitches and 8 double crochet rows = 4 inches.
- 15 half-double crochet stitches and 13 half-double crochet rows = 4 inches.
Approximate gauge with 4 mm hook:
- 18 single crochet stitches and 20 rounds = 4 inches.
Make a small swatch before beginning, particularly for the blanket. If your double crochet stitches are much narrower than the stated gauge, the blanket may cup or become more ruffled. If they're wider, the finished blanket may spread farther than the example.
US crochet abbreviations:
- ch = chain
- sc = single crochet
- hdc = half double crochet
- dc = double crochet
- sl st = slip stitch
- inc = work 2 stitches into the same stitch
- sc2tog = single crochet 2 stitches together
- st/sts = stitch/stitches
- rnd = round
- RS = right side
- WS = wrong side
- FO = fasten off
Construction notes:
- Use US crochet terminology throughout.
- Make the black blanket in joined rounds. Beginning chains do not count as stitches.
- Make the head, arms and tail in continuous rounds unless a step specifically says to turn.
- Place a marker at the beginning of every continuous round.
- Work through both loops unless otherwise stated.
- Count the actual stitches, not the turning or starting chains.
- Leave long yarn tails where pieces will be sewn together.
- Secure the starting yarn ends before stuffing or assembling any piece. For every magic ring, pull the ring completely closed, then use a yarn needle to weave the starting tail through several nearby stitches on the inside or back of the crochet fabric. Change direction once to secure it. Do this before closing the stuffed head or arms, and before sewing the ears, muzzle, flower or ivory tail tip over another surface. For the black tail, secure the starting strand along the inside of the 18-chain foundation ring before stuffing and attachment, keeping the base opening intact. Check that none of these starting rings or foundation stitches can loosen during gentle handling.
For the stuffed pieces, use an invisible single crochet decrease whenever possible. Insert the hook into the front loops of the next two stitches, yarn over and draw through both loops, then yarn over and complete the single crochet.
Keep the decorative details simple. Her eyes will be embroidered directly onto the ivory facial patches, not made from separate plastic eyes or sewn-on black discs.
Crochet the Skunk Head, Face and Ears
Let's start with the head. The round black shape is fairly straightforward. What makes her look like our particular skunk is the placement of the ivory patches, the stripe down her forehead and those little embroidered eyes.
Black Head
Use black yarn and the 4 mm hook. Work in continuous rounds. Place a stitch marker in the first stitch of each round.
Rnd 1: Work 6 sc into a magic ring. (6)
Rnd 2: Work 2 sc in each stitch. (12)
Rnd 3: (1 sc, inc) 6 times. (18)
Rnd 4: (2 sc, inc) 6 times. (24)
Rnd 5: (3 sc, inc) 6 times. (30)
Rnd 6: (4 sc, inc) 6 times. (36)
Rnd 7: (5 sc, inc) 6 times. (42)
Rnd 8: (6 sc, inc) 6 times. (48)
Rnd 9: (7 sc, inc) 6 times. (54)
Rnd 10: (8 sc, inc) 6 times. (60)
Rnds 11–15: Work 1 sc in each stitch. (60 each round)
Rnd 16: (8 sc, sc2tog) 6 times. (54)
Rnd 17: (7 sc, sc2tog) 6 times. (48)
Rnd 18: (6 sc, sc2tog) 6 times. (42)
Rnd 19: (5 sc, sc2tog) 6 times. (36)
Rnd 20: (4 sc, sc2tog) 6 times. (30)
Rnd 21: (3 sc, sc2tog) 6 times. (24)
Stop here before closing the head. Do not work Rnds 22–24 yet. Leave the opening accessible and continue to the Ivory Facial Patches instructions below. Make and attach both patches, the muzzle and the forehead stripe. Then complete the embroidered eyes, nose and smile. Secure all facial yarn ends inside the still-open head.
Once those facial details are finished, return to this point. Add firm but gentle stuffing, keeping the head evenly rounded without stretching the stitches open. Continue with Rnds 22–24 below to close the head. After closing it, proceed to the ear and arm instructions.
Rnd 22: (2 sc, sc2tog) 6 times. (18)
Rnd 23: (1 sc, sc2tog) 6 times. (12)
Rnd 24: Sc2tog 6 times. (6)
FO, leaving a long black sewing tail. Draw the yarn through the remaining six front loops and close the opening. Do not attach the head to the blanket yet.
Checkpoint: At the widest point, your head should have 60 stitches around. With the suggested gauge, expect a rounded head about 4–4.5 inches wide. Add enough stuffing to hold the shape without stretching the stitches open.
Ivory Facial Patches: Make 2
Use ivory yarn and the 4 mm hook. These are two softly rounded patches, not one enormous white face. Work in turned rows.
Row 1: Ch 3. Sc in the second chain from the hook and in the next chain. Ch 1, turn. (2)
Row 2: Work 2 sc in each stitch. Ch 1, turn. (4)
Row 3: Work 2 sc in the first stitch, 1 sc in each of the next 2 stitches, and 2 sc in the last stitch. Ch 1, turn. (6)
Rows 4–9: Sc in each stitch. Ch 1 and turn after every row. (6 each row)
Row 10: Sc2tog, sc in each of the next 2 stitches, sc2tog. Ch 1, turn. (4)
Row 11: Sc2tog twice. (2)
FO with a long ivory tail. Make a second matching patch.
Position the two patches symmetrically on the front of the head, roughly across Rnds 10–19, with their longer direction running vertically. Keep a narrow center space for the forehead stripe. The lower ends should sit beside the future muzzle.
Pin both patches before sewing. Use small stitches around their edges, catching the crocheted head surface without pulling the face inward.
Ivory Muzzle
Work a small flat circle with ivory yarn.
Rnd 1: Work 6 sc into a magic ring. (6)
Rnd 2: Work 2 sc in every stitch. (12)
Rnd 3: (1 sc, inc) 6 times. (18)
FO, leaving a sewing tail. Flatten the circle and position it beneath the lower portion of the forehead stripe, overlapping the lower inside edges of both cheek patches.
Sew the muzzle flat. It should round out the lower face without making a large protruding snout.
Continuous Ivory Head Stripe
Our skunk has an ivory stripe that runs down her forehead, continues over the crown and finishes at the back of the head. Crochet it as one long surface strip.
Use ivory yarn and the 4 mm hook.
Row 1: Ch 6. Sc in the second chain from the hook and across. Ch 1, turn. (5)
Rows 2–31: Sc in each stitch. Ch 1 and turn after every row. (5 each row)
Row 32: Sc2tog, sc in the next stitch, sc2tog. Ch 1, turn. (3)
Rows 33–38: Sc in each stitch. Ch 1 and turn after Rows 33–37. (3 each row)
Stripe checkpoint: The completed strip should measure approximately 7.5–8 inches at the stated gauge. Before sewing, pin it from the lower back of the head, over the crown, and down to the top of the muzzle. If your actual head requires a slightly different length, adjust the number of five-stitch rows before the tapered section. The stripe must reach both ends without being stretched tightly.
FO, leaving a long sewing tail.
Starting with the wider end at the lower back of the head, pin the strip up the back, across the center of the crown, and down the forehead. The narrower end should finish immediately above the muzzle and nose position.
The stripe should widen across the top and narrow toward her nose. Sew it down along both sides, easing the fabric smoothly over the rounded head.
Open Embroidered Eyes
Now for the eyes. We want them bright and open, but unmistakably hand-stitched.
Mark one eye near the upper-middle area of each ivory facial patch. Center each eye within its own patch, leaving the ivory forehead stripe clearly visible between them. Check the face straight on before stitching so both eyes sit at the same height and look evenly spaced. Keep the embroidered black eye shapes entirely within the ivory patches.
With black embroidery thread or smooth black yarn, embroider a compact vertical oval on each patch, approximately 3/8 inch wide and 1/2 inch tall. Use closely spaced satin stitches worked through the ivory crochet stitches. Build the shape gradually rather than covering it with one large strand.
Fill each oval completely with black thread. The stitches themselves should remain visible.
Do not add a surrounding white eye shape, a white crescent at the outer edge, or a plastic-looking iris. Add one very short ivory embroidered stitch near the upper inside area of each completed black eye to create the tiny highlight shown in the finished example. Keep the highlight small, with black embroidery surrounding it on every side. Do not extend the ivory thread to the outer edge of the eye. Secure both highlights inside the head before stuffing and closing it.
Add two or three short black embroidered eyelashes at each outer upper corner. Make each lash small and securely anchored through the crochet fabric. Finish with one gently curved embroidered eyebrow above each eye.
That gives her an alert, friendly expression without the glossy doll-eye appearance.
Nose and Smile
Embroider a small black triangular nose near the top center of the ivory muzzle, just below the forehead stripe. Build the triangle with several short satin stitches.
Bring a single black stitch down from the nose, then embroider a small curved smile spreading slightly to either side. Keep the smile narrow enough to stay within the ivory muzzle.
Secure every embroidery end inside the head before the final stuffing and closure.
Rounded Ears: Make 2
Use black yarn and the 4 mm hook.
Rnd 1: Work 6 sc into a magic ring. (6)
Rnd 2: Work 2 sc in every stitch. (12)
Rnd 3: (1 sc, inc) 6 times. (18)
Rnd 4: (2 sc, inc) 6 times. (24)
Rnd 5: Sc in each stitch. (24)
FO, leaving a long black tail. Make the second ear the same way.
Ivory Inner Ears: Make 2
Rnd 1: With ivory yarn, work 6 sc into a magic ring. (6)
Rnd 2: Work 2 sc in each stitch. (12)
FO, leaving a sewing tail.
Sew one ivory circle onto the front center of each black ear, leaving a clear black rim showing all around. Slightly pinch the lower edge of each completed ear to give it a gently cupped appearance.
Position the ears symmetrically near the upper sides of the head, approximately spanning the area around Rnds 5–9. Sew the pinched lower edges securely into the black head stitches.
Check the head from the front before tightening the final stitches. The ears should look rounded and fairly upright, not long or pointed.
Small Black Arms: Make 2
Use black yarn and the 4 mm hook.
Rnd 1: Work 6 sc into a magic ring. (6)
Rnd 2: Work 2 sc in every stitch. (12)
Rnd 3: (1 sc, inc) 6 times. (18)
Rnds 4–6: Sc in each stitch. (18 each round)
Rnd 7: (4 sc, sc2tog) 3 times. (15)
Rnds 8–11: Sc in each stitch. (15 each round)
Rnd 12: (3 sc, sc2tog) 3 times. (12)
Rnds 13–14: Sc in each stitch. (12 each round)
Stuff the rounded hand end lightly, leaving the upper end mostly flat. Flatten the opening so six pairs of stitches line up, then work 6 sc through both layers to close it.
FO with a long black tail. Make the second arm to match.
Set the arms aside until the blanket is finished. They'll sit immediately below the head, angling slightly outward so the rounded ends rest against the upper blanket.
Crochet the Black Lovey Blanket and Cream Scalloped Edging
The blanket is what gives our skunk her soft, spreading shape. Instead of starting with a square, we're going to work outward from a small opening at the neck. The first rounds form the tapered upper body, and the later double crochet rounds widen into the blanket.
Use black yarn and the 5.5 mm hook. Work in joined rounds, always keeping the same side facing you. Do not turn your work.
Neck Opening
Ch 20. Without twisting the chain, join with a sl st to the first chain to form a ring.
Rnd 1: Ch 1. Sc in each of the 20 foundation chains. Join with a sl st in the first sc. (20)
Gradually Widen the Upper Body
For each of the following rounds, ch 2 at the beginning, work the instructions, and join with a sl st to the first hdc. The beginning ch 2 does not count as a stitch.
Rnd 2: (3 hdc, 2 hdc in the next stitch) 5 times. (25)
Rnd 3: (4 hdc, 2 hdc in the next stitch) 5 times. (30)
Rnd 4: (5 hdc, 2 hdc in the next stitch) 5 times. (35)
Rnd 5: (6 hdc, 2 hdc in the next stitch) 5 times. (40)
Rnd 6: (7 hdc, 2 hdc in the next stitch) 5 times. (45)
Rnd 7: (8 hdc, 2 hdc in the next stitch) 5 times. (50)
Rnd 8: (9 hdc, 2 hdc in the next stitch) 5 times. (55)
Rnd 9: (10 hdc, 2 hdc in the next stitch) 5 times. (60)
Rnd 10: (11 hdc, 2 hdc in the next stitch) 5 times. (65)
Rnd 11: (12 hdc, 2 hdc in the next stitch) 5 times. (70)
Rnd 12: (13 hdc, 2 hdc in the next stitch) 5 times. (75)
Rnd 13: (14 hdc, 2 hdc in the next stitch) 5 times. (80)
Rnd 14: (15 hdc, 2 hdc in the next stitch) 5 times. (85)
Rnd 15: (16 hdc, 2 hdc in the next stitch) 5 times. (90)
Checkpoint: You should now have exactly 90 stitches. The upper portion should resemble a widening cone rather than a flat disc. This will form the black body beneath the skunk's head and arms.
Widen Into the Circular Blanket
Switch to double crochet. At the beginning of each round, ch 3 without counting that chain as a stitch. Join each completed round with a sl st in the first dc.
Rnd 16: (8 dc, 2 dc in the next stitch) 10 times. (100)
Rnd 17: (9 dc, 2 dc in the next stitch) 10 times. (110)
Rnd 18: (10 dc, 2 dc in the next stitch) 10 times. (120)
Rnd 19: (11 dc, 2 dc in the next stitch) 10 times. (130)
Rnd 20: (12 dc, 2 dc in the next stitch) 10 times. (140)
Rnd 21: (13 dc, 2 dc in the next stitch) 10 times. (150)
Rnd 22: (14 dc, 2 dc in the next stitch) 10 times. (160)
Rnd 23: (15 dc, 2 dc in the next stitch) 10 times. (170)
Rnd 24: (16 dc, 2 dc in the next stitch) 10 times. (180)
Rnd 25: (17 dc, 2 dc in the next stitch) 10 times. (190)
Rnd 26: (18 dc, 2 dc in the next stitch) 10 times. (200)
Rnd 27: (19 dc, 2 dc in the next stitch) 10 times. (210)
FO with black yarn after joining Rnd 27. Weave the end into the WS of the blanket.
Checkpoint: Your final black round must contain 210 stitches. That's the number we'll use to divide the ivory edging into 30 scallops of seven stitches each.
Spread the blanket on a table and check the shape. The narrow upper section should rise gently from the larger circular blanket. The lower rounds should spread and drape with a little fullness. Don't try to pull the fabric into a rigid flat circle.
If your blanket cups tightly instead of spreading, compare your gauge with the stated measurements before continuing. If it develops very deep ripples, check that you haven't accidentally worked extra increases or counted a beginning chain as a stitch.
Ivory Scalloped Edging
Join ivory yarn to any stitch of Rnd 27. Keep the same 5.5 mm hook.
Rnd 28: Ch 1. Work 1 sc in every stitch around. Join with a sl st in the first sc. (210)
Rnd 29: Ch 1. Repeat the following sequence 30 times: sc in the next stitch, skip the next 2 stitches, work 7 dc in the following stitch, then skip the next 3 stitches. Join with a sl st in the first sc.
You should have 30 full ivory shells around the blanket, each made from seven double crochet stitches.
FO and weave in the end on the WS. Gently spread the scallops with your fingers.
The ivory border is supposed to be noticeable. It outlines the black blanket and softens the whole project without putting a white stripe down the front.
There is no ivory stripe on the front blanket. Keep that entire surface black except for the scalloped border and the small flower near the lower edge.
Make the Fluffy-Looking Striped Skunk Tail and Back Stripe
Turn our little skunk around and you'll see the feature that really sets her apart. The ivory stripe continues down the back, and there's a substantial black tail with an ivory stripe running along its outside curve.
We'll make the tail with tight single crochet stitches, light stuffing and four simple shaping sections. No wire is needed. The extra rows on one side give it a gentle bend, while the stripe adds a little raised texture.
Black Tail Base and Body
Use black yarn and the 4 mm hook. Work from the open base of the tail toward its rounded tip.
Ch 18, taking care not to twist the chain. Join with a sl st to make a ring. Ch 1. This beginning chain does not count as a stitch.
Work all tail rounds in a continuous spiral beginning with Rnd 1. Do not join rounds with a slip stitch or make additional beginning chains. Place a stitch marker in the first sc of Rnd 1 and move it to the first stitch of every following round, including the rounds between shaping sections.
Rnd 1: Sc in each of the 18 foundation chains. (18)
Rnd 2: (2 sc, inc) 6 times. (24)
Rnd 3: (3 sc, inc) 6 times. (30)
Checkpoint: You should now have 30 stitches around the tail. Continue in a spiral, following the additional turning instructions only on the four specified shaping rounds.
Rnds 4–9: Sc in every stitch. (30 each round)
How the Tail Curve Works
On four shaping rounds, we'll add two short rows across half the tail. Those extra rows make that side longer, encouraging the stuffed tube to curve toward the opposite side.
Mark the first 15 stitches of the round as the outside of the curve. Keep this marked side facing the same direction throughout the shaping.
For each shaping round:
- Sc in the first 15 stitches.
- Ch 1 and turn. Sc back across those same 15 stitches.
- Ch 1 and turn again. Sc forward across those 15 stitches.
- Continue with sc in the remaining 15 stitches of the original round.
The full round still contains 30 stitches. The two short rows are extra shaping fabric, not additional stitches in the round count. Don't count either turning chain as a stitch.
Continue the Tail:
Rnd 10: Work the shaping-round instructions above. (30 in the full round)
Rnds 11–17: Sc in every stitch. (30 each round)
Rnd 18: Repeat the shaping-round instructions. (30)
Rnds 19–25: Sc in every stitch. (30 each round)
Rnd 26: Repeat the shaping-round instructions. (30)
Rnds 27–33: Sc in every stitch. (30 each round)
Rnd 34: Repeat the shaping-round instructions. (30)
Rnd 35: Sc in every stitch. (30)
Checkpoint: The tube should now have a fuller outside curve and a shorter inside curve. You should still have 30 working stitches around the opening. Don't add any extra increases to the short rows.
Round the Tail Tip:
Rnd 36: (3 sc, sc2tog) 6 times. (24)
Rnd 37: (2 sc, sc2tog) 6 times. (18)
Rnd 38: (1 sc, sc2tog) 6 times. (12)
Stuff the tail lightly through its open base, feeding the fiberfill toward the rounded tip. Use small pieces of stuffing rather than one tightly packed lump. The tail should look full while remaining bendable.
Rnd 39: Sc2tog 6 times. (6)
FO, draw the yarn through the six remaining front loops, and close the tip. Secure the end inside the tail.
Keep the 18-stitch base opening available for attachment to the lovey later.
Raised Ivory Tail Stripe
Use ivory yarn and the 4 mm hook. Work in turned rows. This stripe will be sewn along the outside of the curved black tail.
Row 1: Ch 9. Sc in the second chain from the hook and across. Ch 1, turn. (8)
Rows 2–8: Sc across. Ch 1 and turn after each row. (8)
Row 9: Work 2 sc in the first stitch, sc in each of the next 6 stitches, and 2 sc in the last stitch. Ch 1, turn. (10)
Rows 10–31: Sc across. Ch 1 and turn after each row. (10)
Row 32: Sc2tog, sc in the next 6 stitches, sc2tog. Ch 1, turn. (8)
Rows 33–39: Sc across. Ch 1 and turn after each row. (8)
Row 40: Sc2tog, sc in the next 4 stitches, sc2tog. Ch 1, turn. (6)
Rows 41–44: Sc across. Ch 1 and turn after Rows 41–43. (6)
FO, leaving a long ivory sewing tail.
Pin the wide stripe along the outside of the black tail, starting close to its base. The wider middle section should follow the fuller curve, while the tapered end reaches toward the rounded tip.
Ease the strip around the curve without pulling it tight. Sew both long edges down with small, closely spaced ivory stitches. Sew the short ends flat as well. The raised crochet surface gives the tail a full, soft look without adding any loose yarn fringe.
Ivory Tail Tip
To match the finished back view, add a small ivory circle over the rounded end of the tail. Use ivory yarn and the 4 mm hook.
Rnd 1: Work 6 sc into a magic ring. (6)
Rnd 2: Work 2 sc in each stitch. (12)
Rnd 3: (1 sc, inc) 6 times. (18)
FO, leaving a long ivory sewing tail. Lay the finished circle flat and position it over the rounded black tip of the skunk's tail. Center it on the end that will face the viewer when the tail curls under.
Using the long ivory yarn tail, sew around the entire edge of the circle, catching the black crochet stitches underneath. Ease the circle gently over the rounded tip without pulling it into a point.
Bring the narrow end of the long ivory tail stripe against the ivory tip circle. Sew the two pieces together neatly so the cream marking continues without a black gap. Secure the yarn end inside the tail.
Checkpoint: The tail should have one continuous ivory marking along its outer curve, ending in a rounded ivory tip. The circle must be securely attached all the way around, without loose edges.
Shape the Curled-Under Tail
After attaching the ivory stripe and tip, gently bend the lightly stuffed tail into its finished curve. The ivory stripe should follow the outside of the bend, and the rounded ivory tip should curl under and face toward you when the skunk is viewed from behind.
To help hold the curve, use a separate length of black yarn and a yarn needle to make small concealed anchoring stitches on the inside of the bend. Begin by bringing the inner surfaces near Tail Rnds 16 and 23 toward one another. Catch a few black crochet stitches from each area and secure them together. Repeat near Rnds 23 and 30 if additional shaping is needed.
Draw the stitches just tight enough to hold a rounded curve without creating a sharp fold. Adjust the attachment points slightly if your yarn or stuffing changes the bend. Secure the shaping stitches firmly and weave the yarn ends into the tail. Do not leave loose loops or exposed connecting strands.
Check the tail from the rear before attaching it to the blanket. The lower section should remain full, while the upper portion curves forward with its ivory tip clearly visible. The finished tail must remain soft and flexible, without wire or rigid supports.
The final curl depends on yarn tension and the amount of stuffing, so check the shape carefully before permanently attaching the tail to the body.
Ivory Stripe Down the Back Blanket
We'll make this as a separate flat strip. It belongs only on the back of the black blanket, not down the front.
Use ivory yarn and the 4 mm hook.
Row 1: Ch 5. Sc in the second chain from the hook and across. Ch 1, turn. (4)
Rows 2–12: Sc across. Ch 1 and turn after each row. (4)
Row 13: Work 2 sc in the first stitch, sc in the next 2 stitches, and 2 sc in the last stitch. Ch 1, turn. (6)
Rows 14–25: Sc across. Ch 1 and turn after each row. (6)
Row 26: Work 2 sc in the first stitch, sc in the next 4 stitches, and 2 sc in the last stitch. Ch 1, turn. (8)
Rows 27–50: Sc across. Ch 1 and turn after Rows 27–49. (8)
FO, leaving a long sewing tail.
Arrange the finished blanket with its tapered upper body rising from the center and the RS of the crochet fabric facing outward. Identify the back of the skunk, directly opposite the plain black front where the face will point. Center the narrow end of the ivory strip immediately below the neckline on this exterior back section. Let the wider end run down the center back toward the ivory scalloped edging.
Pin the stripe along the exterior back from the neckline to the lower border. Keep it centered and straight. The expected stripe length is approximately 10 inches, depending on your gauge. Ease the crocheted strip gently so it lies flat without stretching or puckering the black body.
Sew both long edges of the stripe securely to the black body with small ivory stitches. Catch enough of the underlying black fabric to anchor the stripe firmly, but keep the joining stitches from passing visibly through the opposite front surface. Secure both short ends as well. The stripe must remain visible on the outside when the skunk is viewed from behind.
Secure the lower end near the scalloped edging and weave in all remaining ends.
The black front should remain plain. If you turn the lovey over and see obvious ivory sewing stitches running down the front, adjust the attachment before proceeding.
Positioning the Tail
With the exterior back of the skunk facing you, position the tail base directly over the center of the ivory back stripe, approximately across Blanket Rnds 12–15. The attachment should be about 3–4 inches below the neckline, depending on your gauge. The tail must emerge from the center rear of the body, not from either side or beneath an arm.
Arrange the tail so its broad ivory marking follows the outside of the upward curve. Bend the rounded upper portion back toward the viewer, with the ivory tip facing directly outward when the skunk is viewed from behind. The lower tail should remain centered over the back stripe rather than branching off to one side.
Use black yarn to sew completely around the 18-stitch tail-base opening, catching the ivory stripe and the underlying black body securely. Work additional anchoring stitches through the lower 2–3 inches of the tail and into the black body beneath the stripe. Keep the anchoring stitches concealed as much as possible. Do not rely on the separately sewn ivory stripe alone to support the tail.
Those additional attachment stitches matter. A large tail sewn by its base alone would pull on one small area and flop around too freely.
Keep the upper curved part flexible. Without a hidden rigid support, it may settle differently when the lovey is picked up or laid flat. That's normal for a soft crocheted project.
Crochet the Pink Flower and Sage Leaf
We're keeping the flower small and placing it near the lower edge of the black blanket. It gives our skunk a little color without competing with her face or that wonderful tail.
Make only one flower and one leaf. Nothing needs to go on her head.
Five-Petal Flower
Use dusty-pink yarn and the 4 mm hook.
Rnd 1: Work 5 sc into a magic ring. Pull the ring closed and join with a sl st in the first sc. (5)
Rnd 2: Working into the first sc, make a sl st, ch 2, work 3 dc into that same stitch, ch 2, and sl st into the same stitch.
Repeat that petal sequence in each of the remaining four single crochet stitches.
At the end of the round you should have five rounded petals.
FO, leaving a long pink sewing tail.
Ivory Flower Center
Thread a short strand of ivory yarn through a yarn needle. Work four or five small, closely placed embroidery stitches over the center opening of the pink flower, making a soft raised center.
Secure the ivory yarn on the back of the flower. Do not use a bead, button or plastic center.
Sage-Green Leaf
Use sage-green yarn and the 4 mm hook.
Ch 8. Starting in the second chain from the hook, work the following stitches along the foundation chain:
Sl st, sc, hdc, dc, hdc, sc, sl st. (7 stitches)
Rotate the work to crochet along the unused loops on the underside of the foundation chain.
Work sl st, sc, hdc, dc, hdc, sc, sl st back along the opposite side. (7 stitches)
Join to the first sl st. FO, leaving a long green sewing tail.
Flatten the leaf gently between your fingers. It should be a small oval with slightly pointed ends.
Flower Placement
Lay the lovey front-side up with the skunk's face looking toward you. Position the flower in the lower right portion of the black blanket, approximately 1.5–2 inches inside the ivory scalloped border.
Tuck the sage leaf behind the upper right side of the flower, with its tip pointing slightly outward.
Sew the leaf flat first, catching stitches along its center and outer edge. Then sew the flower over the base of the leaf. Attach the flower securely through its center and the bases of all five petals.
The flower should sit close against the blanket rather than hanging from a loose strand. Check its attachment by gently tugging each petal and the leaf separately.
And stop there. One little flower is enough.
Assemble and Finish the Skunk Lovey
All the crocheted pieces are finished, and the back stripe and tail are already attached. Now we can put the rest of our little skunk together. Spread the blanket out and pin the head and arms in position before sewing them permanently. Check the face from the front, then turn the lovey around to make sure the head stripe, back stripe and centered tail line up properly.
Step 1: Attach the Head
Center the completed head directly over the 20-stitch neckline opening, with its face pointing toward the plain black front of the blanket.
The ivory forehead stripe should be centered above the nose. The stripe on the back of the head should line up visually with the separate ivory stripe on the back of the blanket.
Thread the long black sewing tail left after closing Head Rnd 24 onto a yarn needle. Pass the needle from the closed bottom center of the head through the stuffing and bring it out through the black crochet fabric at Head Rnd 21. This moves the sewing yarn to the round that will form the neckline seam.
Position the head over the blanket's 20-stitch neckline opening, gently tucking the closed lower tip of the head inside the opening. Align Head Rnd 21, which has 24 stitches, with the neckline.
Divide both circumferences into four equal sections using removable stitch markers. Match six head stitches to five neckline stitches in each quarter. Sew one complete seam around the neckline, easing the one extra head stitch into each quarter so the join stays even.
Catch both the head fabric at Rnd 21 and the corresponding neckline stitches with each group of sewing stitches. Keep the seam firm without gathering the opening or flattening the head. Return to the starting point and secure the yarn end.
Sew all the way around the neck opening rather than relying on a few stitches at the bottom of the head. Close the join firmly so the head doesn't wobble or pull away from the blanket when lifted.
Weave the remaining yarn end into the black fabric and secure it.
Step 2: Attach the Arms
Position one arm on either side of the upper body, just below the head, near Blanket Rnds 2–5.
Angle the rounded ends slightly outward and downward. The upper ends should be tucked close beneath the head, with most of each arm remaining visible from the front.
Using each arm's black sewing tail, stitch the flattened upper edge firmly to the blanket body. Add several anchoring stitches along the upper inside portion of each arm so the attachment does not pivot freely.
Check that both arms sit at approximately the same height and angle.
Step 3: Check the Back Stripe and Tail
Turn the project over. The ivory stripe should run vertically from beneath the head toward the lower blanket border.
The tail should emerge from the center of the ivory back stripe, below the arms. Its lower section should be securely attached to the rear body, with the full upper section curling outward and the rounded ivory tip facing toward you. Both ear backs should be entirely black.
Inspect the tail's base seam and all the stitches anchoring its lower section. Add a few more black stitches if the base twists or pulls away from the blanket.
Do not add wire, pipe cleaners, plastic inserts or other rigid materials to make the tail stand up. The finished lovey needs to remain soft and flexible.
Step 4: Check the Flower
Turn the skunk front-side up again. The pink flower should remain near the lower edge, with the sage leaf tucked behind it.
Run your fingertips around the flower and leaf. Nothing should lift away on a loose thread. If an edge is unsecured, add another small stitch through the blanket fabric.
Step 5: Weave In the Ends
For the flat blanket, back stripe, flower and leaf, thread each remaining yarn tail onto a needle and weave it securely through several stitches on the WS of the fabric. Change direction at least once before trimming the excess.
For the stuffed head, arms and tail, the inside of the crochet fabric is no longer accessible. After securing an attachment seam, pass the yarn needle through nearby crochet stitches and into the stuffed piece. Bring it out through a different stitch several stitches away. Reinsert the needle and change direction for another concealed pass before trimming the end close to the crocheted surface.
Check that the yarn ends cannot be pulled free during gentle handling. Do not leave loose loops, exposed knots or dangling strands on the stuffed pieces.
Pay particular attention to the head, ears, arms, facial patches, flower, leaf and tail. Those are the areas most likely to be handled and tugged.
Make certain no stuffing is visible through the crocheted stitches. If you can see gaps when gently stretching the head or tail, the stuffing is too firm or the crochet fabric too loose.
Step 6: Shape and Finish the Blanket
Lay the lovey on a clean towel and gently spread the black blanket into its finished circular shape.
Smooth the ivory scallops with your fingers. If you need to relax the fabric, lightly dampen the blanket portion and let it dry flat according to the yarn manufacturer's care instructions.
Don't stretch the neckline, embroidered face, or flower while shaping the blanket. Avoid direct heat on acrylic yarn and keep the stuffed pieces dry unless you're washing the entire finished item according to the yarn label.
Once dry, check that the blanket still spreads evenly and that all the attachment points remain secure.
Remove every temporary pin, stitch marker and positioning clip before gifting the lovey. Check the head, ears, arms, tail, flower and blanket separately so nothing used during construction has been left inside or attached to the finished project.
Final Appearance Checklist
- One rounded black skunk head with two round black-and-ivory ears.
- Ivory facial patches and a tapered central forehead stripe.
- Two bright black embroidered eyes without white side crescents or plastic parts.
- One black embroidered nose and a small friendly smile.
- Two small black arms, evenly positioned.
- One spreading black blanket with 30 ivory scallops.
- No ivory stripe down the front of the blanket.
- One dusty-pink five-petal flower and one sage leaf near the lower front edge.
- One ivory stripe running down the back of the blanket.
- One long, curved black tail with a substantial ivory stripe.
Take one last look at the project from the front and the back. The face gives her personality, but the back stripe and tail are what make her unmistakably a skunk.
Baby Lovey Safety and Care Notes
This crocheted skunk is intended as a handmade gift and for supervised awake-time play. It isn't suitable for placement in a baby's crib, bassinet or other infant sleep space.
The U.S. Consumer Product Safety Commission's safe sleep guidance advises keeping loose blankets, soft objects and toys out of infant sleep spaces. A crocheted lovey belongs outside the sleep area.
Before gifting this project, check the following:
- Both eyes, the nose and the smile are embroidered with securely fastened threads.
- There are no plastic safety eyes, beads, buttons or detachable decorations.
- Both ears and arms are firmly sewn to the head and body.
- The head is securely attached around the neckline.
- The flower and leaf are stitched flat and cannot be pulled away easily.
- The tail is attached around its entire base and supported along its lower section.
- There are no wires, long loose strands, hanging ties or unsecured yarn ends.
- The stuffing remains enclosed within dense crochet stitches.
Use washable yarn and follow the care instructions on its label. After washing, inspect all embroidered details, seams and decorative attachments before allowing further supervised use.
If any piece begins to loosen, stop using the lovey until it has been securely repaired. A pretty handmade gift still needs careful inspection.
If you'd rather make a smaller project with a flatter blanket, my easy baby lovey crochet patterns include simpler animal-and-blanket constructions. This skunk has a little more shaping, but her long striped tail and soft scalloped blanket are what give her a look of her own.
When you click on links to various merchants on this site and make a purchase, this may result in this site earning a commission. This does not affect the price you pay.

UBGI Gold Standard 2026
Reviewed under the site's
editorial checklist.
Photos, decorating ideas, party setups and reader submissions are shared for inspiration unless a page is specifically presented as a pattern, tutorial, reference guide or step-by-step project. Follow the instructions, measurements, safety guidance and manufacturer directions provided for the particular project or product.
About Jan | Contact | Baby Nursery Ideas (Blog) | Site Map | Privacy Policy | Disclosure Policy | Disclaimer | Affiliate Disclosure | Earnings Disclosure | Facebook | Pinterest
I am a participant in the Amazon Services LLC Associates Program, an affiliate advertising program designed to provide a means for us to earn fees by linking to Amazon. As an Amazon Associate I earn from qualifying purchases.
Copyright © 2006-2026. All Rights Reserved.