Free Crochet Christmas Lights Garland Pattern with Flat Bulb Appliqués
By Jan Bay
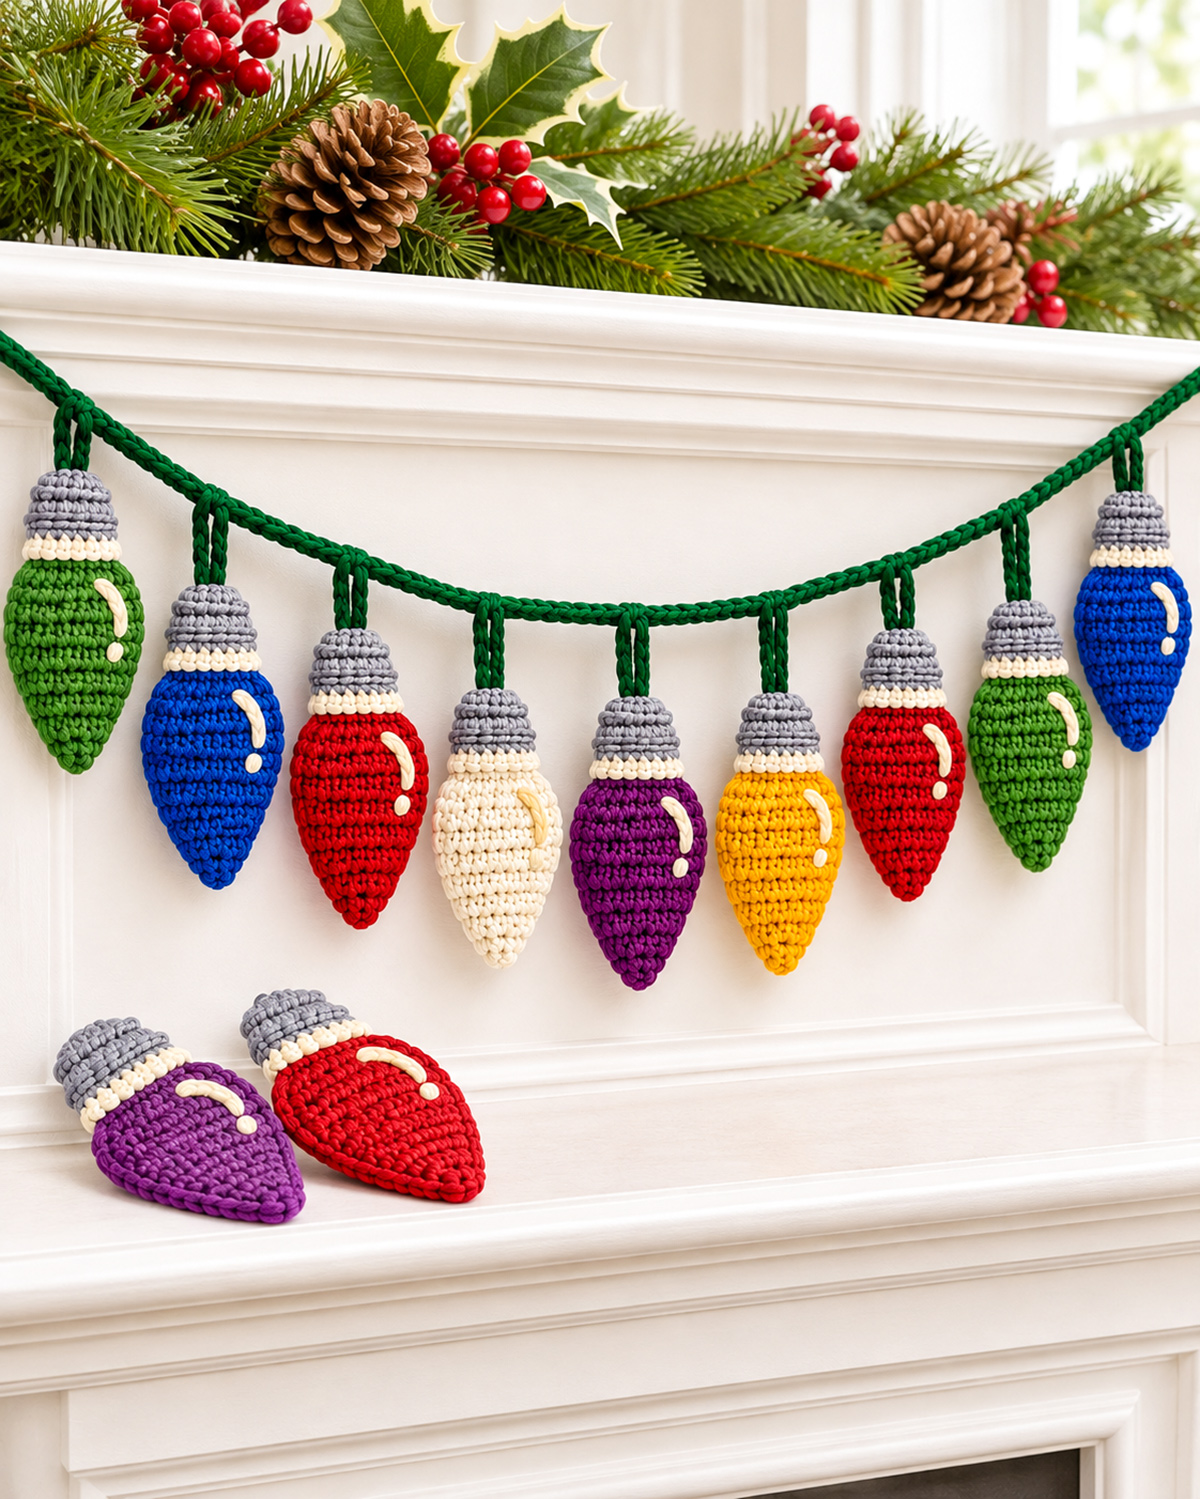
This free crochet Christmas lights garland pattern features nine colorful, vintage-style light bulbs in Christmas red, holly green, royal blue, royal purple, golden yellow, and ivory. Each flat bulb appliqué has a ribbed silver-gray socket, a narrow ivory band, and a little curved highlight that makes it look like frosted glass. I'll show you how to crochet the individual bulbs and attach them to a deep evergreen cord with alternating hanging lengths. You can make the complete Christmas garland for your mantel or use the separate flat bulbs to decorate stockings, gift bags, and other handmade holiday projects.
Explore More Free Christmas Crochet Patterns
Free Christmas Crochet Patterns
Christmas Crochet Appliqué Patterns
See Supplies for This Project Here.
Jump to a Section
- Materials and Supplies
- Finished Size and Gauge
- Stitch Abbreviations and Pattern Notes
- Flat Christmas Light Bulb Pattern
- Ivory Band and Ribbed Silver Socket
- Embroidered Bulb Highlights
- Crochet Garland Cord
- Garland Assembly and Spacing
- Ways to Use the Flat Bulb Appliqués
- Finishing and Blocking
- Frequently Asked Questions
Materials and Supplies for the Crochet Christmas Lights Garland
We're making nine Christmas light bulbs for the garland, plus two loose appliqués like the ones in the example image. All eleven use the same basic pattern. Just change the yarn color when you start another bulb.
I'd use a smooth DK-weight cotton yarn for this project. It gives you a neat stitch pattern without making the bulbs too thick. The finished pieces are flat, so there's no stuffing to buy and no separate front and back pieces to sew together.
Yarn Colors
- Christmas red: Three bulbs, including the loose appliqué.
- Holly green: Two bulbs.
- Royal blue: Two bulbs.
- Royal purple: Two bulbs, including the loose appliqué.
- Golden yellow: One bulb.
- Warm ivory: One bulb, plus the narrow bands and embroidered highlights on all bulbs.
- Silver gray: All eleven sockets and their raised rib details.
- Dark evergreen: The main garland cord, hanging tabs, and end loops.
For planning, allow approximately 15 to 25 yards of each bulb color, at least 30 yards of silver gray for the eleven socket caps and twenty-two 20-inch ridge strands, 20 yards of ivory for the bands and embroidery, and 30 yards of dark evergreen. These are planning allowances, not quantities measured from a completed sample. If you're making only the nine bulbs on the garland, you'll need less.
Hooks and Other Supplies
- 3.5 mm (E/4) crochet hook for the flat bulbs and hanging tabs.
- 4.5 mm crochet hook for the main garland cord, made with two strands of yarn held together.
- Blunt yarn needle for embroidery, fastening the tabs, and weaving in ends.
- Scissors.
- Flexible measuring tape.
- Nine removable stitch markers for the cord positions.
- Blocking mat and rustproof pins, if needed.
Use the same yarn weight for every bulb so they'll finish close to the same size. The individual colors can come from leftover yarn, provided the yarns have similar thickness and texture.
One thing I'd skip is metallic thread worked throughout the silver caps. It can make small stitches harder to see. A good medium gray gives the sockets their old-fashioned metal appearance without adding another material.
Finished Size and Gauge
Each Christmas bulb should measure approximately 3.7 inches from its pointed tip to the top of the gray socket and about 2.2 inches across the widest part.
The complete garland should measure approximately 40 to 44 inches along the crocheted cord, excluding the separate end loops. That's a starting size for a mantel or wall decoration. The width between the hanging points will be smaller after you arrange the cord in a gentle curve.
Gauge
Target bulb gauge: 22 single crochet stitches and 26 rows = 4 inches, using DK-weight yarn and a 3.5 mm hook.
Make a gauge swatch before starting. Ch 33. Sc in the second ch from the hook and in each remaining ch. (32 sc)
Ch 1, turn, and work 32 sc across each following row until you have completed 36 rows total, including the first row. Make only one turning chain between rows, and do not count it as a stitch.
At the target gauge, this swatch should measure approximately 5.8 inches wide and 5.5 inches tall. Measure a centered 4-inch area, away from the outer edges. Count the single crochet stitches across and the rows vertically. You're aiming for 22 stitches and 26 rows in 4 inches.
If your stitches are too large, try a smaller hook. If they're too small, go up a hook size. You can also keep your own gauge and accept a slightly different finished bulb size.
Important: The bulb is worked from the pointed bottom toward the gray socket. Its widest row contains 12 stitches. At the top of the colored body, it narrows to 6 stitches before the ivory band begins.
Size Checkpoints
- After Row 8, the bulb should have 12 stitches across its widest part.
- After Row 14, the body should still have 12 stitches.
- After Row 18, the top of the colored body should have 6 stitches.
- After Row 20, the ivory band should still have 6 stitches.
- After Row 24, the completed socket should have 6 stitches across.
If your bulb curls or pulls to one side, check the stitch counts before changing your hook size. A missed increase or an extra stitch at the end of a row can throw off the shape.
Before making the full set: Finish one complete bulb, including its ivory band, silver socket, and embroidered highlight. Lay it flat and check that it measures close to 2.2 inches wide and 3.7 inches long. The measurements are calculated from the stated gauge, so yours may vary. Make sure the sides are even, the tip points downward, and the cap doesn't gather. If anything looks off, correct that first. Then you can make the remaining bulbs using the same instructions.
Crochet Stitch Abbreviations and Pattern Notes
This pattern uses US crochet terms.
- ch: Chain.
- sc: Single crochet.
- sl st: Slip stitch.
- sc2tog: Single crochet two stitches together.
- RS: Right side, or the front of the bulb.
- WS: Wrong side, or the back of the bulb.
- st/sts: Stitch/stitches.
- rep: Repeat.
You'll also use a simple single crochet increase. That means working two single crochet stitches into the same stitch.
How to Work sc2tog
Insert your hook into the next stitch and pull up a loop. Insert the hook into the following stitch and pull up another loop. Yarn over and pull through all three loops on your hook.
Two stitches have become one.
Turning Chains and Row Counts
Each numbered row after Row 1 begins with "Ch 1, turn." Make that turning chain once, immediately before working the new row. Do not add another turning chain at the end of the previous row. Turning chains do not count as stitches.
Work into both loops of each stitch unless a section specifically tells you otherwise.
The first row establishes the front, or right side, of the bulb. Odd-numbered rows are worked with the right side facing you. Even-numbered rows are worked with the wrong side facing you.
For a reference to standard US crochet terms, see the Craft Yarn Council's crochet abbreviations guide.
Free Crochet Christmas Lights Garland Pattern: Make the Flat Bulbs
Start with one bulb in Christmas red. Once you've made that first one and checked its shape, repeat the same instructions in the remaining colors.
We're working from the pointed bottom upward. The first few rows form the tapered tip. The middle rows give the bulb its rounded width, and the final shaping rows bring the top inward to meet the silver socket.
Use your 3.5 mm hook and one strand of DK-weight yarn.
Part A: Crochet the Pointed Bottom
Foundation: Ch 3.
Row 1 (RS): Sc in the second ch from the hook and in the next ch. (2 sc)
Row 2 (WS): Ch 1, turn. Sc in each of the 2 sts. (2 sc)
Row 3: Ch 1, turn. Work 2 sc in each st. (4 sc)
Row 4: Ch 1, turn. Sc in each st across. (4 sc)
Row 5: Ch 1, turn. Work 2 sc in the first st, sc in each of the next 2 sts, and 2 sc in the last st. (6 sc)
Row 6: Ch 1, turn. Work 2 sc in the first st, sc in each of the next 4 sts, and 2 sc in the last st. (8 sc)
Row 7: Ch 1, turn. Work 2 sc in the first st, sc in each of the next 6 sts, and 2 sc in the last st. (10 sc)
Row 8: Ch 1, turn. Work 2 sc in the first st, sc in each of the next 8 sts, and 2 sc in the last st. (12 sc)
Checkpoint: You should have 12 stitches across Row 8. The bottom should form a tapered point, widening evenly on both sides. At the target gauge, the widest part should measure close to 2.2 inches.
If one edge has more increases than the other, correct that now. Don't keep working and hope it'll straighten out when you block it.
Part B: Make the Rounded Bulb Body
Row 9: Ch 1, turn. Sc in each st across. (12 sc)
Row 10: Ch 1, turn. Sc in each st across. (12 sc)
Row 11: Ch 1, turn. Sc in each st across. (12 sc)
Row 12: Ch 1, turn. Sc in each st across. (12 sc)
Row 13: Ch 1, turn. Sc in each st across. (12 sc)
Row 14: Ch 1, turn. Sc in each st across. (12 sc)
Checkpoint: Rows 9 through 14 have no increases or decreases. They form the full-width portion of the bulb.
Lay your work flat with the pointed tip facing downward. You should see a tapered lower section and a wider upper body. Don't worry if the upper shoulders still look square. We'll shape those next.
Part C: Shape the Upper Shoulders
Row 15: Ch 1, turn. Sc2tog over the first 2 sts, sc in each of the next 8 sts, sc2tog over the last 2 sts. (10 sc)
Row 16: Ch 1, turn. Sc in each st across. (10 sc)
Row 17: Ch 1, turn. Sc2tog over the first 2 sts, sc in each of the next 6 sts, sc2tog over the last 2 sts. (8 sc)
Row 18: Ch 1, turn. Sc2tog over the first 2 sts, then sc in each of the next 4 sts. Begin an sc2tog over the last 2 sts. When you have three loops on your hook, yarn over with ivory and pull through all three loops to complete the decrease and change colors. (6 sc)
You've finished the colored glass portion of your Christmas light bulb.
Final body checkpoint: Row 18 has exactly 6 stitches. Both upper shoulders should slope inward toward the narrower top.
Cut the bulb-color yarn, leaving a 6-inch tail to weave in later. Keep the ivory yarn attached and continue to Row 19. Don't fasten off.
Crochet the Ivory Band and Ribbed Silver Socket
The silver-gray socket is one of the details that makes these bulbs look like old-fashioned Christmas lights. I prefer keeping it attached to the bulb rather than making a separate little cap and sewing it on afterward.
We'll make two rows of ivory and four rows of gray. Then we'll add the horizontal ridges on the front of the gray section.
Part A: Narrow Ivory Band
With ivory yarn already attached:
Row 19: Ch 1, turn. Sc in each of the 6 sts. (6 sc)
Row 20: Ch 1, turn. Sc in each of the first 5 sts. Begin an sc in the last st. When you have two loops on your hook, yarn over with silver gray and pull through both loops to complete the stitch and change colors. (6 sc)
Cut the ivory yarn, leaving a 6-inch tail to weave in later. Keep the silver-gray yarn attached and continue to Row 21.
The narrow ivory band is now complete. It should sit directly above the colored body without a gap or separate seam.
Part B: Silver-Gray Socket
Continue with silver-gray yarn.
Row 21: Ch 1, turn. Sc in each of the 6 sts. (6 sc)
Row 22: Ch 1, turn. Sc in each of the 6 sts. (6 sc)
Row 23: Ch 1, turn. Sc in each of the 6 sts. (6 sc)
Row 24: Ch 1, turn. Sl st in the first st, sc in each of the next 4 sts, and sl st in the last st. (6 sts worked: 2 sl sts and 4 sc)
Fasten off, leaving an 8-inch gray tail for weaving in.
The shorter slip stitches at the two upper corners of Row 24 give the socket a slightly rounded top edge. Don't pull them tight enough to gather the gray fabric.
Socket checkpoint: The gray cap is four rows tall. The ivory band beneath it is two rows tall. Both sections remain 6 stitches wide, so they should line up evenly.
Part C: Add the Two Raised Silver Ridges
Turn the finished bulb so the right side faces you and the pointed tip hangs downward. We're adding two short horizontal lines of surface slip stitches across the gray cap.
First silver ridge:
- Cut a fresh 20-inch length of silver-gray yarn. With the right side of the socket facing you, hold the new yarn behind the socket, leaving a 6-inch starting tail on the wrong side. Use this new strand to work the first raised ridge. When making the second ridge, start with another fresh 20-inch length of gray yarn.
- Insert your hook from front to back at the right edge of the gray cap, between Rows 21 and 22.
- Catch the yarn from behind and pull a loop to the front.
- Move one stitch space toward the left, insert the hook, and pull another loop through the fabric and through the loop on your hook.
- Repeat across the five spaces between the six socket stitches. You should make 5 surface slip stitches.
- After the fifth surface slip stitch, cut the gray yarn, leaving a 6-inch tail. Pull the tail through the final loop to fasten off. Use your yarn needle to take the tail through the gray fabric to the wrong side, then weave it through several gray stitches. Secure the starting tail on the wrong side, too.
First-ridge checkpoint: Lay the bulb flat with the silver socket at the top. The first ridge should lie across the cap without pulling its sides inward. The six-stitch gray socket should remain approximately the same width as the six-stitch ivory band beneath it. If the gray section looks pinched or starts to cup, remove only the five surface slip stitches and work them again with slightly longer loops. Don't change the six socket stitches or add increases.
Second silver ridge: Repeat the same five-surface-slip-stitch method along the line between Rows 23 and 24. Start with the second 20-inch gray strand and fasten off on the wrong side as described above.
Second-ridge checkpoint: Check the cap again before making the next bulb. Both ridges should sit on the front without gathering the gray stitches. If the cap was flat after the first ridge but pulls inward after the second, redo only the second ridge with looser loops. The bulb should lie flat, with the gray socket centered above the ivory band.
Now the silver socket has the narrow horizontal ridges shown in the example.
Part D: Repeat for the Remaining Bulbs
Make nine bulbs for the garland in this order:
- Holly green.
- Royal blue.
- Christmas red.
- Warm ivory.
- Royal purple.
- Golden yellow.
- Christmas red.
- Holly green.
- Royal blue.
Make one extra royal purple bulb and one extra Christmas red bulb if you want the two loose appliqués shown on the mantel.
Every bulb uses the same 24-row pattern, two silver ridges, and embroidered glass highlight. There's no need to change the stitch counts for different colors.
The ivory bulb is the one exception in appearance: its ivory band blends into the matching bulb body. That's fine. Keep the same two band rows so its height matches the others.
Embroider the Frosted-Glass Highlights
Now we'll add the little curved reflection on the front of each bulb. I like this detail because it gives the colored yarn the appearance of shiny Christmas light glass without adding another crocheted layer.
You'll need ivory yarn and your blunt yarn needle. For the warm ivory bulb, you can use a very pale silver-gray yarn if you want the reflection to show a little more clearly.
Choose the Front of the Bulb
Lay the bulb flat with the right side facing up, the silver socket at the top, and the pointed tip facing down.
The highlight belongs on the upper-right portion of the colored bulb. Don't put it in the center. That slightly off-center placement is what gives the glass its reflected-light appearance.
Make the Curved Reflection
- Thread approximately 12 inches of ivory yarn through your needle.
- Bring the needle from the back to the front between the eighth and ninth stitches of Row 14, counting from the left side as you look at the bulb.
- Make a loose diagonal stitch downward and toward the right, ending between the tenth and eleventh stitches of Row 12.
- Bring the needle up again at that lower point, then make a shorter stitch downward and slightly left, ending between the ninth and tenth stitches of Row 11.
- Gently arrange these two stitches into a small curved reflection. Don't pull the yarn so tightly that it bends the bulb.
- Bring the needle up between the ninth and tenth stitches of Row 9, counting from the left as you face the bulb. Insert the needle back down between the ninth and tenth stitches of Row 8. This makes a short, separate ivory mark below the curved reflection.
- Secure the embroidery on the wrong side by weaving the yarn through several existing stitches. Trim the extra yarn.
The reflection should resemble a narrow curved streak with a little separate dot beneath it. It doesn't need to be perfectly round or look like a question mark.
Highlight checkpoint: The embroidery sits to the right of the center, entirely on the colored body. It doesn't cross the ivory band or the silver socket.
Repeat the same embroidery on every bulb. If you're making all nine for the garland, check that the reflections face forward before attaching the hanging tabs.
Keep the embroidery small. A large white shape would cover too much of the bulb and make it look more like a decoration sewn onto the surface than reflected light.
Crochet the Evergreen Garland Cord
Now that the bulbs are finished, we can make the cord that holds them. The dark evergreen yarn works well here because it looks like the wiring on a traditional string of Christmas lights.
We're going to hold two strands of green yarn together while crocheting the main cord. That gives it a fuller, rope-like appearance without making a complicated braid.
The hanging tabs will use just one strand of green yarn, so they'll be a little thinner than the main cord.
Part A: Main Green Cord
Use your 4.5 mm hook and hold two strands of dark evergreen DK-weight yarn together.
- Leave approximately 12 inches of starting yarn tails from both strands.
- Make a slip knot with the two strands held together.
- Ch 220, treating the two strands as one working yarn.
- Keep your tension even and don't pull the chains too tightly.
- Fasten off after Chain 220, leaving approximately 12 inches of yarn tails from both strands.
- Lay the finished cord flat and measure it without stretching.
Expected length: Approximately 40 to 44 inches if your doubled-chain gauge is close to 5 to 5.5 chains per inch.
The stitch count is 220 chains. There's no second row on the main cord. Working the chain with doubled yarn gives it the fuller look we're after while keeping it flexible.
If your cord finishes noticeably shorter than 40 inches, make it again with a slightly larger hook or looser chains. If it's much longer than 44 inches, try a smaller hook. The exact hanging length can also be changed, but the 220-chain version is the one used for this nine-bulb arrangement.
Part B: Make Two End Hanging Loops
Make two separate end loops using the doubled evergreen yarn and 4.5 mm hook.
End Loop 1:
- Leave approximately 12 inches of starting yarn tails.
- Ch 16 with the two strands held together.
- Sl st into the first chain to form a closed ring. Don't twist the chain.
- Fasten off, leaving another pair of 12-inch yarn tails.
Make a second loop in exactly the same way.
Attach the left loop: Place the closed ring against the first three chain links at the left end of the main cord. Using the long yarn tails and a blunt needle, sew through the base of the ring and through those first three links several times. Make at least four secure passes through the crocheted fabric.
After attaching the left loop, use the two starting yarn tails from the main cord to reinforce the attachment. Thread each tail separately through your yarn needle and sew through the base of the hanging loop and the first three cord chains at least three times. Keep the stitches snug without bunching the cord.
Weave the remaining yarn tails through nearby chain stitches, changing direction before trimming. Weave in the tails from the separate hanging loop as well.
Repeat at the right end, using the two finishing tails from the main cord and the yarn tails from the second hanging loop. Check that both end loops are firmly attached and that no long yarn tails remain loose.
Both loops should sit beyond the decorative portion of the cord, not in the spaces where the bulbs will hang.
Give each loop a gentle pull to check that the sewing stays in place. These are decorative hanging loops, not load-bearing hardware.
Part C: Crochet the Short and Long Hanging Tabs
Instead of making every bulb hang at exactly the same height, we'll alternate two tab lengths. It gives the garland that slightly uneven, old-fashioned Christmas light arrangement shown in the example.
Switch to one strand of evergreen yarn and your 3.5 mm hook.
Short Tab: Make 5
- Leave a starting yarn tail approximately 12 inches long.
- Ch 11.
- Fasten off, leaving another 12-inch tail at the opposite end.
Long Tab: Make 4
- Leave a starting yarn tail approximately 12 inches long.
- Ch 17.
- Fasten off, leaving another 12-inch tail at the opposite end.
You'll have nine crocheted hanging tabs: five short tabs with 11 chains each and four long tabs with 17 chains each. Every tab has a long yarn tail at both ends for attaching it to the silver socket.
Don't join the ends of these strips into rings. We need them open for attaching to the main garland cord and sewing onto the silver sockets.
Tab checkpoint: Fold each strip in half. The two free ends should meet, and the fold should sit at the top. The longer tabs will hang lower after they're attached to the cord.
Set the tabs aside with their yarn tails still attached. We'll fasten them to the main cord in the assembly section.
Assemble the Christmas Lights Garland
Now comes the fun part. We have nine finished bulbs, nine green hanging tabs, and one long evergreen cord. All that's left is putting them together in the right order.
I'd lay everything out on a table before sewing the bulbs onto their tabs. It's much easier to check your spacing and colors that way.
Step 1: Mark the Nine Bulb Positions
Lay your 220-chain evergreen cord flat, with the end loops pointing outward.
Starting at the left end of the cord, count the actual chain stitches. Don't count the separate end loop.
Place a removable marker at each of these chain positions:
- Chain 22.
- Chain 44.
- Chain 66.
- Chain 88.
- Chain 110.
- Chain 132.
- Chain 154.
- Chain 176.
- Chain 198.
The marked positions are 22 chain numbers apart. There are 21 complete chains before the first marked chain and 22 chains after the last marked chain. That one-chain difference won't be noticeable in the finished garland.
The nine bulbs will therefore be spaced evenly along the length of the crocheted cord. Their finished positions will curve naturally when you hang the garland.
Spacing checkpoint: The fifth marker belongs at Chain 110, the midpoint of the 220-chain cord. There should be four marked bulb positions on either side.
Step 2: Attach the Green Hanging Tabs
We'll attach the tabs to the cord with a folded-loop hitch. That keeps the green connectors looking neat and lets you adjust their positions before fastening the bulbs below them.
Start at the first marker with a short 11-chain tab.
- Fold the crocheted tab in half so its two free ends meet.
- Place the folded midpoint behind the main evergreen cord at Chain 22.
- Bring the folded loop over the cord, then pass both free ends through that loop.
- Gently pull the two free ends downward to tighten the hitch around the cord.
- Slide the hitch into position at the marker. Keep the two free ends hanging downward.
- Repeat at the remaining markers, alternating short and long tabs.
Use this arrangement:
| Position | Bulb Color | Tab |
|---|---|---|
| 1 | Holly green | Short, ch 11 |
| 2 | Royal blue | Long, ch 17 |
| 3 | Christmas red | Short, ch 11 |
| 4 | Warm ivory | Long, ch 17 |
| 5 | Royal purple | Short, ch 11 |
| 6 | Golden yellow | Long, ch 17 |
| 7 | Christmas red | Short, ch 11 |
| 8 | Holly green | Long, ch 17 |
| 9 | Royal blue | Short, ch 11 |
Once all nine tabs are in place, check that the longer ones hang a little lower than their neighbors. That's the staggered arrangement we want.
Step 3: Sew Each Tab to Its Silver Socket
Lay your first green bulb below the first short hanging tab with the embroidered highlight facing upward.
The two free ends of the folded tab will attach to the top of the gray socket.
- Thread the long yarn tail from one end of the green tab through your blunt yarn needle.
- Place that chain end against the third stitch of Row 24 on the gray socket, counting from the left as you face the front.
- Sew through the chain end and the gray crochet fabric, including a stitch from Row 23 beneath it.
- Make at least three securing passes through the crocheted fabric.
- Weave the remaining green yarn tail through the wrong side of the gray socket and trim it.
- Attach the second free chain end to the fourth stitch of Row 24 in the same way.
- Turn the bulb over and check that both attachments are secured into the socket fabric.
The two green chain ends should meet near the center of the gray cap. The bulb should hang straight down, with its ivory reflection facing forward.
Repeat this attachment for all nine bulbs.
Don't attach the tabs only through the raised silver ridges. Sew them through the underlying gray socket stitches. Those decorative ridges aren't meant to carry the weight of the bulbs.
Step 4: Check the Complete Garland
Lay the finished strand flat and look at the arrangement from left to right.
You should have:
- 9 flat Christmas light bulbs.
- 5 short hanging tabs.
- 4 long hanging tabs.
- 2 reinforced end loops.
- 1 continuous evergreen crocheted cord.
- 2 silver ridges and 1 embroidered glass reflection on every bulb.
All nine gray sockets should face upward, and every pointed bulb tip should face downward.
Before hanging the garland, gently lift it by the two end loops. Watch how the bulbs settle. If one twists backward, straighten its folded green tab and adjust the hitch on the cord.
Once you're happy with the positions, use a short length of evergreen yarn to make two small securing stitches through each folded hitch and the underlying main cord. Work these stitches on the back so they won't show. Weave the ends into the cord. The tabs can be adjusted before this step, but the finished bulbs won't slide out of place as easily.
The center of the garland will hang lower when you drape the cord. That's expected. Leave enough clearance beneath it so the longest bulbs don't touch the mantel, furniture, or other decorations.
Decorative use only: The finished garland contains long yarn cords and hanging pieces. Keep it completely out of reach of babies and young children, and away from cribs, bassinets, changing areas, candles, fireplaces, and other heat sources. It isn't a toy or an item for a baby's sleep space.
Ways to Use the Flat Christmas Light Bulb Appliqués
You don't have to make the entire garland to use this pattern. The individual bulbs are cute little Christmas decorations on their own, and they're much easier to attach to another project when you leave off the hanging tabs.
For appliqué use, crochet the same 24-row bulb, finish the silver ridges, and add the embroidered highlight. Then weave in the yarn ends without adding a green hanging connector.
Add the Bulbs to a Christmas Stocking
I'd arrange three small bulbs down one side of a plain crochet or fabric stocking. Red, royal blue, and holly green would make a nice combination.
Pin each bulb into position with its front facing outward. Sew around the edges using matching yarn or thread, taking small stitches through the appliqué and the stocking fabric. Keep those stitches close enough to prevent the pointed ends from curling upward.
Leave the silver cap and glass reflection visible. You don't need to add a connecting cord unless you want the stocking to look like a string of lights.
Decorate a Handmade Christmas Gift Bag
One large Christmas bulb makes a simple decoration for a reusable fabric gift bag. Place it near the center of the bag rather than close to the drawstring opening.
Use the same edge-sewing method, but stitch the appliqué to the outer layer of fabric only. That keeps the bag from being sewn shut accidentally.
Make Individual Hanging Christmas Ornaments
For a single flat hanging ornament, add one short green tab to the silver socket, joining the two free tab ends securely at the top. Leave the folded end as the hanging loop.
You can make one in each color and use them on a holiday wall display, gift package, or decorative tree placed beyond children's reach.
These are flat ornaments, not stuffed ones. That's intentional. They use less yarn, take up less storage space, and don't require a second bulb piece.
Make a Coordinating Christmas Decoration
If you enjoy making holiday garlands, you might also like my free crochet Christmas garland with stockings, candy canes and mittens. That design uses larger decorations, while this Christmas lights version has smaller matching bulbs and a simpler, more uniform arrangement.
Or browse the Christmas crochet pattern collection for more handmade holiday projects.
Finishing and Blocking Your Crochet Christmas Lights
Before you put your garland away or hang it for Christmas, give each bulb one last check. These are small pieces, but a little attention to the finish makes the entire strand look neater.
Weave in the Yarn Ends
Turn each bulb to the wrong side. Thread each remaining yarn tail through your needle and weave it through several existing stitches in the same color.
Change direction at least once so the tail won't slip out easily. Trim the remaining yarn close to the fabric, but don't cut into the crochet stitches.
Check especially around the ivory-to-gray color change and the bottom tip. There shouldn't be any loose tails hanging below the bulbs.
Block the Bulbs Flat
If the bulbs curl at the edges, lightly dampen them with water, provided your yarn care instructions allow it.
- Lay each bulb on a blocking mat with the embroidered front facing upward.
- Straighten the pointed bottom and smooth the sides with your fingers.
- Use rustproof pins along the outer edges if needed.
- Check that both upper shoulders slope toward the silver cap.
- Let the bulbs dry completely before removing the pins.
Don't stretch the widest part so much that the bulb loses its rounded shape. We're just helping the stitches lie evenly.
Avoid pressing a hot iron directly onto the yarn or embroidered highlights. Follow the care recommendations for the yarn you've chosen.
Final Garland Check
Hang the finished garland from its two end loops at suitable, securely installed hanging points. Arrange the cord into a shallow curve, then turn each bulb so its embroidery faces outward.
Check that the bulbs hang freely and face forward. The hanging tabs should stay in place because you've already secured their hitches to the cord. If one bulb needs repositioning, carefully remove its two green securing stitches, slide the hitch to the new position, and sew it securely to the cord again.
Make sure the green tab ends are firmly attached to the gray socket fabric. They shouldn't be held only by the decorative surface stitches.
Remove all nine cord-position markers and any blocking pins or temporary positioning yarn before hanging or storing the completed garland.
If the bulbs twist, check the folded tabs first. A crooked attachment can make an otherwise even bulb hang sideways.
And that's your finished Christmas lights garland. Nine colorful, flat crochet bulbs, each with a little silver socket and its own glass reflection.
When the decorations come down, I'd lay the garland in a loose coil rather than wrapping it tightly. Keep the bulbs flat, and avoid crushing the raised gray ridges.
Frequently Asked Questions About the Crochet Christmas Lights Garland
Are These Crochet Christmas Light Bulbs Stuffed?
No. The bulbs in this pattern are made from one flat layer of crochet. They don't have stuffing, a sewn back, or separate raised pieces. The silver socket is crocheted directly onto the bulb body, and the glass reflection is embroidered on the front.
Can I Make the Garland Longer?
Yes. Make a longer evergreen cord and add more bulbs using the same 24-row pattern. The original version uses nine bulbs spaced 22 chains apart along a 220-chain cord. For a longer arrangement, keep roughly the same spacing and leave a similar margin at each end.
Make the extra tabs in alternating short and long lengths, just as you did for the first nine bulbs.
Can I Use Worsted-Weight Yarn Instead?
Yes, but your bulbs will probably finish larger if you keep the same stitch counts. Make one complete bulb first, check its measurements, and adjust your hook size if needed.
I'd keep the same yarn weight for the bulbs, silver sockets, and ivory bands so the pieces stay in proportion. Use a matching yarn for the hanging tabs, and adjust the main cord length to suit the larger bulbs.
Can I Make These for a Baby's Christmas Room?
You can use the garland as an adult-controlled holiday decoration, but keep it completely outside a child's reach. Don't hang it over a crib, bassinet, changing table, or other area where a child could grab the cord or pull down the bulbs.
For a baby's Christmas keepsake, a single flat bulb appliqué sewn securely to an adult-handled gift bag or decorative fabric keepsake is a better choice than a dangling strand.
What If My Bulb Looks Wider or Shorter Than the Example?
First, check your row counts. The widest part should contain 12 stitches, the colored body should finish at Row 18 with 6 stitches, and the completed bulb should have 24 rows.
If all those counts are correct, check your gauge. A different yarn thickness or hook size can change the proportions. Try a small sample with a different hook before making the remaining bulbs.
When you click on links to various merchants on this site and make a purchase, this may result in this site earning a commission. This does not affect the price you pay.

UBGI Gold Standard 2026
Reviewed under the site's
editorial checklist.
Photos, decorating ideas, party setups and reader submissions are shared for inspiration unless a page is specifically presented as a pattern, tutorial, reference guide or step-by-step project. Follow the instructions, measurements, safety guidance and manufacturer directions provided for the particular project or product.
About Jan | Contact | Baby Nursery Ideas (Blog) | Site Map | Privacy Policy | Disclosure Policy | Disclaimer | Affiliate Disclosure | Earnings Disclosure | Facebook | Pinterest
I am a participant in the Amazon Services LLC Associates Program, an affiliate advertising program designed to provide a means for us to earn fees by linking to Amazon. As an Amazon Associate I earn from qualifying purchases.
Copyright © 2006-2026. All Rights Reserved.