Free Crochet Skull Applique Pattern
By Jan Bay
This free crochet skull applique pattern makes a flat skull motif you can sew onto Halloween baby clothes and costumes, goth-inspired outfits, blankets, bags and other handmade projects. Make it in classic white and black or change the colors to create a softer spooky look for fall baby and kids projects.
Explore More Free Halloween and Crochet Applique Patterns
Free Halloween Crochet Patterns
Crochet Ghost Applique Pattern
Crochet Supplies for This Skull Applique
Jump to the Crochet Skull Applique Section You Need
Finished Size – skull applique measurements Materials – yarn, hook and supplies Gauge – keep the applique flat and even Crochet Skull Pattern – make the skull motif step by step Skull Face Details – add the eyes, nose and mouth Change the Size – make a smaller or larger applique Baby Halloween Project Ideas – use the skull on clothes and accessories Goth Project Ideas – alternative clothing and handmade projects Skull Applique Blanket Ideas – add the motif to blankets and throwsThe skull is worked as one flat ivory piece from the bottom of the jaw upward. The shaping is built into the rows, so you don't have to crochet separate cheek, jaw or head pieces and sew them together later. The black parts are embroidery only. There are no crocheted eye circles or separate nose pieces.
I would embroider the face before sewing the skull to anything. It's much easier to keep the eye sockets flat, hide the thread ends and make the mouth straight while you can still turn the applique over in your hand.
Finished Size
At the gauge below, the finished skull should measure about 5 inches wide at the widest part of the cranium and about 5 1/2 inches tall after the edging is added.
That finished measurement is calculated from the stitch and row gauge rather than taken from a physically test-made sample, so treat it as an expected size. A small difference is fine for an applique. What matters more is that the piece stays flat and keeps the same skull proportions.
If you're putting it on baby or toddler clothing, check the available chest area before you start. Five inches is a fairly noticeable applique on a small sweatshirt. For a smaller garment, use the resizing directions farther down the page instead of squeezing the full-size skull onto the front.
Materials for the Crochet Skull Applique
Yarn: Approximately 45 yards of smooth worsted weight #4 yarn in ivory or soft white.
Hook: 4 mm crochet hook, or the hook size needed to match gauge.
Embroidery: One skein of black six-strand cotton embroidery floss.
Other supplies: Yarn needle, sharp embroidery or chenille needle, scissors, rustproof blocking pins and matching sewing thread if you plan to attach the skull to clothing or fabric.
I prefer a smooth yarn for this pattern rather than fuzzy chenille. The row shaping and embroidered face are easier to see, and the applique lies flatter against clothing or a blanket.
Use a yarn that can be washed the same way as the item you're decorating. That matters more on baby clothes and blankets than it does on a wall hanging or tote.
Gauge
18 single crochet stitches and 20 rows = 4 inches.
The skull doesn't have to match gauge as closely as a fitted garment, but gauge does control its finished size. If your stitches are much larger, the skull will grow quickly and the jaw may look too broad for a small sweatshirt.
Keep the stitches firm enough that the black embroidery sits on the surface instead of sinking into large gaps. Don't crochet so tightly that the applique curls.
This pattern uses standard U.S. crochet abbreviations. If you need a refresher, the Craft Yarn Council crochet abbreviations page is a useful reference.
Abbreviations used: ch = chain, sc = single crochet, sc2tog = single crochet 2 stitches together, st = stitch, sts = stitches, sl st = slip stitch.
Increase: Work 2 sc in the same stitch.
Decrease: Work sc2tog over the next 2 stitches.
Each written ch 1, turn is the turning chain for the following row and does not count as a stitch. Do not chain 1 again after turning.
Free Crochet Skull Applique Pattern
With ivory yarn, ch 13.
Row 1: Sc in the second ch from the hook and in each ch across. Ch 1, turn. 12 sc.
Row 2: Sc in each st across. Ch 1, turn. 12 sc.
Row 3: Sc in each st across. Ch 1, turn. 12 sc.
Row 4: Sc in each st across. Ch 1, turn. 12 sc.
Those first four rows form the squared lower jaw. Keep them plain. The width starts changing in the next row.
Row 5: Work 2 sc in the first st, sc across to the last st, work 2 sc in the last st. Ch 1, turn. 14 sc.
Row 6: Work 2 sc in the first st, sc across to the last st, work 2 sc in the last st. Ch 1, turn. 16 sc.
Row 7: Sc in each st across. Ch 1, turn. 16 sc.
Rows 5 through 7 create the little flare at the sides of the lower face. Don't add extra increases here. The skull needs that brief widening before the temples pull back in.
Row 8: Sc2tog over the first 2 sts, sc across to the last 2 sts, sc2tog. Ch 1, turn. 14 sc.
Row 9: Sc in each st across. Ch 1, turn. 14 sc.
Rows 8 and 9 create the slight indentation at the temples. It is subtle on purpose. A deep indentation would make the finished skull look pinched in the middle.
Row 10: Work 2 sc in the first st, sc across to the last st, work 2 sc in the last st. Ch 1, turn. 16 sc.
Row 11: Work 2 sc in the first st, sc across to the last st, work 2 sc in the last st. Ch 1, turn. 18 sc.
Row 12: Work 2 sc in the first st, sc across to the last st, work 2 sc in the last st. Ch 1, turn. 20 sc.
Rows 13 through 19: Sc in each st across. Ch 1, turn after Rows 13 through 18. Do not turn after Row 19. 20 sc in each row.
That seven-row section gives the skull its broad rounded cranium and leaves enough solid fabric for the embroidered eye sockets.
Row 20: Ch 1 and turn. Sc2tog over the first 2 sts, sc across to the last 2 sts, sc2tog. Ch 1, turn. 18 sc.
Row 21: Sc in each st across. Ch 1, turn. 18 sc.
Row 22: Sc2tog over the first 2 sts, sc across to the last 2 sts, sc2tog. Ch 1, turn. 16 sc.
Row 23: Sc in each st across. Ch 1, turn. 16 sc.
Row 24: Sc2tog over the first 2 sts, sc across to the last 2 sts, sc2tog. Ch 1, turn. 14 sc.
Row 25: Sc in each st across. 14 sc.
Do not fasten off yet. The stepped decreases at the top create the rounded head once the edging is added.
Size checkpoint: Before adding the edging, the skull should be about 4 1/2 inches wide at the broadest part of the cranium and about 5 inches tall at the stated gauge. These are expected measurements calculated from the gauge, so a small difference is fine as long as the piece lies flat and the proportions look right.
Outer Edging: Ch 1. Do not turn. Rotate the work so you can crochet down the side edge.
Work 1 sc in the end of each of the 25 rows down the first side. Work 1 sc in each of the 12 unused foundation-chain loops across the bottom of the jaw. Work 1 sc in the end of each of the 25 rows up the second side. Work 1 sc in each of the 14 stitches across the top edge. Join with a sl st to the first edging sc. 76 sc around.
Fasten off. Choose the smoother side of the skull as the front, then weave the ivory ends into the opposite side so they stay on the wrong side.
Lay the skull flat and check the silhouette before adding the face. You should have a narrow squared jaw, a slight cheek flare, a small indentation at each temple and a much broader rounded upper head.
If the edge waves, the border stitches are probably too loose. If the skull cups, the border is too tight. Fix that before you embroider anything.
Lightly block the applique according to the care instructions for your yarn. Pin it into the skull shape without stretching the jaw wider than the head.
Embroider the Skull Face Details
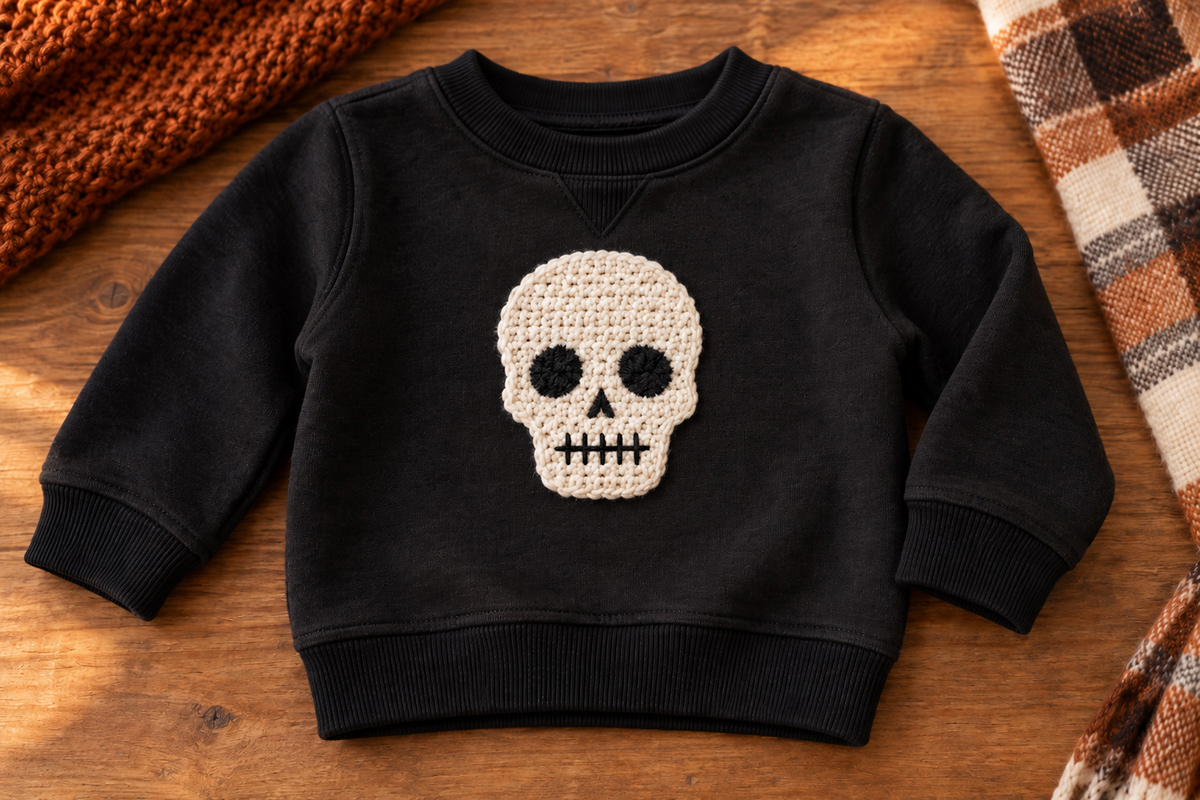
Use black embroidery floss for every facial feature. Do not crochet black circles for the eyes and do not crochet a separate nose. The flat embroidery is part of what keeps this skull looking like the example image.
With the chosen front facing you, thread the embroidery needle with all six strands of black floss for the eye sockets and nose.
Left eye socket: Place the eye over approximately Rows 13 through 17. Center it over about four stitches on the left half of the face. Leave several ivory stitches between the eye and the outside edge.
Outline a soft oval about 1 inch tall and a little less than 1 inch wide. Fill the oval with closely packed satin stitches worked directly over the ivory crochet. Place the stitches beside one another until very little ivory shows through.
Right eye socket: Repeat on the opposite side at the same height. Match the width, height and distance from the center of the face before filling it.
Don't pull the satin stitches hard. They should lie flat on the crochet surface without gathering the ivory fabric underneath.
Nose: Center the nose below the eye sockets over approximately Rows 9 and 10. Make a small inverted triangle about 1/2 inch wide across the top with the point facing down.
Fill the triangle with short satin stitches. Keep the nose noticeably smaller than either eye socket. The narrow ivory bridge between the eyes and nose helps the face read clearly.
Mouth: Use black floss to make one straight horizontal line across the center of the jaw at about Row 4. Keep the line roughly 2 inches wide and centered from side to side.
Add exactly five short vertical tooth stitches across the horizontal mouth line. Space them evenly. Each vertical stitch should cross the mouth line and extend a short distance above and below it.
Check the face from a few feet away before tying off the floss. If one eye is higher or the mouth tilts, fix it now. Once the applique is sewn to clothing, those little differences are harder to correct.
Secure the embroidery ends firmly on the wrong side of the skull. Trim the tails so nothing extends beyond the edge.
To attach the applique: Pin the finished skull in place. Use matching thread and small hand stitches around the entire ivory outer edge. Catch the edge of the crochet and a small amount of the garment or blanket fabric with each stitch.
Keep the attachment stitches close enough together that fingers can't easily catch under the applique. On stretchy clothing, don't pull the thread so tightly that the sweatshirt fabric puckers.
Final check: Remove every blocking pin, placement pin and needle. Run your fingers around the entire applique edge to make sure no section lifts, then check that the embroidery and attachment ends are securely fastened on the wrong side before the finished item is used or washed.
How to Make the Crochet Skull Smaller or Larger
I would change the yarn and hook before changing the stitch counts. The row shaping is what gives this particular skull its cheek, temple and cranium proportions. Adding random stitches or skipping shaping rows can turn it into a plain oval with a jaw stuck on the bottom.
For a smaller skull: Work the same pattern with sport weight #3 yarn and a hook around 3.25 to 3.5 mm. Your exact size will depend on gauge, but the finished applique should come out noticeably smaller while keeping the same proportions.
A smaller version makes more sense on a baby cardigan, small sweatshirt pocket area, bib or narrow blanket border.
For a larger skull: Use a heavier #5 yarn with an appropriately sized hook and work the same 25 rows. Keep the stitches fairly firm so the embroidery still has a solid surface.
The black face needs to scale with the skull too. Make the eye sockets and nose larger in proportion rather than leaving tiny features in the middle of a large head.
If you only need a small adjustment, change hook size by 0.5 mm and make a gauge swatch first. That's easier than rewriting the whole skull.
Baby Halloween Project Ideas for the Skull Applique
The black sweatshirt in the example keeps the skull easy to see, but you don't have to stay with black. Rust, charcoal, deep olive and muted plum all give the ivory skull enough contrast without turning every project into the same black-and-white combination.
On a baby or toddler sweatshirt, I would keep one skull centered on the chest and stop there. The motif is already large enough to be the main detail.
You could also put a smaller version on the upper corner of a cardigan, the front of a daytime romper, a trick-or-treat tote or the corner of a stroller blanket.
If you're making several Halloween projects, pair this skull with the crochet ghost applique pattern instead of covering one garment with several skulls. The two motifs give you some variety while still looking like they belong together.
You can find more seasonal projects in my free Halloween crochet patterns.
I would keep handmade yarn appliques on daytime clothing rather than altering children's sleepwear unless you know the finished garment still meets the rules that apply to it. The U.S. Consumer Product Safety Commission explains the requirements on its children's sleepwear regulations page.
Goth Baby and Kids Project Ideas
The skull doesn't have to disappear when Halloween is over. Change the surrounding colors and it can work on a more alternative or goth-inspired project without adding pumpkins, bats or other seasonal details.
For that version, I would keep the skull ivory and use charcoal, black, burgundy, dark plum or dusty rose for the fabric underneath it. The simple two-color skull is easier to mix with other clothes than a heavily decorated sugar-skull style motif.
A single skull can work on the back of a toddler cardigan, the front of a small tote, a denim-look fabric jacket panel or a handmade nursery storage bag.
If you want it softer for a nursery project, use warm ivory for the skull instead of bright white. Keep the embroidery black so the eyes, nose and five tooth stitches stay easy to read.
For more flat motifs that can be sewn onto handmade projects, browse my free crochet animal applique patterns. They aren't goth patterns, but the same flat-applique idea makes it easy to mix motifs across blankets, bags and clothing.
Skull Applique Ideas for Blankets
A blanket gives you more room, but I still wouldn't scatter skulls everywhere just because the surface is larger.
For a baby blanket, one skull near a lower corner is enough. Another option is to make three smaller skulls and space them in a simple row across one end of the blanket.
If the blanket already has stripes, granny squares or a busy stitch pattern, put the applique on a plain section where the ivory outline won't disappear into the texture.
Secure the entire outer edge rather than tacking down only the top and bottom. A blanket gets folded, washed and handled from every direction, so loose applique edges are more likely to catch.
If this is going on a blanket for a baby under 12 months, keep the finished blanket out of the crib, bassinet and other infant sleep spaces. Use it for supervised awake time or keep it as a handmade keepsake instead. The U.S. Consumer Product Safety Commission's Safe Sleep guidance says an infant sleep space should contain only a fitted sheet, with blankets and other soft items kept out.
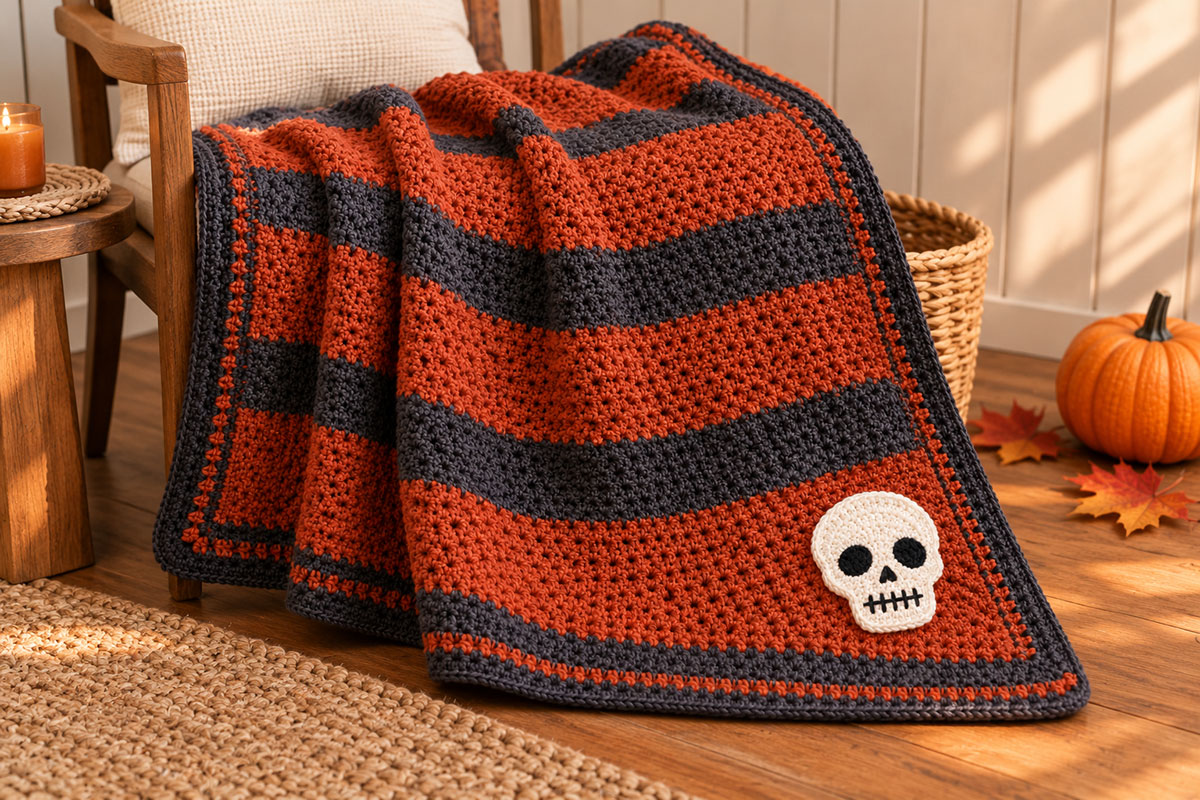
You can use the same idea on a larger throw by making the skull with heavier yarn rather than adding extra rows to the pattern. That keeps the recognizable shape intact.
If you're looking for another project after this one, my free baby crochet patterns collection has more handmade ideas for clothing, blankets and nursery projects.
When you click on links to various merchants on this site and make a purchase, this may result in this site earning a commission. This does not affect the price you pay.

UBGI Gold Standard 2026
Reviewed under the site's
editorial checklist.
Photos, decorating ideas, party setups and reader submissions are shared for inspiration unless a page is specifically presented as a pattern, tutorial, reference guide or step-by-step project. Follow the instructions, measurements, safety guidance and manufacturer directions provided for the particular project or product.
About Jan | Contact | Baby Nursery Ideas (Blog) | Site Map | Privacy Policy | Disclosure Policy | Disclaimer | Affiliate Disclosure | Earnings Disclosure | Facebook | Pinterest
I am a participant in the Amazon Services LLC Associates Program, an affiliate advertising program designed to provide a means for us to earn fees by linking to Amazon. As an Amazon Associate I earn from qualifying purchases.
Copyright © 2006-2026. All Rights Reserved.