Free Crochet Puppy Snuggler Pattern with Floppy Ears
By Jan Bay
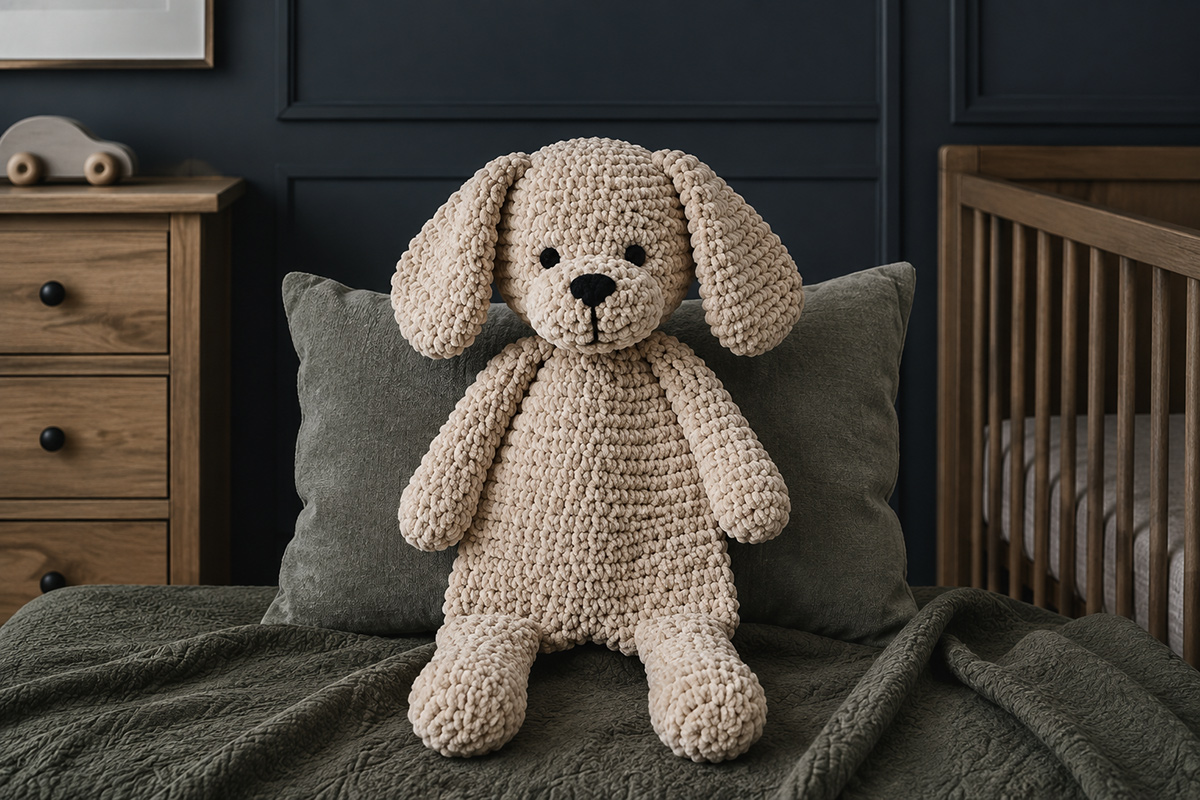
This free crochet puppy snuggler pattern makes a floppy little dog with a lightly stuffed head, long ears and a soft unstuffed body that bends and drapes instead of holding a stiff stuffed-animal shape. The arms and legs hang naturally from the body, while embroidered facial details keep the face soft and free of plastic eyes, a plastic nose or buttons.
Supplies for This Crochet Puppy Snuggler Pattern
Pattern at a Glance
Yarn and Supplies
Crochet the Puppy Head
Make the Floppy Ears
Crochet the Flat Puppy Body
Make the Arms and Legs
Assemble the Puppy Snuggler
Finishing and Shape Check
Puppy Snuggler FAQ
Free Crochet Puppy Snuggler Pattern at a Glance
This free crochet puppy snuggler pattern makes a full puppy-shaped snuggler with an oversized head, broad floppy ears, a rounded muzzle and a flat pear-shaped body. The head and muzzle have enough stuffing to hold their shape, while the torso stays completely unstuffed so the puppy can bend, fold and drape instead of sitting like a firm amigurumi toy.
The body is made from two matching shaped panels. Each panel starts narrow at the neck, widens gradually through the chest and then becomes fuller through the lower half before curving back toward the bottom. Joining those two panels gives the puppy the broad lower-body silhouette without filling the torso with stuffing.
The head is worked separately in continuous rounds. It stays generously sized in proportion to the body and finishes with an 18-stitch neck opening. After the face is finished, that opening is flattened into 9 pairs of stitches and sewn closed to keep the head stuffing contained. Each body panel has a 9-stitch top edge, giving you 9 matching front-and-back pairs when the head is attached.
The muzzle is a separate oval piece sewn low on the face and lightly filled before you close the final section of the seam. It should project enough to give the puppy a definite dog-shaped profile. The black eyes are embroidered with satin stitches, and the nose is built up with dense black satin stitches rather than using plastic safety eyes or a plastic nose. Add the short mouth line with black embroidery floss after the muzzle is attached.
Make the ears broad and long enough to hang beside the cheeks and below the lower part of the muzzle. They stay completely unstuffed. The chenille yarn gives them enough thickness on its own, so adding filling would make them too stiff for the floppy look.
The arms attach high on the sides of the torso and hang well below the chest. The legs are fuller than the arms and finish with rounded puppy paws. Use only a small amount of stuffing in the ends of the paws. Leave the upper arms and upper legs soft so the limbs can bend naturally when the puppy is picked up or laid down.
A small unstuffed tail is attached to the back of the lower body. Keep it simple. The head, ears, muzzle and pear-shaped torso are doing most of the visual work here.
Expected finished size: about 17 to 18 inches from the top of the head to the ends of the feet when worked at the gauge given below. That is a calculated finished measurement for this pattern, not a measurement taken from a physically test-made sample.
Construction: 11 crocheted pieces consisting of one head, one muzzle, two ears, two body panels, two arms, two legs and one tail.
Stuffing: lightly stuff the head and muzzle and use a small amount in the paw ends. Leave the body, ears, upper arms, upper legs and tail unstuffed.
Skill level: confident beginner to intermediate. You'll work single crochet in rows and continuous rounds, make increases and decreases, crochet around a foundation chain and sew the finished pieces together.
If you want the puppy head attached to a square security blanket instead, that's a different construction. The puppy lovey crochet pattern gives you that version. This one stays puppy-shaped from head to toe.
Yarn and Supplies for the Puppy Snuggler
I would use a soft chenille yarn for this puppy because the thicker yarn gives the flat body some substance without having to stuff it. Stay with the same yarn weight throughout the puppy so the head, body and limbs stay in proportion.
Yarn: #6 super bulky chenille yarn in a warm taupe, oatmeal or light brown. Have about 250 to 300 yards available. That amount is an estimate, so I'd rather have a little left over than run short near the end.
Hook: 6.0 mm crochet hook, or the size you need to reach the target gauge and make a dense fabric without obvious gaps.
You'll also need: black embroidery floss, polyester fiberfill, a yarn needle, an embroidery or tapestry needle that will carry the floss through the crochet fabric, stitch markers, scissors and a few removable pins or stitch markers for positioning the pieces before sewing.
Target gauge: approximately 10 single crochet stitches and 10 rows per 4 inches.
Gauge matters more than it sometimes does on a small stuffed project because we need the head, flat torso and long limbs to stay in proportion. If your stitches are noticeably larger, the puppy will grow quickly. If they're much smaller, you'll lose some of the broad, floppy look.
The fabric around the stuffed head and paws should be tight enough that the filling doesn't show between stitches. The body doesn't have that problem because we're leaving it empty.
US crochet terms used: ch = chain, sc = single crochet, inc = work 2 sc in the same stitch, dec = single crochet 2 stitches together, st = stitch, sts = stitches, rnd = round and MR = magic ring.
Unless a section tells you otherwise, work the three-dimensional pieces in continuous rounds without joining. Put a stitch marker in the first stitch of each round and move it up as you work.
Crochet the Puppy Head and Muzzle
Start with the head because its final 18-stitch opening determines the width of the body neck. The head is intentionally oversized for the body. Don't reduce it just because it looks big while you're working it. That generous puppy head is part of the finished shape.
Puppy Head
Use the main chenille yarn.
Round 1: Make 6 sc in a MR. (6 sts)
Round 2: Inc in each st around. (12 sts)
Round 3: [Sc in next st, inc in next st] 6 times. (18 sts)
Round 4: [Sc in next 2 sts, inc in next st] 6 times. (24 sts)
Round 5: [Sc in next 3 sts, inc in next st] 6 times. (30 sts)
Round 6: [Sc in next 4 sts, inc in next st] 6 times. (36 sts)
Round 7: [Sc in next 5 sts, inc in next st] 6 times. (42 sts)
Rounds 8 through 13: Sc in each st around. (42 sts for each round)
Round 14: [Sc in next 5 sts, dec] 6 times. (36 sts)
Round 15: [Sc in next 4 sts, dec] 6 times. (30 sts)
Round 16: [Sc in next 3 sts, dec] 6 times. (24 sts)
Start adding fiberfill. Fill the upper and side portions first and shape the head with your hands as you go. Keep it rounded rather than packing the stuffing so tightly that the stitches spread apart.
Round 17: [Sc in next 2 sts, dec] 6 times. (18 sts)
Add enough filling to hold the rounded head shape, but leave the last inch near the opening a little softer. Do not close the opening yet. Fasten off with a long yarn tail and leave the neck open while you attach the muzzle and embroider the face.
Rounded Puppy Muzzle
The muzzle is worked as a shallow oval and sewn onto the front of the head. It needs enough depth to give the finished puppy a recognizable dog profile, so don't flatten it against the face.
Round 1: Ch 5. Work 2 sc in the second ch from the hook, sc in each of the next 2 ch and 4 sc in the last ch. Turn the foundation chain so you can work along the unused loops on the opposite side. Sc in each of the next 2 loops and work 2 sc in the final unused loop. (12 sts)
Round 2: Inc in each of the next 2 sts, sc in next 2 sts, inc in each of the next 4 sts, sc in next 2 sts, inc in each of the final 2 sts. (20 sts)
Rounds 3 and 4: Sc in each st around. (20 sts)
Fasten off, leaving a long yarn tail.
Center the muzzle on the lower front of the head so its upper edge sits below the eye line. Pin it in place before sewing. Sew around most of the outer edge, tuck a small amount of fiberfill underneath the muzzle and finish the seam. The muzzle should project from the face without becoming hard or overfilled.
Embroider the Puppy Face
Use black embroidery floss for every facial feature. There are no plastic eyes, plastic noses or buttons in this pattern.
Place the eyes above the muzzle at about Round 10 to Round 11. Keep them level and leave roughly 5 to 6 crochet stitches between their centers. Each eye should be a small solid oval rather than a tiny dot.
Build each eye with satin stitches placed closely beside one another until the crochet underneath is covered. Keep both eyes the same height and width. A finished eye around 3/8 inch high works with the proportions of this head.
Center the nose on the upper half of the muzzle. Outline a soft triangular nose about 3/4 to 1 inch wide, then fill the entire shape with close black satin stitches. Run the stitches in the same direction so the surface looks like embroidery rather than a separate attached piece.
Bring one strand of black floss straight down from the bottom center of the nose for about 1/2 inch. Add a short curved mouth line to each side at the bottom. Keep those lines small. The broad muzzle and floppy ears already give the puppy plenty of expression.
Secure the embroidery floss ends inside the head while the neck is still open. Adjust the fiberfill if needed, keeping the area nearest the neck slightly softer. Flatten the 18-stitch neck opening so that 9 stitches sit across the front and 9 across the back. Whipstitch through the 9 pairs to close the head completely and secure the yarn tail. This closed seam becomes the bottom of the head and keeps the stuffing from moving down into the unstuffed body.
Make the Broad Floppy Puppy Ears
Each ear is crocheted as an empty tube and flattened before it is attached. That gives you two layers of chenille and a substantial-looking ear without putting stuffing inside it.
Make 2 with the main yarn.
Round 1: Make 6 sc in a MR. (6 sts)
Round 2: Inc in each st around. (12 sts)
Round 3: [Sc in next st, inc in next st] 6 times. (18 sts)
Rounds 4 through 8: Sc in each st around. (18 sts for each round)
Round 9: [Sc in next 4 sts, dec] 3 times. (15 sts)
Rounds 10 and 11: Sc in each st around. (15 sts)
Round 12: [Sc in next 3 sts, dec] 3 times. (12 sts)
Rounds 13 and 14: Sc in each st around. (12 sts)
Do not stuff the ear. Flatten Round 14 so that 6 stitches sit across the front and 6 across the back. Whipstitch through the 6 pairs to close the base. Fasten off with a long yarn tail for sewing.
At the target gauge, each ear should be roughly 5 1/2 to 6 inches long. The rounded lower end should be noticeably wider than the attachment end.
Set the finished ears aside until assembly. We'll sew each one high on the side of the head so it drops beside the cheek rather than sticking straight out.
Crochet the Flat Pear-Shaped Puppy Body
The body is the feature that keeps this project in snuggler territory rather than turning it into another stuffed puppy. Make two identical panels and leave the finished body completely empty.
Make 2 with the main chenille yarn. At the end of every row, turn. Ch 1 before beginning the next row. The turning chain does not count as a stitch.
Row 1: Ch 10. Starting in the second ch from the hook, sc across. (9 sts)
Row 2: Sc across. (9 sts)
Row 3: Inc in first st, sc in next 7 sts, inc in last st. (11 sts)
Row 4: Sc across. (11 sts)
Row 5: Inc in first st, sc in next 9 sts, inc in last st. (13 sts)
Rows 6 and 7: Sc across. (13 sts)
Row 8: Inc in first st, sc in next 11 sts, inc in last st. (15 sts)
Rows 9 through 12: Sc across. (15 sts)
Row 13: Dec over first 2 sts, sc in next 11 sts, dec over final 2 sts. (13 sts)
Rows 14 through 16: Sc across. (13 sts)
Fasten off the first panel. Make the second panel exactly the same way.
Before you join them, lay the panels on top of one another and check the shape. The 9-stitch neck edge should be the narrowest part. The body should widen gradually, reach 15 stitches through the fuller lower section and then narrow to a 13-stitch bottom edge.
At the target gauge, one panel calculates to about 6 1/4 to 6 1/2 inches from neck to bottom and about 6 inches across at its widest point.
Chenille yarn can vary quite a bit in thickness and how much it compresses, so check the shape of your panel before joining the two layers. You want a narrow neck, gradual widening through the chest and a noticeably fuller lower body. If your stitch counts are correct but the panel looks much narrower or wider than that, check your gauge before changing the increase or decrease rows.
Place the panels together with their edges lined up. Starting at the upper corner on one side, work 16 sc through both layers down the first side, placing one sc at the end of each body row. Work 13 sc across the lower edge, then 16 sc up the second side in the same way. You will have 45 joining stitches altogether. Leave both 9-stitch neck edges open. Fasten off and secure the yarn.
Do not put any fiberfill between these panels. If the empty body folds when you pick it up, that's what we want.
Make the Long Arms, Dangling Legs and Tail
The limbs need enough shape at the ends to look like puppy paws, but the upper portions stay soft. If you fill the entire arm or leg firmly, the puppy won't have the relaxed drape this design needs.
Long Puppy Arms
Make 2.
Round 1: Make 6 sc in a MR. (6 sts)
Round 2: Inc in each st around. (12 sts)
Round 3: [Sc in next 3 sts, inc in next st] 3 times. (15 sts)
Rounds 4 and 5: Sc in each st around. (15 sts)
Round 6: [Sc in next 3 sts, dec] 3 times. (12 sts)
Put a small amount of fiberfill into the rounded paw end now. Keep the filling below Round 7.
Rounds 7 through 13: Sc in each st around. (12 sts)
Leave Rounds 7 through 13 unstuffed. Flatten the upper opening into 6 pairs of stitches and whipstitch the opening closed. Fasten off with a long yarn tail.
Make the second arm the same way.
Fuller Puppy Legs
Make 2.
Round 1: Make 6 sc in a MR. (6 sts)
Round 2: Inc in each st around. (12 sts)
Round 3: [Sc in next st, inc in next st] 6 times. (18 sts)
Rounds 4 through 6: Sc in each st around. (18 sts)
Round 7: [Sc in next 4 sts, dec] 3 times. (15 sts)
Round 8: [Sc in next 3 sts, dec] 3 times. (12 sts)
Lightly fill the rounded lower portion of the leg. Keep the stuffing in Rounds 1 through 8 and stop before the narrow upper leg begins.
Rounds 9 through 14: Sc in each st around. (12 sts)
Leave Rounds 9 through 14 unstuffed. Flatten the top into 6 pairs of stitches and whipstitch the opening closed. Fasten off with a long yarn tail.
Make the second leg the same way.
Small Floppy Tail
The tail is deliberately simple and stays unstuffed.
Round 1: Make 6 sc in a MR. (6 sts)
Rounds 2 through 6: Sc in each st around. (6 sts)
Do not add stuffing. Flatten the opening into 3 pairs of stitches and stitch it closed. Leave a long tail for sewing.
Assemble the Crochet Puppy Snuggler
I would pin every piece in place before doing the final sewing. A half inch in the wrong direction can change the expression of the face or make one limb appear noticeably higher than the other.
Because the two body panels are identical, choose one side of the joined body as the front and the other as the back before you begin attaching the pieces. Keep that orientation the same through the rest of the assembly.
Attach the Head
Hold the head above the open neck of the body with the face centered over the front body panel. The closed base of the head has 9 paired attachment positions, and each body panel has 9 stitches across its neck edge.
Using a fresh length of the main yarn, match each of the 9 closed head-base positions with one front-panel neck stitch and the corresponding back-panel neck stitch. Sew through the head base and both body layers at each of the 9 positions. This closes the body neck and attaches the head in the same seam.
Check the placement after the first few stitches. The head should sit directly over the narrow body neck without a gathered ruffle, stretched edge or gap between the head and torso.
Attach the Ears
Pin one ear high on each side of the head. Set the upper end of the 6-stitch flattened base at about Round 7 and the lower end at about Round 12. Distribute the 6 base stitches evenly along that diagonal line so each stitch has a clear attachment point. The ears should begin near the upper side of the head and fall beside the cheeks.
Look at the puppy from the front before sewing. Both ears should start at the same height, but they don't have to hang in perfectly identical curves. They are supposed to be floppy.
Sew across the flattened base of each ear, then make a second pass through the attachment area for a secure seam.
Attach the Arms
Place one arm on each side of the upper torso. Match the 6 stitches across the flattened arm base to the 6 consecutive side-joining stitches that correspond with Body Rows 3 through 8. Pin those six positions before sewing so both arms begin and end at the same height.
Before sewing, let both arms hang freely. The paw ends should fall well below the chest and the two arms should appear even in length.
Sew each flattened arm base securely through the joined body edge. Do not stitch the long unstuffed portion of the arm against the torso. It needs to remain free to hang.
Attach the Legs
The joined lower body edge has 13 joining stitches. That gives you an exact placement for the two 6-stitch leg bases.
With the puppy facing you, attach the first leg across lower-edge joining stitches 1 through 6. Leave joining stitch 7 uncovered in the center. Attach the second leg across joining stitches 8 through 13.
Sew through the flattened leg base and both body layers. The single uncovered center stitch makes a small natural separation between the legs instead of pushing them together into one wide lower edge.
Attach the Tail
Turn the puppy over. On the back body panel, center the 3-stitch tail base across stitches 6 through 8 of Body Row 13. Sew the flattened base securely to those three stitches and leave the rest of the tail loose and unstuffed.
Finishing and Shape Check
Remove every pin and removable stitch marker used while crocheting or during assembly. Weave in every yarn end securely and work the ends back through several stitches before trimming them. Check the embroidered face as carefully as the crochet seams. No loose loop of embroidery floss should be left where it can be pulled away from the face.
Lay the finished puppy flat and compare the two sides before deciding you're done.
Head: The head should be roughly 5 to 5 1/2 inches across and look noticeably large in relation to the upper torso.
Ears: Each ear should be about 5 1/2 to 6 inches long, remain completely unstuffed and fall beside the face.
Body: Expect roughly 6 1/4 to 6 1/2 inches from the neck edge to the lower edge, with the widest portion around 6 inches across. The lower half should be broader than the chest. These are calculated dimensions at the stated gauge.
Arms: The arms should be long enough to hang well below the chest. Only the paw ends should feel lightly filled.
Legs: The legs should look fuller than the arms and hang independently from the two lower corners of the body. Check that the single center stitch remains visible between their attachment points.
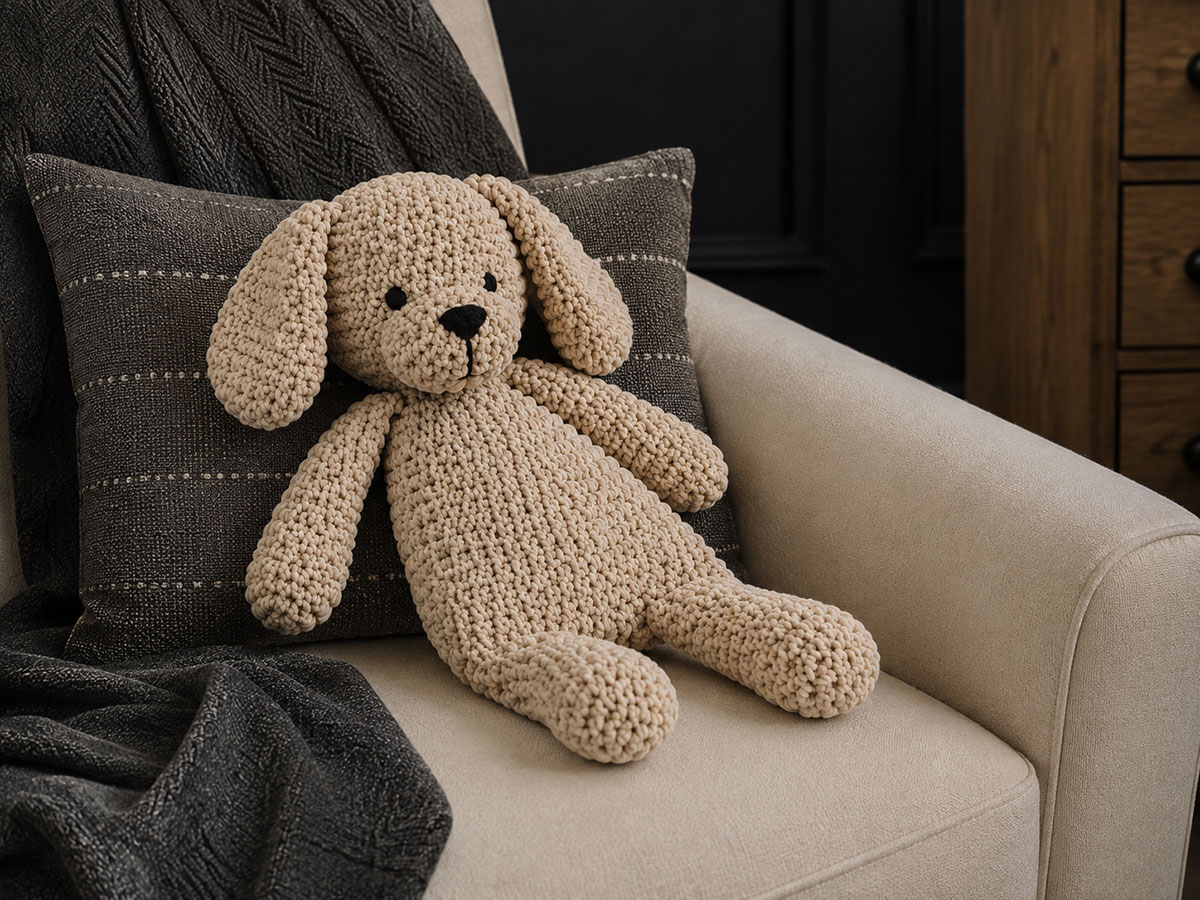
Drape: Pick the puppy up beneath the head. The body should hang rather than staying rigid, and the upper arms and legs should bend easily. If the torso behaves like a stuffed animal body, something has been added or worked too stiffly.
Face: Both eyes and the nose should be completely embroidered with black floss. If you can see chenille through the satin stitches, add another pass or two instead of attaching a separate plastic feature.
If you're making this for a baby, treat it as a cuddle or play item rather than something to leave in an infant's sleep space. The American Academy of Pediatrics recommends keeping toys and other soft objects out of an infant's sleep area. You can read the AAP safe sleep guidance here.
Once the seams, embroidery and shape all look right, give the chenille surface a gentle hand smoothing. Don't brush it or pull at individual loops. The finished puppy should stay soft, floppy and distinctly puppy-shaped from the oversized head all the way down to the dangling feet.
Crochet Puppy Snuggler Pattern FAQ
Why isn't the puppy body stuffed?
The empty body is intentional. Two shaped chenille panels give the puppy a broad torso while still letting it bend and drape. Filling the torso would change it into a more traditional stuffed crochet dog and would also move this project much closer to a different construction than the snuggler shown here.
Can I use worsted weight yarn instead of chenille?
You can crochet the same stitch counts with another yarn, but you won't get the same finished puppy. A thinner yarn will make the head, ears, paws and body substantially smaller and will change the proportions and drape. If you want to keep the proportions used in this pattern, I'd stay with super bulky chenille and match the stated gauge.
Can I stuff the arms and legs all the way to the body?
I wouldn't. Keep the stuffing down in the paw ends. The empty upper limbs are what let the arms and legs hang naturally instead of sticking away from the torso.
Why does the body start with only 9 stitches?
The head finishes with 18 neck stitches, which are flattened into 9 pairs and sewn closed after the face is finished. Each body panel has a 9-stitch neck edge, so the closed head base lines up with 9 matching front-and-back body positions. That keeps the neck smooth without gathering either piece.
What if my body looks too narrow through the lower half?
Check the gauge before changing the pattern. The panel should reach 15 stitches across Rows 8 through 12. At the target gauge, that's about 6 inches wide. If you have 15 stitches but the panel is much narrower, your crochet is tighter than the pattern gauge.
Can I use plastic safety eyes or a plastic nose?
This pattern is designed around embroidered features, so I'd keep them that way. The eyes and triangular nose are made with black satin stitches, and no buttons or plastic facial pieces are needed.
When you click on links to various merchants on this site and make a purchase, this may result in this site earning a commission. This does not affect the price you pay.

UBGI Gold Standard 2026
Reviewed under the site's
editorial checklist.
Photos, decorating ideas, party setups and reader submissions are shared for inspiration unless a page is specifically presented as a pattern, tutorial, reference guide or step-by-step project. Follow the instructions, measurements, safety guidance and manufacturer directions provided for the particular project or product.
About Jan | Contact | Baby Nursery Ideas (Blog) | Site Map | Privacy Policy | Disclosure Policy | Disclaimer | Affiliate Disclosure | Earnings Disclosure | Facebook | Pinterest
I am a participant in the Amazon Services LLC Associates Program, an affiliate advertising program designed to provide a means for us to earn fees by linking to Amazon. As an Amazon Associate I earn from qualifying purchases.
Copyright © 2006-2026. All Rights Reserved.