Free Crochet Frog Blanket Lovey Pattern
By Jan Bay
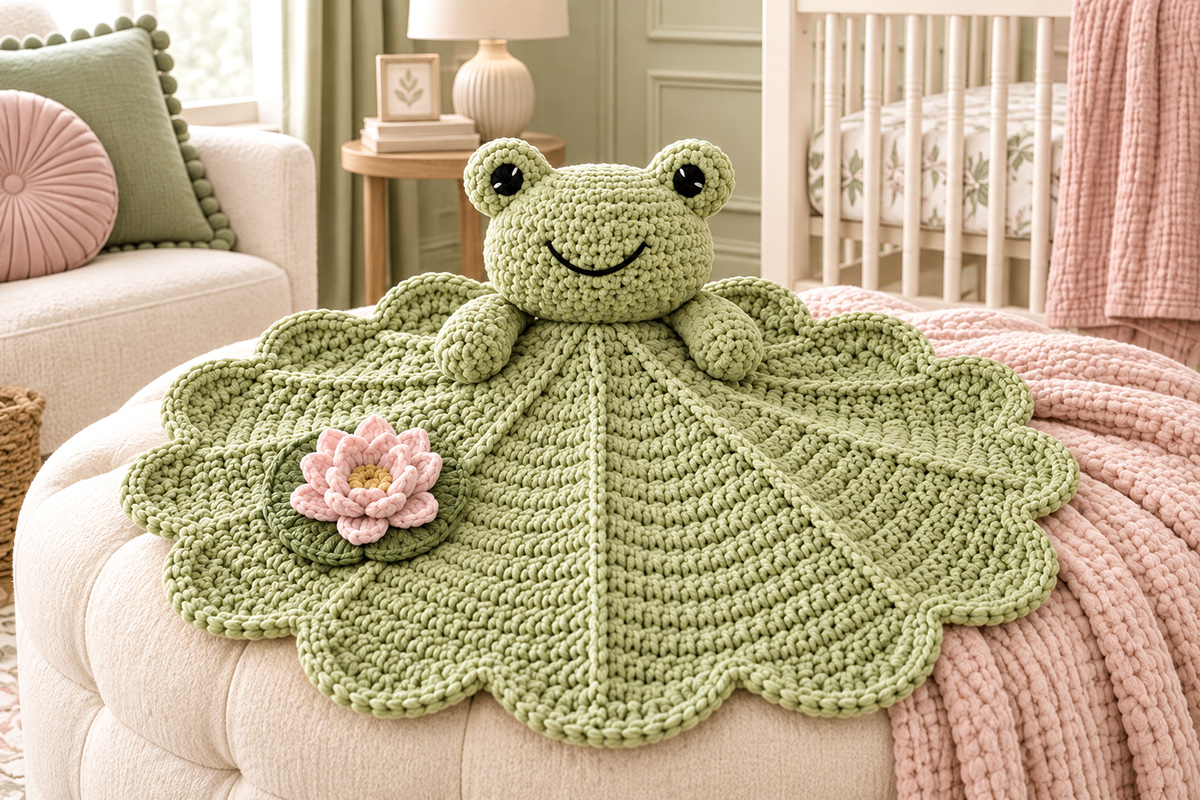
This free crochet frog blanket lovey pattern creates a charming frog complete with its very own round lily pad inspired blanket. There is also an optional attached pink crochet lily flower that adds a pretty pond detail if you want to get fancy. Unlike a traditional stuffed frog, this baby lovey combines a sweet frog character with a soft blanket made for cuddling. The gently textured green blanket adds another layer of comfort to the classic frog design.
Explore More Free Crochet Baby Patterns
Long Leggy Frog Snuggler Lovey
Worsted Weight Yarn for Crochet Lovey Patterns
Jump to:
Materials for the Frog Lovey
I’d use a smooth worsted weight yarn for this one. The raised lines in the lily pad and those big scallops are part of the design, so I wouldn’t swap in chenille or another fuzzy yarn that hides the stitches. The smoother yarn also keeps the blanket from feeling as bulky while showing off all that lily pad texture.
- Approximately 400 to 450 yards worsted weight yarn in sage green for the blanket, raised ribs, frog head, eye bumps and arms
- Approximately 20 yards darker green worsted weight yarn for the small lily pad beneath the flower
- Approximately 20 to 25 yards blush pink worsted weight yarn for the lily petals
- A few yards of soft yellow or muted mustard worsted weight yarn for the flower center
- Small amount of black embroidery floss for the eyes and smile
- Small amount of white embroidery floss for the tiny eye highlights, optional
- 4 mm crochet hook, or the size needed to match the gauge below
- Polyester fiberfill for the frog head, eye bumps and ends of the arms
- Yarn needle
- Embroidery needle
- Removable stitch markers
- Rustproof straight pins or additional locking stitch markers for positioning pieces
- Scissors
A washable cotton and acrylic blend is a good choice if you want the stitches to stay crisp while keeping the lovey soft. Whatever yarn you choose, use the same weight throughout the frog and blanket so the proportions stay close to the example.
Finished Size and Gauge
At the gauge below, expect the finished lily pad blanket to measure about 13 to 14 inches across from scallop tip to scallop tip. The frog head should finish about 4 1/2 inches wide. Once assembled, the lovey should measure roughly 12 to 13 inches from the top of the raised eyes to the lowest blanket edge, depending on stuffing and blocking.
The pink lily should finish about 2 1/2 to 3 inches across. Its darker green pad should be about 3 inches across.
These finished measurements and yarn amounts are calculated estimates based on the stated gauge and construction. They are not measurements from a physically test-crocheted sample, so allow a little extra yarn and expect small differences from yarn choice, tension, stuffing and blocking.
Blanket gauge: about 15 double crochet stitches and 8 rounds over 4 inches.
Frog gauge: about 17 single crochet stitches and 18 rounds over 4 inches.
Exact gauge matters most if you want the proportions shown in the example image. Check the blanket after Round 7. It should be close to 7 inches across before the edging. After Round 11, it should be close to 11 inches across before the large scallops are added.
If your blanket is noticeably smaller, go up a hook size. If it is already larger, go down a hook size. Fix that early instead of trying to make the scalloped border compensate for it.
Crochet Abbreviations
- MR = magic ring
- ch = chain
- sc = single crochet
- dc = double crochet
- tr = treble crochet
- sl st = slip stitch
- surface sl st = surface slip stitch worked across the surface of the fabric
- inc = work 2 stitches in the same stitch
- dec = single crochet 2 stitches together
- FLO = front loop only
- BLO = back loop only
- st = stitch
- sts = stitches
- rnd = round
- rep = repeat
- RS = right side
This pattern uses standard U.S. crochet terms.
Free Crochet Frog Blanket Lovey Pattern Notes
The blanket and frog are built separately and joined at the end. The round blanket is worked in joined double crochet rounds, followed by twelve large scallops. Twelve raised surface crochet lines are added afterward to give the blanket the pronounced lily pad sections shown in the example image.
Before assembly, you should have six main pieces: one lily pad blanket, one frog head, two raised eye bumps and two arms. If you're adding the flower, you will also have one darker green flower pad and one pink and yellow lily, for eight pieces altogether.
The frog head, eye bumps, arms and yellow flower center are worked in continuous rounds. Use a stitch marker in the first stitch of each piece and move it up as you work. The blanket and darker green flower pad are worked in joined rounds as written.
Chain 2 at the beginning of each joined double crochet round does not count as a stitch. Join each joined round with a slip stitch in the first double crochet unless the instructions say otherwise.
Keep the blanket increases relaxed. If the center begins to cup, your stitches are probably too tight. If the blanket starts to ruffle before the scalloped edge is added, check your stitch count before going farther.
The twelve scallops and twelve raised ribs are intentional. Keep that number the same if you want your finished lovey to match the example.
The pink lily is optional, but I’d keep it. That little flower and green pad are what turn the round blanket from simply green into an obvious little pond inspired design.
A Note About Using a Lovey with a Baby
This pattern uses embroidered facial features instead of plastic eyes or buttons, and every decorative piece should be sewn down securely. Check the lovey regularly for loose yarn, pulled stitches or damaged embroidery.
A lovey is not infant sleep bedding. The U.S. Consumer Product Safety Commission recommends keeping a baby's sleep space bare, with no blankets, pillows or toys added. You can read the current CPSC safe sleep guidance before giving any handmade blanket or lovey for a baby.
Crochet the Round Lily Pad Blanket
Use the main sage green yarn. The blanket starts as a simple flat circle. Don’t worry that it doesn’t look much like a lily pad yet. The large scallops and raised ribs do most of that work later.
Round 1: Make an MR. Ch 2. Work 12 dc into the ring. Pull the ring closed and join with a sl st in the first dc. 12 sts
Round 2: Ch 2. Work 2 dc in every st around. Join. 24 sts
Round 3: Ch 2. *Dc in the next st, 2 dc in the next st.* Rep around. Join. 36 sts
Round 4: Ch 2. *Dc in the next 2 sts, 2 dc in the next st.* Rep around. Join. 48 sts
Round 5: Ch 2. *Dc in the next 3 sts, 2 dc in the next st.* Rep around. Join. 60 sts
Round 6: Ch 2. *Dc in the next 4 sts, 2 dc in the next st.* Rep around. Join. 72 sts
Round 7: Ch 2. *Dc in the next 5 sts, 2 dc in the next st.* Rep around. Join. 84 sts
Lay the work flat here. At the listed gauge, it should measure close to 7 inches across. A little variation is fine, but it should lie flat without a bowl shape or obvious ruffling.
Round 8: Ch 2. *Dc in the next 6 sts, 2 dc in the next st.* Rep around. Join. 96 sts
Round 9: Ch 2. *Dc in the next 7 sts, 2 dc in the next st.* Rep around. Join. 108 sts
Round 10: Ch 2. *Dc in the next 8 sts, 2 dc in the next st.* Rep around. Join. 120 sts
Round 11: Ch 2. *Dc in the next 9 sts, 2 dc in the next st.* Rep around. Join. 132 sts
Check the blanket again. Before the scallops, the circle should be close to 11 inches across.
Make the Twelve Large Scallops
Each scallop uses exactly 11 stitches from Round 11. Twelve repeats use all 132 stitches.
Scallop Round: *Sl st in the next st, skip the next 2 sts, work 2 dc in the next st, 3 tr in the next st, 5 tr in the next st, 3 tr in the next st, 2 dc in the next st, skip the next 2 sts, sl st in the next st.* Rep from * to * 11 more times. 12 scallops
Fasten off the sage yarn and weave in the end securely before beginning the raised lily pad ribs.
Don’t pull the slip stitches at the valleys tight. Those valleys should dip gently between the rounded scallops rather than puckering the blanket.
Add the Raised Lily Pad Ribs
Lay the blanket RS up. Place a marker in each valley between two scallops. You should have twelve evenly spaced valley points.
For the first rib, hold the sage working yarn behind the blanket. Insert the hook from the RS at the outer edge of Round 1 on an imaginary straight line leading toward the first marked valley and pull up a loop.
Working outward, make two loose surface sl sts across each dc round from Round 2 through Round 11. Place the first about halfway across the height of the round and the second at the outer edge of that round. Finish with one final surface sl st in the marked scallop valley. You should have 21 surface sl sts in the rib. Keep the stitches relaxed and close to the fabric so the rib is raised without drawing the blanket inward.
Fasten off at the valley.
Repeat the same 21-stitch path from the center to each of the remaining eleven marked valleys. You will have 12 raised ribs, each with 21 surface sl sts, dividing the blanket into twelve broad lily pad sections.
Look at the blanket from a few feet away before weaving in every rib end. The lines should radiate evenly from the center. If one wanders noticeably, it’s worth pulling out that one line and doing it again.
Weave in all blanket ends securely.

Crochet the Frog Head
Use the main sage yarn. The head should be softly rounded and substantial enough to sit above the blanket without looking like a tiny amigurumi head stuck onto a large circle.
Round 1: Make an MR and work 6 sc into the ring. 6 sts
Round 2: Inc in every st around. 12 sts
Round 3: *Sc in the next st, inc in the next st.* Rep around. 18 sts
Round 4: *Sc in the next 2 sts, inc in the next st.* Rep around. 24 sts
Round 5: *Sc in the next 3 sts, inc in the next st.* Rep around. 30 sts
Round 6: *Sc in the next 4 sts, inc in the next st.* Rep around. 36 sts
Round 7: *Sc in the next 5 sts, inc in the next st.* Rep around. 42 sts
Round 8: *Sc in the next 6 sts, inc in the next st.* Rep around. 48 sts
Round 9: *Sc in the next 7 sts, inc in the next st.* Rep around. 54 sts
Round 10: *Sc in the next 8 sts, inc in the next st.* Rep around. 60 sts
Rounds 11 through 18: Sc in every st around. 60 sts
Round 19: *Sc in the next 8 sts, dec.* Rep around. 54 sts
Round 20: *Sc in the next 7 sts, dec.* Rep around. 48 sts
Round 21: *Sc in the next 6 sts, dec.* Rep around. 42 sts
Round 22: *Sc in the next 5 sts, dec.* Rep around. 36 sts
Begin stuffing. Keep the front smoothly rounded but don’t pack the head rock hard.
Round 23: *Sc in the next 4 sts, dec.* Rep around. 30 sts
Round 24: *Sc in the next 3 sts, dec.* Rep around. 24 sts
Add the remaining stuffing.
Round 25: *Sc in the next 2 sts, dec.* Rep around. 18 sts
Round 26: *Sc in the next st, dec.* Rep around. 12 sts
Round 27: Dec around. 6 sts
Fasten off, leaving a long tail for assembly. Close the remaining opening, but do not weave in the tail. At the stated gauge, the finished head should be about 4 1/2 inches wide. Gently shape it with your hands so the face is slightly broader than it is tall.
Make Two Raised Eye Bumps
Make two in sage.
Round 1: MR, 6 sc. 6 sts
Round 2: Inc around. 12 sts
Round 3: *Sc in the next st, inc in the next st.* Rep around. 18 sts
Round 4: *Sc in the next 2 sts, inc in the next st.* Rep around. 24 sts
Rounds 5 and 6: Sc around. 24 sts
Before closing the eye bump, use black embroidery floss to make an open oval eye on the front. Build the oval with closely placed satin stitches until the black area is solid and smooth. If you want the small highlight shown in the example, add one tiny white embroidery stitch near the upper outside of the black eye.
Secure the embroidery knots inside the piece where they will be covered by stuffing.
Round 7: *Sc in the next 2 sts, dec.* Rep around. 18 sts
Add a small amount of stuffing. The bump needs enough shape to stand above the head, but it should not become a hard ball.
Fasten off with a long tail for sewing.
Position the eye bumps across the upper third of the frog head with their centers about 2 1/2 to 2 3/4 inches apart. Angle them slightly outward as shown in the example. Pin both before sewing so you can compare them from the front.
Using the long sewing tail, stitch through each of the 18 stitches around the open lower edge of the eye bump and into the frog head beneath it. Distribute the stitches evenly so the edge sits flat against the head. Make a second pass around the attachment if needed, then weave the tail well inside the head.
Embroider the Smile
Thread black embroidery floss and make a small knot in the starting end. Insert the needle through the lower back of the stuffed head and bring it out at one end of the smile. Gently pull until the knot slips just beneath the crochet fabric and is buried in the stuffing.
Make a smooth curved smile about 2 to 2 1/4 inches wide and center it below the eyes. Use small backstitches or couch a longer strand into place rather than pulling one tight stitch across the face.
At the end of the smile, take one small securing stitch beneath the embroidery, then pass the needle back through the stuffed head and out through the lower back about 1 to 2 inches away. Pull gently, trim the floss close to the surface and massage the fabric so the cut end retracts inside the head.
Keep the curve shallow. The wide simple smile is part of the frog's expression in the example.
Crochet the Frog Arms
Make two in sage. These are short arms, not long frog legs. They should rest over the blanket on either side of the head.
Round 1: MR, 6 sc. 6 sts
Round 2: Inc around. 12 sts
Round 3: *Sc in the next st, inc in the next st.* Rep around. 18 sts
Rounds 4 and 5: Sc around. 18 sts
Round 6: *Sc in the next st, dec.* Rep around. 12 sts
Lightly stuff the rounded end of the arm. Leave the remaining arm unstuffed or only barely filled so it bends naturally over the blanket.
Rounds 7 through 14: Sc around. 12 sts
Fasten off with a long sewing tail. Flatten the open end. Each arm should measure about 3 to 3 1/2 inches long.
Crochet the Optional Pink Lily Flower and Green Pad
You can leave the flower off and still have a finished frog lovey. I prefer it with the flower. The darker green pad underneath also gives the pink some separation from the sage blanket instead of letting the whole detail disappear into one color.
Green Lily Pad
Use the darker green yarn.
Round 1: MR. Ch 2. Work 12 dc into the ring. Join. 12 sts
Round 2: Ch 2. Work 2 dc in every st around. Join. 24 sts
Round 3: Ch 2. *Dc in the next st, 2 dc in the next st.* Rep around. Join. 36 sts
Fasten off, leaving about a 30-inch tail for attaching the completed flower pad to the blanket later. The pad should be about 3 inches across. Set it aside while you make the flower.
Pink Water Lily
Begin with the yellow yarn.
Round 1: MR, 6 sc. 6 sts
Round 2: Inc around. 12 sts
Fasten off yellow. With the right side facing you, join the pink yarn with a sl st in any front loop of Round 2. This joining sl st uses the first front loop and forms the first valley between petals.
Inner Petal Round: In the next front loop, work ch 2, 2 dc, 1 tr, 2 dc, ch 2 and sl st in that same loop. Then repeat the following sequence 5 times: sl st in the next front loop; in the following front loop, work ch 2, 2 dc, 1 tr, 2 dc, ch 2 and sl st in that same loop. You will have 6 inner petals and will have used all 12 front loops.
Fasten off pink.
With the right side of the flower facing you, gently lift the inner petals out of the way to expose the 12 unused back loops from Round 2. Join pink yarn with a sl st in any unused back loop. This joining sl st uses the first back loop and forms the first valley between the larger petals. Keep the right side facing you while working the outer petal round.
Outer Petal Round: In the next back loop, work ch 3, 7 tr, ch 3 and sl st in that same loop. Then repeat the following sequence 5 times: sl st in the next back loop; in the following back loop, work ch 3, 7 tr, ch 3 and sl st in that same loop. You will have 6 larger outer petals behind the first six and will have used all 12 back loops.
Fasten off and weave the pink ends toward the center of the flower.
Shape the petals with your fingers. The outer petals should sit fairly flat while the six smaller center petals stand slightly higher around the yellow center.
Join the Flower to Its Green Pad
Cut a separate piece of pink yarn about 18 inches long and thread it onto the yarn needle. Center the pink lily over the darker green pad. Sew through the flower center and the pad several times, then add a few small hidden stitches beneath the inner petals so the flower cannot twist or lift away from its base. Weave both pink yarn ends securely into the back of the green pad.
Do not use the long darker green pad tail for this step. Leave that tail intact for attaching the completed flower pad to the blanket.
Assembly and Finishing
Spread the finished lily pad blanket flat with the raised ribs facing up. Decide which scallop will be the front center. Once the head and, if used, the flower are attached, that orientation becomes permanent.
Attach the Frog Head
Center the bottom of the frog head over the blanket's center ring with the face pointing toward the front center scallop.
Use four pins or locking stitch markers to outline an attachment area about 2 1/2 inches wide and 1 1/2 inches from front to back. Keep this area within approximately Rounds 1 through 3 of the blanket so the attachment stays centered.
Using the long tail left on the frog head, sew the lower third of the head securely around that marked area. Catch both the head fabric and blanket stitches without pulling the center into a bowl shape. Make a second sewing pass around the same attachment area.
Remove the positioning pins or markers and set the lovey down flat. The head should sit upright without pulling the center of the blanket upward.
Attach the Arms
Position one arm on each side of the head with the rounded ends pointing forward over the blanket.
Flatten the 12-stitch opening of each arm so it forms six paired edge positions. Sew through all six paired positions, attaching the upper arm securely to the lower side of the head and the blanket immediately beneath it. Angle the arms slightly inward rather than letting them stick straight out to the sides.
To keep the finished lovey looking like the example, cut a separate piece of sage yarn about 18 inches long and thread it onto the yarn needle. Secure it on the wrong side of the blanket beneath one hand, then tack the underside of the rounded hand to the blanket with two or three small hidden stitches. Weave the yarn ends securely into the wrong side of the blanket. Repeat for the second hand. The hands will still look relaxed, but they won't flop behind the head.
Attach the Pink Lily
Place the green flower pad in one of the lower side sections of the blanket. In the example it sits on the viewer's left when looking at the frog face-on, with its outer edge about 1 inch inside the scalloped edge.
Pin it before sewing. Center the pad between two raised ribs when possible. A slight overlap at the edge of a rib is fine, but don't center the flower directly over one of the raised lines because you still want the lily pad texture to show around it.
Using the darker green tail, sew through each of the 36 edge stitches of the green pad and into the blanket beneath it. Add several evenly spaced hidden stitches through the center as well. The flower should be firmly attached with no loose edge large enough for little fingers to pull away from the blanket.
Final Check
Remove every positioning pin and removable stitch marker. Weave in every remaining yarn end on the wrong side and bury the tails through several inches of stitches before trimming them.
Check both eye bumps, both arms and the head. If you added the flower, check that attachment too. Tug each attached piece gently. Nothing should shift away from the blanket.
Lay the lovey flat and check the twelve scallops and twelve raised ribs. Smooth each section outward from the center with your hands. If needed, lightly block the blanket without soaking the stuffed frog head.
You should now have the same basic proportions as the example: one round sage lily pad blanket with twelve raised sections and twelve large scallops and a centered frog head with two short arms. If you added the optional flower, the pink lily should sit securely on its darker green pad in one lower side section of the blanket.
Make It Without Changing the Design
The flower is the easiest piece to make optional. Leave it off and the stitch counts for the frog and blanket stay exactly the same.
You can also change the colors without changing the construction. A deeper pond green, fresh spring green or muted olive can work for the main blanket. Keep enough contrast between the blanket and the smaller flower pad so the pink lily still has a defined edge.
I would not change the round blanket to a granny square or remove the raised ribs if you want this particular frog lovey. Those two details are what give the blanket its lily pad shape instead of making it look like a frog head attached to a generic baby blanket.
If you'd rather make a frog with a completely different silhouette, the long legged crochet frog lovey pattern has the stuffed snuggler style instead. You can also browse the crochet animal lovey patterns for more blanket and animal combinations.
Before You Call It Finished
Set the lovey on a flat surface and look at the whole piece instead of checking one stitch at a time. The frog should sit squarely over the center and the two arms should mirror each other. If you added the flower, it should sit securely in one lower side section without hiding the surrounding lily pad texture.
The blanket doesn't have to be stiff and perfectly flat. It should have enough drape to cuddle. What you don't want is a center that bowls upward or an edge that ruffles before the scallops begin.
If those proportions look right, stop. The big scallops and raised green ribs already give the blanket its lily pad character, and the optional pink lily adds the finishing detail if you chose to include it.
When you click on links to various merchants on this site and make a purchase, this may result in this site earning a commission. This does not affect the price you pay.

UBGI Gold Standard 2026
Reviewed under the site's
editorial checklist.
Photos, decorating ideas, party setups and reader submissions are shared for inspiration unless a page is specifically presented as a pattern, tutorial, reference guide or step-by-step project. Follow the instructions, measurements, safety guidance and manufacturer directions provided for the particular project or product.
About Jan | Contact | Baby Nursery Ideas (Blog) | Site Map | Privacy Policy | Disclosure Policy | Disclaimer | Affiliate Disclosure | Earnings Disclosure | Facebook | Pinterest
I am a participant in the Amazon Services LLC Associates Program, an affiliate advertising program designed to provide a means for us to earn fees by linking to Amazon. As an Amazon Associate I earn from qualifying purchases.
Copyright © 2006-2026. All Rights Reserved.