Free Crochet Baby Hat Pattern with a Large Flower
By Jan Bay
This free crochet baby hat pattern with a large flower makes the flower the focal point instead of covering the hat with several decorations. The finished hat has a simple fitted shape with one oversized layered crochet flower at the side, so the project works best when the hat itself stays clean and the flower is allowed to do the decorating.
Explore More Baby Hat Patterns
Free Baby Hat Patterns to Crochet and Knit
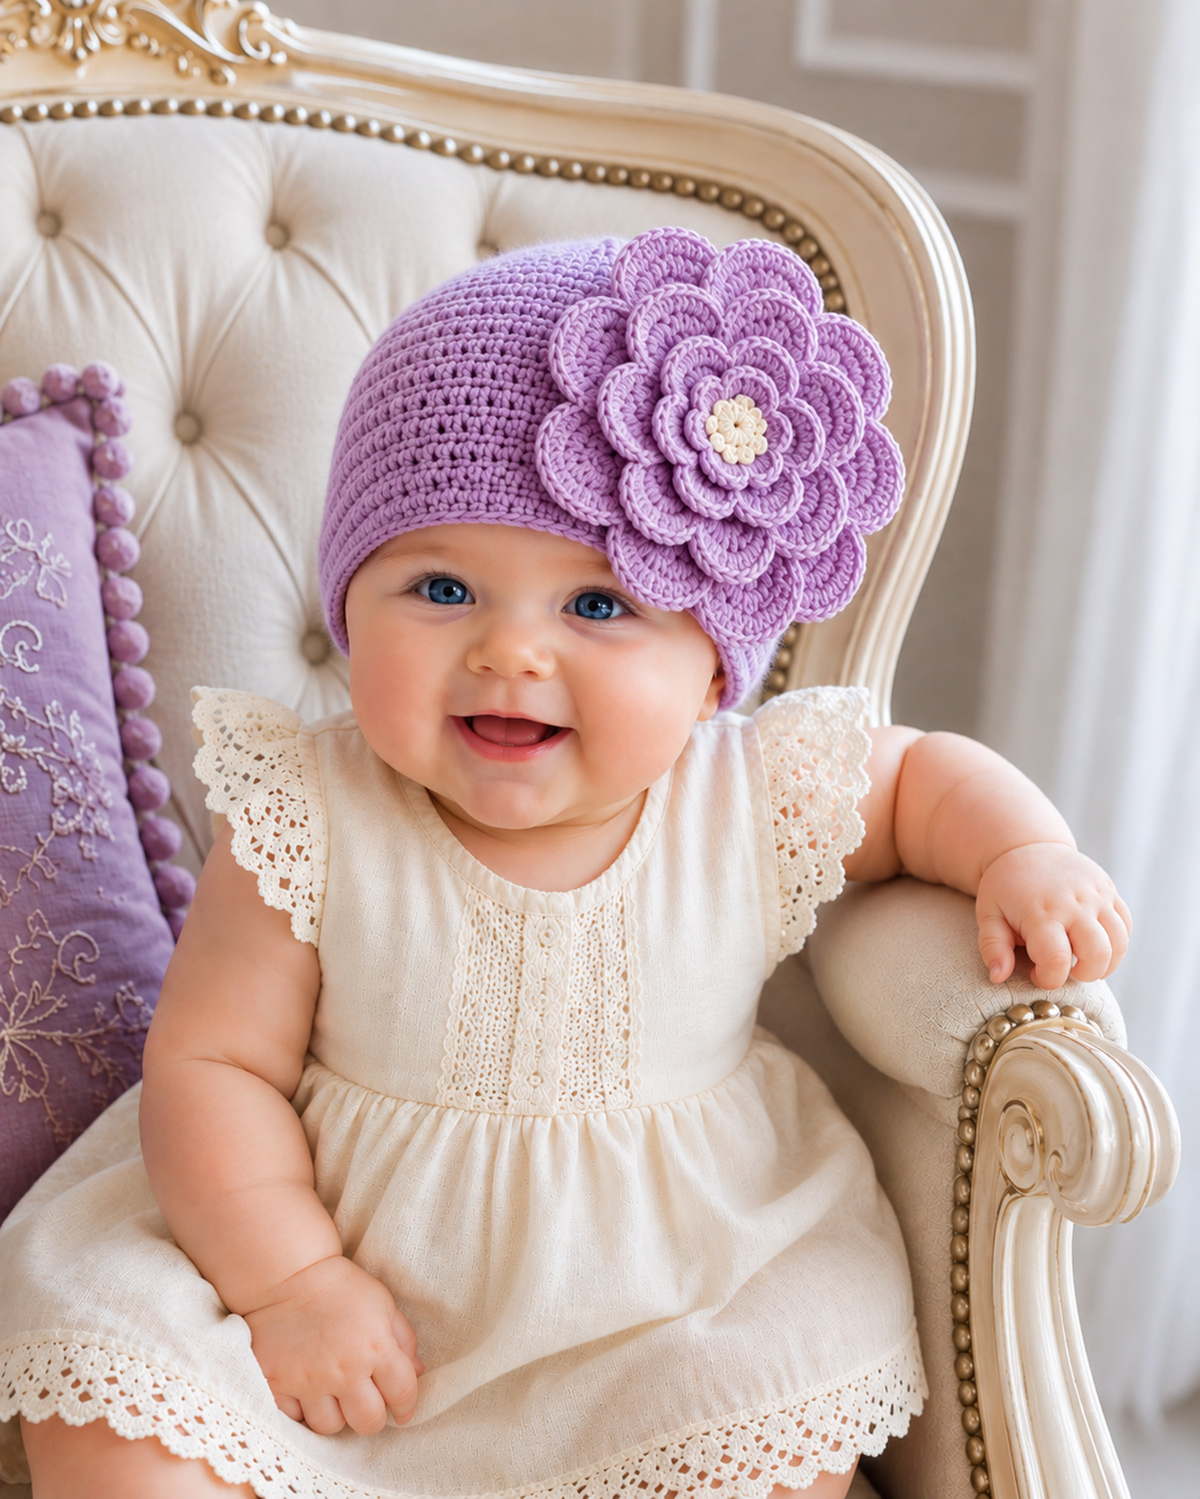
This styled photo illustrates the finished look and flower placement. Follow the written pattern for the exact six-layer flower construction and stitch counts.
Soft Baby Yarn for Crochet Hats
Jump to:
Free Crochet Baby Hat Pattern with a Large Flower: Sizes
For this pattern, I'd choose the size from the baby's actual head circumference rather than the age label alone. Babies don't all land on the same measurement at the same age, and an inch makes a noticeable difference on a little hat.
The Craft Yarn Council head circumference chart gives 14 to 16 inches as its broad baby range. I've divided this pattern more narrowly so you have three useful baby sizes instead of trying to make one size cover the entire range.
| Pattern Size | Use for a Head Measuring About | Expected Hat Circumference | Expected Hat Height |
|---|---|---|---|
| 0 to 3 months | 14 to 15 inches | 13 1/3 inches | About 5 1/8 inches |
| 3 to 6 months | 15 to 16 inches | 14 2/3 inches | About 5 3/4 inches |
| 6 to 12 months | 16 to 17 1/2 inches | 16 inches | About 6 1/4 inches |
Those finished measurements are expected measurements calculated from the gauge and stitch counts below. They are not measurements taken from a physically test-crocheted sample. That's why checking your gauge before you get very far matters.
If the baby's head falls between two sizes, look at the actual finished circumference instead of automatically moving up. The hat is meant to stretch gently. I wouldn't make it so loose that the flower pulls the hat sideways or so snug that the lower edge leaves a deep mark.
Materials and Gauge
You don't need specialty yarn for this one. A soft, washable size 4 worsted-weight yarn gives the hat enough body to support that large flower without turning the beanie stiff.
- Main-color yarn: size 4 worsted-weight yarn, approximately 90 (105, 120) yards for 0 to 3 months (3 to 6 months, 6 to 12 months)
- Flower yarn: approximately 70 to 90 yards of size 4 worsted-weight yarn
- Flower-center yarn: a small amount of a third color, about 5 yards
- Crochet hook: 5.5 mm (I-9), or the size needed to obtain gauge
- Yarn needle
- Scissors
- Removable stitch markers
The yardage figures are expected working amounts based on the stitch counts, not measured test-skein totals. Check the yardage printed on your yarn label rather than relying on skein weight alone, and keep a little extra yarn available for the flower.
Gauge
12 double crochet stitches = 4 inches
7 double crochet rounds = about 4 inches in height
The horizontal gauge is the same 6 double crochet stitches per 2 inches used on the older version of this page. If you're getting more than 12 stitches across 4 inches, your hat will come out smaller. If you're getting fewer, it will come out larger.
Don't compensate for a bad gauge by simply choosing a different size. Fix the hook size first. The flower is large enough that a poorly fitted hat underneath it becomes very noticeable.
Abbreviations
- ch = chain
- dc = double crochet
- hdc = half double crochet
- sc = single crochet
- sl st = slip stitch
- st/sts = stitch/stitches
- rnd = round
US crochet terminology is used throughout.
Pattern Construction
The hat is worked from the crown down in joined rounds. The chain 2 at the beginning of a double crochet round does not count as a stitch. Join each round with a slip stitch to the first double crochet unless the instructions say otherwise. Do not turn.
The flower is made separately as six graduated six-petal layers plus one crocheted center. Stack all six petal layers from largest to smallest, sew the center securely through the complete stack, and then attach the finished flower to the side of the hat.
Finished piece count: 8 pieces total: 1 hat, 6 flower layers and 1 flower center.
Keep the center completely crocheted. You don't need a bead, rhinestone, pearl or button there. A yarn center keeps the finished design closer to the reference while avoiding a hard detachable decoration on a baby hat.
Free Crochet Baby Hat with a Large Flower Pattern
The numbers are written for 0 to 3 months (3 to 6 months, 6 to 12 months). Where only one number appears, it applies to all three sizes.
Crown
Round 1: Make a magic ring. Ch 2. Work 12 dc into the ring. Pull the ring closed and join with a sl st to the first dc. 12 sts.
Round 2: Ch 2. Work 2 dc in each st around. Join. 24 sts.
Round 3: Ch 2. *Dc in next st, 2 dc in next st.* Repeat from * to * around. Join. 36 sts.
Round 4: Choose Your Size
0 to 3 months: Ch 2. *Dc in each of the next 8 sts, 2 dc in the next st.* Repeat from * to * 4 times. Join. 40 sts.
3 to 6 months: Ch 2. *Dc in each of the next 3 sts, 2 dc in the next st, dc in each of the next 4 sts, 2 dc in the next st.* Repeat from * to * 4 times. Join. 44 sts.
6 to 12 months: Ch 2. *Dc in each of the next 2 sts, 2 dc in the next st.* Repeat from * to * around. Join. 48 sts.
At this point, stop increasing. The crown should begin curving downward naturally once you work the next rounds even.
Hat Body
0 to 3 months, Rounds 5 through 9: Ch 2. Dc in each st around. Join. 40 sts each round.
3 to 6 months, Rounds 5 through 10: Ch 2. Dc in each st around. Join. 44 sts each round.
6 to 12 months, Rounds 5 through 11: Ch 2. Dc in each st around. Join. 48 sts each round.
After the final round, check the height from the center of the crown straight down to the lower edge. You should be close to 5 1/8 (5 3/4, 6 1/4) inches at the stated gauge.
If your circumference is correct but the hat is a little short, one additional even round is a reasonable fit adjustment. If the circumference itself is wrong, adding more rounds won't fix it. Go back and correct the gauge or size.
Fasten off and weave the tail securely into the inside of the hat.
I would leave the lower edge plain. The flower is already doing plenty, and adding a ruffle, scallop and contrasting border underneath it would change the clean fitted look we're trying to reproduce.
Large Six-Layer Crochet Flower
The flower is supposed to be big. That's the feature that separates this hat from a plain beanie with a little appliqué sewn onto it. Make all six layers and graduate them from the broad outer petals to the smaller petals around the center.
For the flower only: tr = treble crochet.
Flower Layer 1: Largest Outer Petals
Round 1: Make a magic ring. Ch 1. Work 6 sc into the ring. Pull the ring closed and join with a sl st to the first sc. 6 sts.
Round 2: *Ch 6, sl st in the next sc.* Repeat from * to * 6 times, with the final sl st returning to the first sc. 6 ch-6 spaces.
Round 3: Sl st into the first ch-6 space. In that space work 1 sc, 1 hdc, 2 dc, 3 tr, 2 dc, 1 hdc, 1 sc. Work the same sequence in each of the remaining 5 ch-6 spaces. 6 petals.
Fasten off and weave in the ends.
Flower Layer 2
Round 1: Make a magic ring. Ch 1. Work 6 sc into the ring. Pull the ring closed and join with a sl st to the first sc. 6 sts.
Round 2: *Ch 5, sl st in the next sc.* Repeat from * to * 6 times, with the final sl st returning to the first sc. 6 ch-5 spaces.
Round 3: Sl st into the first ch-5 space. In that space work 1 sc, 1 hdc, 2 dc, 2 tr, 2 dc, 1 hdc, 1 sc. Work the same sequence in each remaining ch-5 space. 6 petals.
Fasten off and weave in the ends.
Flower Layer 3
Round 1: Make a magic ring. Ch 1. Work 6 sc into the ring. Pull the ring closed and join with a sl st to the first sc. 6 sts.
Round 2: *Ch 5, sl st in the next sc.* Repeat from * to * 6 times, with the final sl st returning to the first sc. 6 ch-5 spaces.
Round 3: Sl st into the first ch-5 space. In that space work 1 sc, 1 hdc, 2 dc, 1 tr, 2 dc, 1 hdc, 1 sc. Work the same sequence in each remaining ch-5 space. 6 petals.
Fasten off and weave in the ends.
Flower Layer 4
Round 1: Make a magic ring. Ch 1. Work 6 sc into the ring. Pull the ring closed and join with a sl st to the first sc. 6 sts.
Round 2: *Ch 4, sl st in the next sc.* Repeat from * to * 6 times, with the final sl st returning to the first sc. 6 ch-4 spaces.
Round 3: Sl st into the first ch-4 space. In that space work 1 sc, 1 hdc, 5 dc, 1 hdc, 1 sc. Work the same sequence in each remaining ch-4 space. 6 petals.
Fasten off and weave in the ends.
Flower Layer 5
Round 1: Make a magic ring. Ch 1. Work 6 sc into the ring. Pull the ring closed and join with a sl st to the first sc. 6 sts.
Round 2: *Ch 4, sl st in the next sc.* Repeat from * to * 6 times, with the final sl st returning to the first sc. 6 ch-4 spaces.
Round 3: Sl st into the first ch-4 space. In that space work 1 sc, 1 hdc, 3 dc, 1 hdc, 1 sc. Work the same sequence in each remaining ch-4 space. 6 petals.
Fasten off and weave in the ends.
Flower Layer 6: Smallest Inner Petals
Round 1: Make a magic ring. Ch 1. Work 6 sc into the ring. Pull the ring closed and join with a sl st to the first sc. 6 sts.
Round 2: *Ch 3, sl st in the next sc.* Repeat from * to * 6 times, with the final sl st returning to the first sc. 6 ch-3 spaces.
Round 3: Sl st into the first ch-3 space. In that space work 1 sc, 3 hdc, 1 sc. Work the same sequence in each remaining ch-3 space. 6 petals.
Fasten off and weave in the ends.
Crochet the Flower Center
Use the flower-center color.
Round 1: Make a magic ring. Ch 1. Work 6 sc into the ring. Pull the ring closed and join with a sl st to the first sc. 6 sts.
Round 2: Ch 1. Work 2 sc in each st around. Join with a sl st to the first sc. 12 sts.
Fasten off, leaving a tail about 36 inches long for assembling all six flower layers.
Stack All Six Flower Layers
Lay Layer 1 right side up. Center Layer 2 on top and rotate it slightly so its petal tips don't sit directly over the petals underneath.
Add Layers 3 through 6 in order, largest to smallest. Rotate each layer a little differently as you add it. You want to see the edges of several petal layers from the front instead of six identical sets lined up in one stack.
Center the crocheted disc over Layer 6. Thread its long yarn tail onto a yarn needle and sew down through the center of all six petal layers.
Take at least 6 secure stitches through the complete stack, changing direction as you work. The layers should not be able to rotate separately once you're finished.
On the back of Layer 1, weave the remaining center tail securely through several nearby stitches and trim it. The six flower layers should now stay together as one unit before you attach the flower to the hat.
The completed flower contains 36 petals total: 6 petals on each of 6 graduated layers, plus the crocheted center.
Before attaching it to the hat, hold the finished flower against the side of the beanie. It should cover a substantial part of the side without extending below the lower edge or covering the baby's eye area. If it does, check that you used size 4 yarn and the intended hook before sewing it down.
Attach the Large Flower to the Baby Hat
Placement matters almost as much as the flower itself. Put it too far forward and it crowds the baby's face. Put it too high and it looks as though it's sitting on the crown. The reference look puts the center of the flower at the side of the hat, slightly toward the front.
Lay the hat flat with the joining seam centered at the back. Decide which side of the hat will hold the flower before you begin counting.
Starting at the back seam, count along the final round toward the side where you want the flower:
- 0 to 3 months: mark the 12th stitch from the back seam
- 3 to 6 months: mark the 13th stitch from the back seam
- 6 to 12 months: mark the 14th stitch from the back seam
Use the same count on either side of the hat. Counting from the back seam toward the chosen side places the flower slightly forward of the exact side point without relying on a clockwise or counterclockwise direction.
Move straight upward from that marked stitch and place the flower center approximately over the third even body round above the lower edge. Use removable stitch markers to hold the flower temporarily while you check the position.
Look at the hat from the front before sewing anything. You should see the flower clearly from the front, but its center should still sit at the side rather than directly over the forehead.
Sew the Flower Securely
Cut about 36 inches of yarn that matches the large outer flower layer and thread it onto a yarn needle.
The six flower layers are already sewn together as one complete flower, so you don't need to force the attachment yarn through the entire stack again. Working from inside the hat, bring the needle through the hat and catch the back of Layer 1 close to the flower center. Take several small stitches around the center area, sewing Layer 1 securely to the hat while keeping the stitches hidden behind the upper flower layers.
Once the center is secure, add 6 small anchoring stitches, one beneath the base of each large outer petal. Catch the hat fabric and the base of Layer 1 with each stitch. Keep these stitches close to the flower center and do not stitch through the petal tips.
Turn the hat inside out and check your work. There shouldn't be long strands of yarn crossing the inside where they could catch on something. Weave the attachment ends securely into several nearby stitches and trim them.
Remove every temporary stitch marker.
Finishing and Fit
Put the finished hat flat on the table before you call it done. The crown should be rounded, the lower edge should lie evenly, and the flower shouldn't pull one side of the hat noticeably shorter than the other.
Final Fit Check
Check these four things:
- The finished circumference still agrees reasonably well with the size you intended to make.
- The lower edge stretches without feeling rigid.
- The flower stays at the side instead of falling forward over the face.
- The flower remains secure when each layer is moved gently by hand.
If one of these final fit checks shows a problem, remove the flower before altering the hat. Length adjustments belong in the hat body, while a hat that is too wide or too narrow needs a gauge or size correction.
Keep the Flower Center Soft
I wouldn't add a button, bead, pearl or rhinestone to the middle. The crocheted center gives the flower the contrast it needs without adding a hard decorative piece that can loosen from a baby hat.
Check the flower attachment periodically, especially after washing. If any part begins to loosen, repair it before the hat is worn again.
Washing the Finished Hat
Follow the care instructions for the yarn you used. After washing, reshape the hat and flower while they're damp and let them dry in the shape you want. Gently separate all six petal layers with your fingers so they don't dry flattened together.
Don't press a hot iron directly onto the crochet. Different fibers react differently to heat, and you don't need heat to get the flower back into shape.
A Baby Hat Is Not Sleepwear
This is a decorative baby accessory for awake wear, not something to leave on during naps or nighttime sleep. The American Academy of Pediatrics safe sleep guidance advises against putting hats on babies indoors after you're home from the hospital because head covering can contribute to overheating. Remove the hat before sleep.
Because the flower is a separately attached decoration, use this hat only while the baby is awake and supervised. Check the flower attachment before each use and repair it before the hat is worn if any part has loosened.
If You Want a Less Dramatic Decoration
Use all six flower layers if you want the finished hat shown in this pattern. That's what gives it the deep, oversized floral look.
If you'd rather have something flatter and simpler, don't quietly shrink this flower and expect the same result. Choose a different design. The crochet bow baby hat pattern keeps the decoration closer to the hat, while the free baby crochet hat patterns collection gives you more styles to compare.
If the large flower is the reason you chose this one, let it be large. Keep the hat simple, put the flower where it belongs and stop there.
When you click on links to various merchants on this site and make a purchase, this may result in this site earning a commission. This does not affect the price you pay.

UBGI Gold Standard 2026
Reviewed under the site's
editorial checklist.
Photos, decorating ideas, party setups and reader submissions are shared for inspiration unless a page is specifically presented as a pattern, tutorial, reference guide or step-by-step project. Follow the instructions, measurements, safety guidance and manufacturer directions provided for the particular project or product.
About Jan | Contact | Baby Nursery Ideas (Blog) | Site Map | Privacy Policy | Disclosure Policy | Disclaimer | Affiliate Disclosure | Earnings Disclosure | Facebook | Pinterest
I am a participant in the Amazon Services LLC Associates Program, an affiliate advertising program designed to provide a means for us to earn fees by linking to Amazon. As an Amazon Associate I earn from qualifying purchases.
Copyright © 2006-2026. All Rights Reserved.