Free Crochet Alligator Applique Pattern
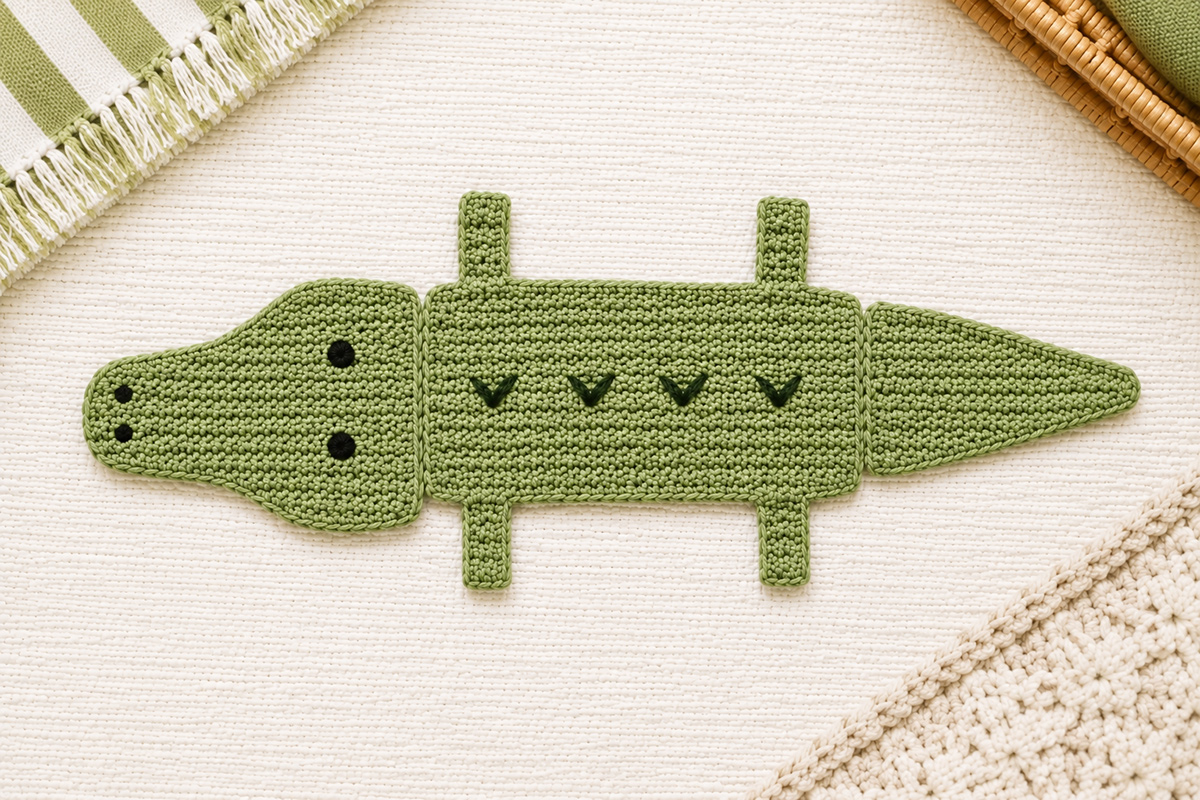
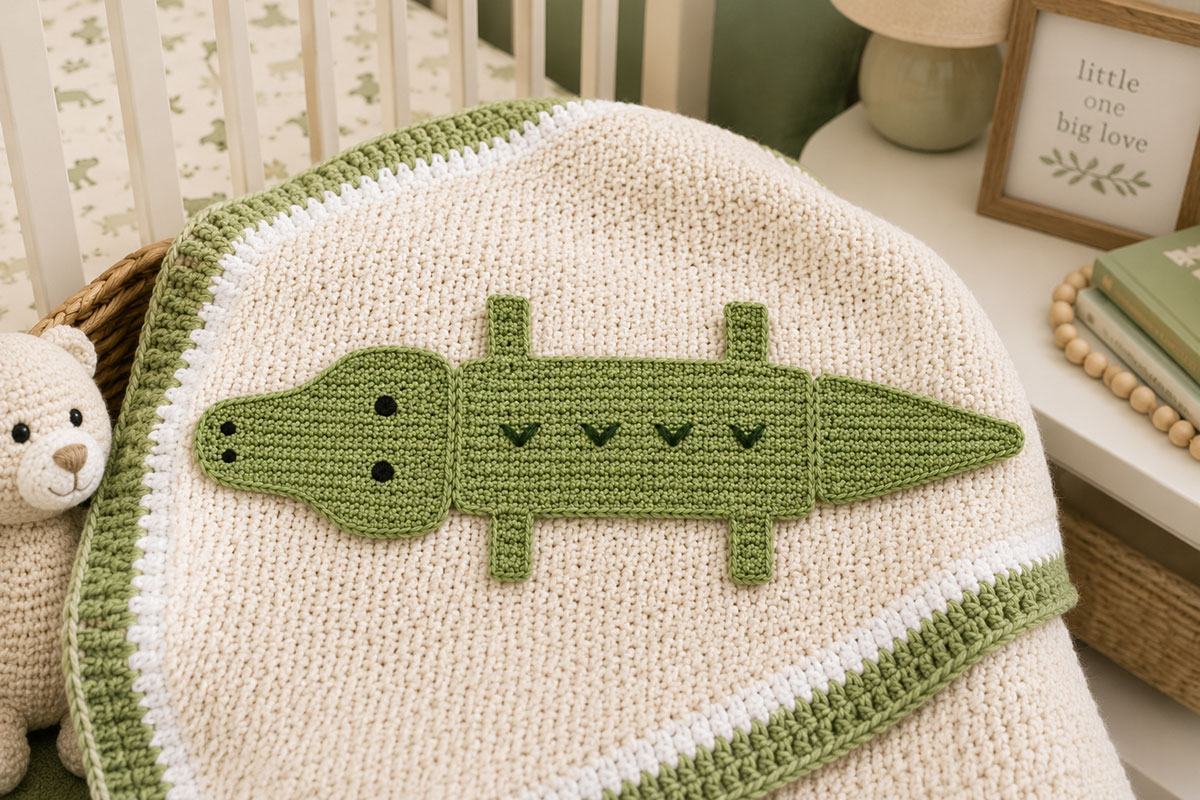
This free crochet alligator applique pattern makes a long, flat little gator with a broad snout, tapered tail, four short legs and embroidered eyes and nostrils. You can sew it onto a baby blanket, nursery banner, wall hanging, tote bag or another handmade project without adding the bulk of a stuffed animal.
Crochet supplies for this project:
Supplies
Crochet Alligator Applique Pattern
Assembly and Face
Attaching the Applique
Alligator Applique FAQs
Supplies for the Crochet Alligator Applique Pattern
You won't need much yarn for one alligator. Worsted weight cotton works especially well because it gives the long body enough structure to hold its shape without making the applique stiff.
- Worsted weight #4 cotton or cotton-blend yarn in medium green, about 35 to 45 yards
- Small amount of darker green yarn for the back markings
- Small amount of black embroidery floss or black yarn for the eyes and nostrils
- 4.0 mm crochet hook
- Yarn needle
- Scissors
- Several locking stitch markers
- Blocking mat or folded towel if light blocking is needed
Expected finished size: Roughly 7 to 8 inches long from the end of the snout to the tail tip and about 4 inches wide across the leg tips with the yarn and hook listed. Exact size will vary with yarn, hook size and tension.
Skill level: Advanced beginner. You'll use basic single crochet, increases, decreases, chains, slip stitches and simple sewing.
Gauge: Exact gauge isn't critical. Keep the stitches even and fairly firm so the pieces lie flat without becoming rigid.
If you're comparing yarn labels, the Craft Yarn Council Standard Yarn Weight System explains the numbered yarn categories and can help you identify a comparable medium-weight yarn.
US Crochet Terms Used
- ch = chain
- sc = single crochet
- sl st = slip stitch
- inc = work 2 sc in the same stitch
- dec = single crochet 2 stitches together
- st = stitch
- sts = stitches
The turning ch 1 does not count as a stitch. Unless the directions say otherwise, work through both loops.
The alligator is made from one flat body, one shaped head and one tapered tail. The four legs are crocheted directly onto the outside edge of the body, so you don't have four extra little pieces to sew on later.
Crochet Alligator Applique Pattern
The body is worked first, then you'll add the head and tail at opposite ends. Keep the pieces flat as you go. If an edge starts curling, smooth it with your fingers before you decide it needs blocking. A little curl is easy to fix later.
I like a medium green for the main pieces and just a touch of darker green for the back. You don't need several shades to make the alligator recognizable. The long shape, broad snout and little side legs do that.
Alligator Body
With medium green yarn, ch 10.
Row 1: Sc in the second ch from the hook and in each ch across. 9 sc.
Row 2: Ch 1, turn. Inc in the first st, sc in the next 7 sts, inc in the last st. 11 sc.
Rows 3 through 12: Ch 1, turn. Sc in each st across. 11 sc.
Row 13: Ch 1, turn. Dec, sc in the next 7 sts, dec. 9 sc.
Row 14: Ch 1, turn. Sc in each st across. 9 sc.
Fasten off and weave in the end. The body should look like a low, slightly rounded rectangle rather than a perfect oval. Don't worry about making it too curvy. Once the head, tail and legs are added, that longer shape looks much more like an alligator.
Broad Alligator Head
The head starts at the narrower neck edge and widens toward the snout. That widening matters. If the head stays the same width from front to back, the finished applique starts looking more like a lizard.
Leave an 18-inch starting tail for sewing, then with medium green yarn, ch 8.
Row 1: Sc in the second ch from the hook and in each ch across. 7 sc.
Row 2: Ch 1, turn. Inc in the first st, sc in the next 5 sts, inc in the last st. 9 sc.
Row 3: Ch 1, turn. Inc in the first st, sc in the next 7 sts, inc in the last st. 11 sc.
Rows 4 through 6: Ch 1, turn. Sc in each st across. 11 sc.
Fasten off and weave in the final yarn end. Keep the long starting tail at the original chain edge for sewing. The original chain edge is the narrow neck end. The final row is the front of the snout.
Don't fold or stuff the head. It stays completely flat.
Tapered Alligator Tail
The tail starts wide where it meets the body and narrows one stitch at a time. Alternating the decreases from one side to the other keeps the taper from leaning too sharply in one direction.
Leave an 18-inch starting tail for sewing, then with medium green yarn, ch 10.
Row 1: Sc in the second ch from the hook and in each ch across. 9 sc.
Row 2: Ch 1, turn. Dec, sc in the next 7 sts. 8 sc.
Row 3: Ch 1, turn. Dec, sc in the next 6 sts. 7 sc.
Row 4: Ch 1, turn. Dec, sc in the next 5 sts. 6 sc.
Row 5: Ch 1, turn. Dec, sc in the next 4 sts. 5 sc.
Row 6: Ch 1, turn. Dec, sc in the next 3 sts. 4 sc.
Row 7: Ch 1, turn. Dec, sc in the next 2 sts. 3 sc.
Row 8: Ch 1, turn. Dec, sc in the next st. 2 sc.
Row 9: Ch 1, turn. Dec. 1 sc.
Fasten off and weave in the final yarn end. Keep the long starting tail at the Row 1 foundation edge for sewing. Don't pull that final stitch into a sharp little spike. A slightly rounded tip looks better once the tail is attached.
Crochet the Four Legs Directly onto the Body
Lay the body horizontally with Row 1 at the head end and Row 14 at the tail end. You'll crochet two legs onto each long side of the body.
First front leg: Join medium green yarn to the side edge of Row 3. Ch 5. Sc in the second ch from the hook and in each of the next 3 ch. 4 sc. Sl st into the side edge of Row 4. Fasten off and weave in the ends.
First back leg: Join medium green yarn to the side edge of Row 10. Ch 5. Sc in the second ch from the hook and in each of the next 3 ch. 4 sc. Sl st into the side edge of Row 11. Fasten off and weave in the ends.
Rotate the body on your work surface so the opposite long side faces you, without flipping the body over. Make the second front leg between Rows 3 and 4 and the second back leg between Rows 10 and 11 in exactly the same way.
You should now have four short legs, with the front pair matched across Rows 3 and 4 and the back pair matched across Rows 10 and 11.
The legs are supposed to be short. Don't keep adding rows because they look small by themselves. Once the head and tail are attached, those little side legs are about right.
Assemble the Alligator and Add the Face
Lay all three main pieces flat before you start sewing. Put the broad head at one end of the body and the wide end of the tail at the other. The four legs should point out from the sides rather than down toward the bottom edge.
I'd hold everything in place with locking stitch markers first. It only takes a minute, and it's much easier to adjust the proportions now than after you've sewn half the alligator together.
Attach the Head
Use the foundation edge below Row 1 of the body as the head end. Place the foundation edge below Row 1 of the head against the center 7 Row 1 stitch bases along the body's 9-stitch foundation edge, leaving one body stitch base free at each side. The 11-stitch snout should extend evenly beyond both sides of the body.
Using the long green yarn tail and a yarn needle, sew through the bases of the 7 Row 1 head stitches and the corresponding 7 center Row 1 body stitch bases one for one. Keep the sewing stitches close to the edge so they don't show through the front.
Weave the yarn end into the back.
Attach the Tail
Use Row 14 of the body as the tail end. Place the foundation edge below Row 1 of the tail against the 9-stitch Row 14 edge of the body. Line up the bases of the 9 Row 1 tail stitches with the 9 Body Row 14 stitches one for one. Let the tapered section extend straight out from the body.
Using the long yarn tail, sew the 9 Row 1 tail stitch bases to the 9 Body Row 14 stitches one for one. Before fastening off, lay the applique flat and make sure the tail isn't twisting. If it is, loosen the last few stitches and straighten it before finishing.
You can curve the tail slightly to one side if you want a more playful shape. Keep the curve gentle so the applique will still lie flat when you sew it onto another project.
Embroider the Eyes and Nostrils
Use black embroidery floss or a thin strand of black yarn for the face. I would keep these details small. Big round eyes can make the head look cartoonish very quickly.
With Row 6 at the front of the snout, place the eyes over Row 3, centering one near stitch 3 and the other near stitch 9. Make each eye with two or three short satin stitches worked close together.
Place the two nostrils over Row 6, centering one near stitch 4 and the other near stitch 8. Use one or two short black stitches for each nostril.
Keep all knots and yarn ends on the back of the applique and weave them in securely.
Add the Dark Green Back Markings
Thread a yarn needle with darker green yarn and add four small markings along the center of the body, placing them near Rows 4, 6, 8 and 10.
Make each marking with two short diagonal stitches that meet in a shallow V. Keep the stitches small and centered so the darker green adds definition without covering much of the main green body.
I wouldn't add much more. Once you have the broad snout, long body, tapered tail and side legs, the shape already does most of the work.
How to Attach the Crochet Alligator Applique
Once the alligator is assembled, lay it on the project before threading your needle. Move it around until the placement looks right, then secure it with several locking stitch markers.
Use matching green yarn and sew around the outside edge with small, even stitches. Catch the applique and the surface underneath without pulling hard enough to pucker either piece.
Pay extra attention to the snout, all four legs and the tail tip. Those narrow areas are the easiest places for an applique edge to lift.
If you're adding the alligator to a baby blanket or another item that a baby may handle, sew every part down securely. Don't leave the legs or tail loose just because they look cute sticking up.
If you attach the applique to a baby blanket, keep that blanket out of an infant's sleep space. The U.S. Consumer Product Safety Commission safe sleep guidance recommends keeping infant sleep spaces bare except for a fitted sheet.
For a framed nursery piece or wall hanging, you have a little more freedom. You can leave a very slight curve in the tail or let the edge of one foot lift a bit if you like the dimensional look.
Final Check
As you sew the applique onto another project, remove each locking stitch marker before you reach that spot with your sewing stitches. When you're finished, check the head, all four legs and the tail, weave in any remaining yarn ends and make sure every locking stitch marker has been removed. Nothing temporary should still be attached when you're done.
Where to Use the Finished Alligator
A single alligator works well on the corner of a blanket, a nursery banner, a fabric storage basket or a framed crochet piece. You can also make several and combine them with other animals from my free crochet animal applique patterns.
If you're making several animals for one project, keep the yarn weight and hook size the same. That helps the appliques look like they belong together even when the animals have very different shapes.
Crochet Alligator Applique FAQs
Does the alligator applique need stuffing?
No. The entire applique is meant to stay flat. The head, body and tail are unstuffed, and the legs are crocheted directly onto the body edge.
Can I make the alligator smaller?
Yes. The easiest way is to use a lighter yarn and a smaller hook while following the same stitch counts. That keeps the proportions intact. If you start removing random rows or stitches, the head and tail can get out of balance with the body.
Can I make it larger?
You can use a heavier yarn and a hook that suits that yarn. Keep in mind that a larger applique will need more sewing points around the edges so it stays flat after it's attached.
What yarn works best for an alligator applique?
Worsted weight cotton or a cotton blend is a good choice because it gives the long body and tail enough structure without making them bulky. Acrylic yarn will work too. Use what you already have if the stitches stay neat and the finished pieces lie flat.
Why is my alligator curling?
A little curling can happen when your tension is tight. Lay the pieces flat and gently shape them with your fingers first. If they still curl after assembly, lightly block the finished applique before sewing it onto your project.
Can I sew this applique onto a baby blanket?
Yes. Sew around the entire outside edge and secure the head, legs and tail carefully so there aren't loose sections that can be pulled away from the blanket. Embroidered facial details are a better choice here than adding buttons, beads or plastic eyes.
Can I use a different green?
Absolutely. Olive, moss, sage and darker forest greens all work. You can also skip the darker back markings and make the whole alligator in one color if you want to keep it simple.
If this little gator is joining a whole group of animals, head back to the crochet animal applique patterns page and pick the next one. A mix of long, tall and round animal shapes makes a much more interesting blanket or nursery piece than repeating the same silhouette over and over.
When you click on links to various merchants on this site and make a purchase, this may result in this site earning a commission. This does not affect the price you pay.

UBGI Gold Standard 2026
Reviewed under the site's
editorial checklist.
Photos, decorating ideas, party setups and reader submissions are shared for inspiration unless a page is specifically presented as a pattern, tutorial, reference guide or step-by-step project. Follow the instructions, measurements, safety guidance and manufacturer directions provided for the particular project or product.
About Jan | Contact | Baby Nursery Ideas (Blog) | Site Map | Privacy Policy | Disclosure Policy | Disclaimer | Affiliate Disclosure | Earnings Disclosure | Facebook | Pinterest
I am a participant in the Amazon Services LLC Associates Program, an affiliate advertising program designed to provide a means for us to earn fees by linking to Amazon. As an Amazon Associate I earn from qualifying purchases.
Copyright © 2006-2026. All Rights Reserved.