Free Christmas Granny Square Stocking Pattern
By Jan Bay
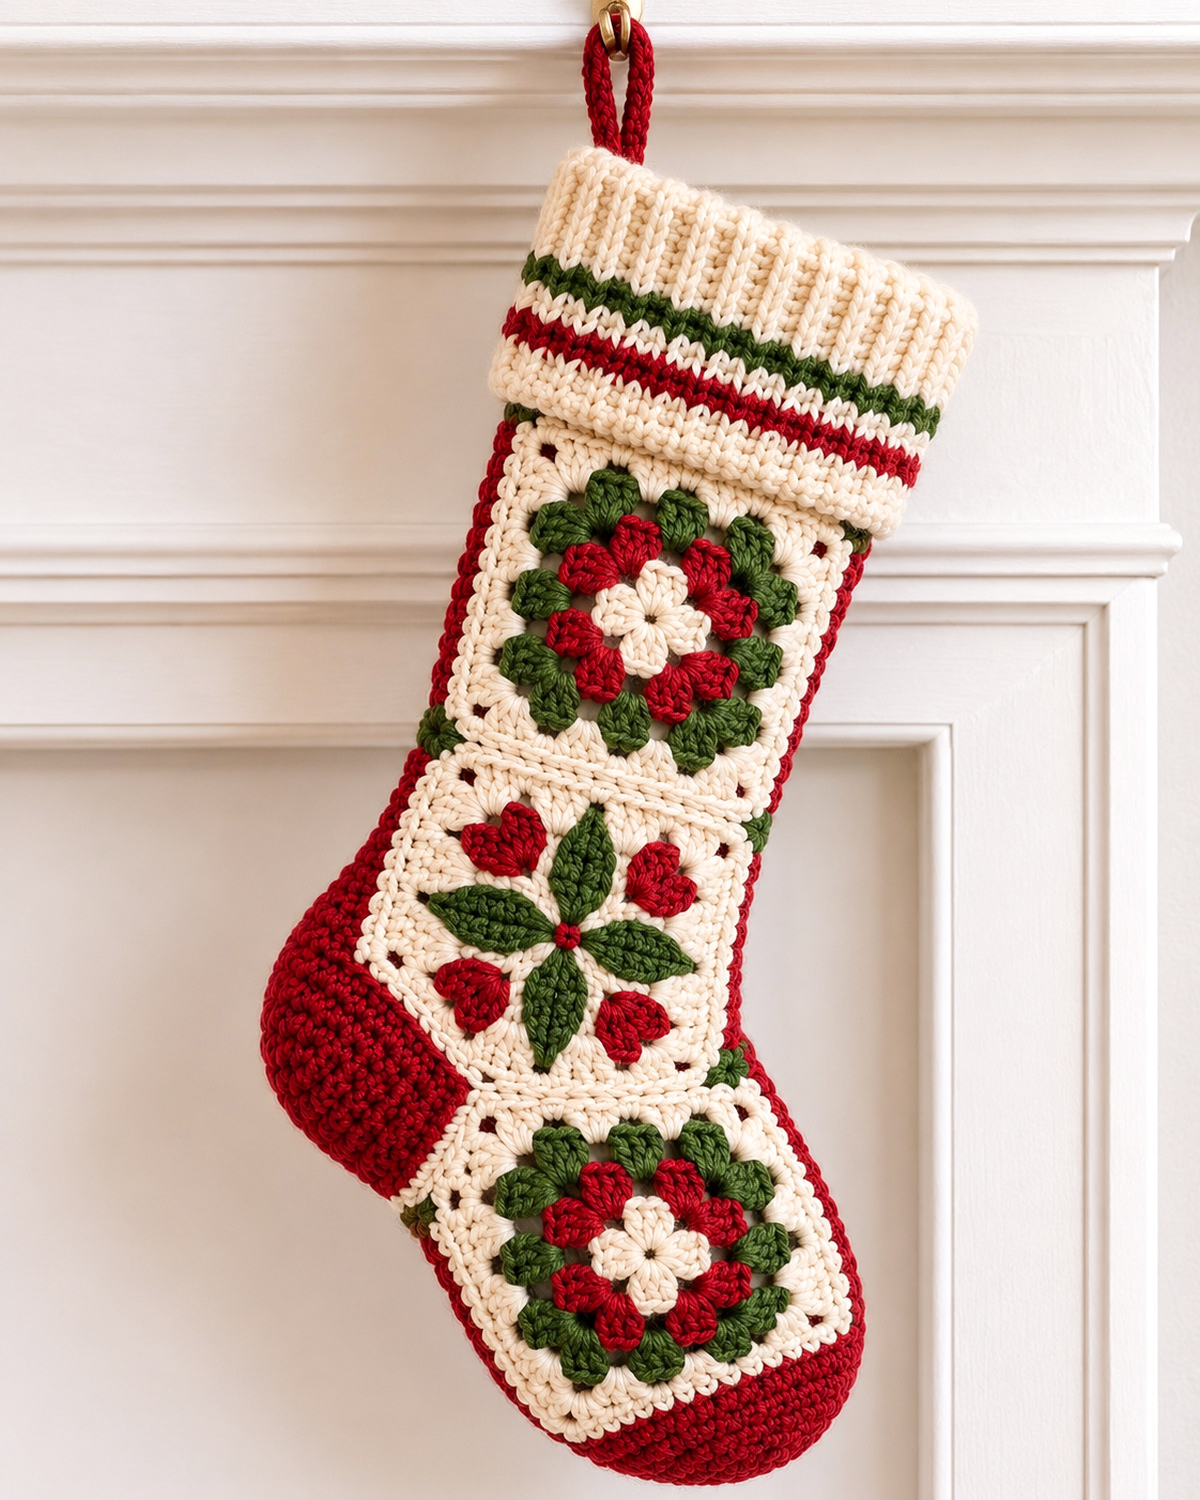
This free Christmas Granny Square Stocking Pattern is built from three large crochet squares, including a pretty holly leaf design, and a classic cranberry-red heel and toe. The large stocking has a thick ivory cuff with red and green stripes, a sturdy hanging loop, and plenty of space inside for the Jolly Elf to fill with goodies. I'll show you how to make the individual squares, join them into a stocking, shape the heel and toe, and add the finishing touches in plenty of time for Christmas Eve.
Explore More Free Christmas Crochet Patterns
Free Christmas Granny Square Patterns
Christmas Granny Square Blanket Pattern
See Supplies for This Project Here.
Jump to a Section
- Finished Size and Pattern Details
- Yarn and Supplies
- Gauge, Abbreviations and Pattern Notes
- Crochet the Two Floral Granny Squares
- Crochet the Holly Leaf Granny Square
- Granny Square Layout and Assembly Map
- Join the Granny Squares
- Crochet the Heel and Toe
- Crochet the Striped Ribbed Cuff
- Hanging Loop and Final Finishing
- Frequently Asked Questions
Christmas Granny Square Stocking Pattern: Finished Size and Details
Skill level: Intermediate. You'll work granny-square clusters, half double crochet increases and decreases, front and back post stitches, and sewn-on decorations. Basic counting and some experience joining crochet pieces will be helpful.
This stocking is made with three large granny squares on the front and a cranberry-red crochet backing. Two matching floral squares go at the top and bottom, with the holly leaf square right in the middle.
The red stocking body gives the squares their shape and makes room for the heel and toe. You'll sew the three squares onto the front, then join the front and back around the edges. The top stays open, of course. The Jolly Elf needs somewhere to put those goodies!
Finished Measurements
- Expected overall length: Approximately 20 to 21 inches, including the cuff.
- Width across the straight leg: Approximately 6 1/4 inches when laid flat.
- Maximum width at the heel: Approximately 8 inches.
- Maximum width across the widened foot: Approximately 8 1/4 inches.
- Front granny squares: Three squares measuring 5 by 5 inches each.
- Cuff height: Approximately 2 to 3 inches.
- Hanging loop: Approximately 2 inches tall when folded.
These measurements are calculated from the target gauge. Your finished stocking may be a little larger or smaller, depending on your yarn and tension.
Construction at a Glance
- Crochet two matching floral granny squares.
- Make the ivory holly square and attach its four green leaves, four cranberry hearts, and one small center berry.
- Crochet two matching cranberry stocking panels with a shaped heel, a wider foot, and a tapered toe.
- Join the upper floral square to the holly square.
- Position those two squares on the front panel, then position the lower floral square toward the toe.
- Sew all three squares securely to the cranberry front.
- Join the front and back stocking panels, leaving the top open.
- Add the striped ivory cuff and cranberry hanging loop.
The floral squares are worked directly into their granny-square borders. The holly leaves, cranberry hearts, and small center berry are made separately and sewn onto the middle square. That keeps their shapes clear without asking you to work complicated stitches into the background.
Yarn and Supplies for the Christmas Stocking
You'll need three Christmas colors for this pattern. I would keep the ivory fairly light so the red flowers and green leaves have enough contrast. A smooth worsted-weight yarn will also make the individual stitches easier to see while you're working.
Yarn
- Cranberry red: Allow approximately 450 to 550 yards of medium-weight #4 yarn for the two stocking panels, floral motifs, berries, cuff stripes, seams, and hanging loop.
- Ivory: Approximately 200 yards of medium-weight #4 yarn for the granny-square backgrounds, flower centers, joins, and cuff.
- Evergreen: Approximately 75 yards of medium-weight #4 yarn for the floral rounds, holly leaves, and cuff stripe.
These are planning allowances rather than quantities measured from a completed stocking. Buy a little extra if you have a loose crochet tension or plan to make a matching decoration.
Other Supplies
- 5 mm crochet hook, or the size needed to meet the square and body gauge
- Yarn needle with a large eye
- Scissors
- Stitch markers
- Measuring tape or ruler
- Blocking mat and rust-resistant pins, if needed
No buttons, bells, beads, or plastic decorations are needed. The flowers, holly leaves, and berries are all made with yarn.
Use the same yarn weight for all three squares. Mixing a lightweight cotton for one square with a thick acrylic for another could leave you with pieces that won't line up properly.
Gauge, Crochet Abbreviations and Pattern Notes
Before making all three squares, crochet the first floral square and measure it. Each finished square needs to be 5 inches across, measured from one outside edge to the opposite outside edge.
Gauge
- Granny-square gauge: One finished square measures approximately 5 by 5 inches, including its single crochet border.
- Stocking body gauge: 14 half double crochet stitches and 12 rows measure 4 inches.
- Hook: Start with 5 mm and adjust if needed.
Square size matters because the three motifs must fit along the stocking front. The body gauge matters because it determines the opening, heel width, and finished length.
If your first square is too large, try a smaller hook. If it's too small, try a larger one. Use the same final hook and tension for the other two squares. Check the body gauge separately before making the stocking panels.
U.S. Crochet Abbreviations
- ch: Chain
- sl st: Slip stitch
- sc: Single crochet
- hdc: Half double crochet
- dc: Double crochet
- tr: Treble crochet
- hdc2tog: Half double crochet two stitches together
- FPdc: Front post double crochet
- BPdc: Back post double crochet
- RS: Right side
- WS: Wrong side
- sp: Space
- st: Stitch
- rep: Repeat
- rnd: Round
This pattern uses U.S. stitch names. If you're working from a different crochet terminology system, check the Craft Yarn Council crochet abbreviation reference before beginning.
Special Stitches
Three-double-crochet cluster (3-dc cluster): Yarn over, insert your hook into the indicated stitch or space, yarn over and pull up a loop. Yarn over and pull through two loops. Repeat that partial double crochet twice more in the same stitch or space. You'll have four loops on your hook. Yarn over and pull through all four loops.
Half double crochet decrease (hdc2tog): Yarn over, insert your hook into the next stitch, and pull up a loop. Yarn over, insert your hook into the following stitch, and pull up another loop. Yarn over and pull through all five loops on your hook. Two stitches become one.
Front post double crochet (FPdc): Work a double crochet around the post of the next stitch from front to back and back to front.
Back post double crochet (BPdc): Work a double crochet around the post of the next stitch from back to front and back again.
Pattern Notes
- Beginning chains do not count as stitches unless specifically stated.
- Join completed rounds with a slip stitch to the first stitch or cluster, not the beginning chain.
- When a granny-square round tells you to slip stitch into the next corner ch-2 space, first slip stitch into each of the next two dc, then slip stitch into the immediately following corner ch-2 space. This moves the working yarn across the top of the starting 3-dc group and into its corner without leaving a long strand across the fabric.
- The three square borders must have matching stitch counts.
- Change colors by fastening off and joining the next color in the indicated space.
- Keep the right side of each completed motif facing outward.
- Weave in yarn ends before assembling the stocking, except for tails needed for sewing.
One more thing: don't add extra rounds to just one square to make it larger. All three squares need the same outside measurements and matching border edges.
Crochet the Two Large Floral Granny Squares
Make two identical floral squares, one for the top of the stocking and one for the foot section. Both have an ivory flower center, cranberry petals, an evergreen floral round, and an ivory square border.
Work the first square all the way through before beginning the second. Once you've checked the size and stitch count, the second one should be much easier.
Floral Granny Square: Make 2
Round 1: Ivory Flower Center
- With ivory yarn, ch 4 and join with a sl st to form a ring.
- Ch 2. This does not count as a stitch.
- Work one 3-dc cluster into the ring, then ch 2.
- Repeat the cluster and ch 2 sequence three more times.
- Join with a sl st to the top of the first cluster.
- Fasten off ivory.
Round 1 count: 4 clusters and 4 ch-2 spaces.
You should have four small ivory petals around the center opening.
Round 2: Cranberry Flower Petals
- Join cranberry yarn in any ch-2 space from Round 1.
- Ch 2. Work one 3-dc cluster into that space.
- Ch 1, then work another 3-dc cluster into the same space.
- Ch 2.
- In each of the remaining three ch-2 spaces, work one 3-dc cluster, ch 1, another 3-dc cluster, then ch 2.
- Join to the first cranberry cluster and fasten off.
Round 2 count: 8 cranberry clusters, 4 ch-1 spaces, and 4 ch-2 spaces.
The cranberry round should form eight raised petal shapes around the ivory center.
Round 3: Evergreen Flower Round
- Join evergreen in any chain space between cranberry clusters.
- Ch 2, then work one 3-dc cluster into that space.
- Ch 2.
- Work one 3-dc cluster and ch 2 into each of the seven remaining chain spaces, including both the ch-1 and ch-2 spaces from the previous round.
- Join to the first green cluster and fasten off.
Round 3 count: 8 evergreen clusters and 8 ch-2 spaces.
Don't worry if the flower is still round at this stage. The next round turns it into a square.
Round 4: Form the Four Corners
- Join ivory in any ch-2 space from Round 3.
- Ch 2, then work 3 dc, ch 2, and 3 dc into that same space. Ch 1. This is the first corner.
- In the next ch-2 space, work 3 dc and ch 1.
- In the next space, work 3 dc, ch 2, 3 dc, then ch 1 for the second corner.
- In the following space, work 3 dc and ch 1.
- Continue alternating corner groups and side groups around the remaining four spaces.
- Join to the first dc.
Round 4 count: 36 dc, 4 corner ch-2 spaces, and 8 side ch-1 spaces.
Round 4 shape checkpoint: Your flower should now have four clearly defined ch-2 corners, with one 3-dc side group between each pair of corners. Lay it flat before continuing. If a corner is missing, check that you worked 3 dc, ch 2, 3 dc into every other space from Round 3. If the square cups or ripples even with the correct groups, check whether the ivory stitches are much tighter or looser than the flower rounds. Adjust your hook slightly and redo this round if needed. Don't try to correct a missing corner by blocking. The square should lie reasonably flat before you begin Round 5.
Round 5: Ivory Granny-Square Border
- Slip stitch into the next corner ch-2 space.
- Ch 2. Work 3 dc, ch 2, 3 dc into that corner space, then ch 1.
- Work 3 dc and ch 1 into each of the next two side ch-1 spaces.
- Repeat the corner group and two side groups around the remaining three sides.
- Join to the first dc.
Round 5 count: 48 dc, 4 corner ch-2 spaces, and 12 side ch-1 spaces.
Round 6: Final Granny-Square Round
- Slip stitch into the next corner ch-2 space.
- Ch 2. Work 3 dc, ch 2, 3 dc into the corner, then ch 1.
- Work 3 dc and ch 1 into each of the next three side ch-1 spaces.
- Repeat around all four sides.
- Join to the first dc.
Round 6 count: 60 dc, 4 corner ch-2 spaces, and 16 side ch-1 spaces.
Round 7: Single Crochet Edge
- Slip stitch into the next corner ch-2 space.
- Ch 1 and work 3 sc into that corner space. Mark the middle sc as the corner stitch.
- Work 1 sc into each dc and 1 sc into each ch-1 space along the next side.
- Work 3 sc into the next corner ch-2 space, marking its middle stitch.
- Repeat around the remaining sides.
- Join to the first sc and fasten off, leaving a tail for joining.
Round 7 count: 88 sc total, including the 12 corner stitches.
Checkpoint: The square has four marked corner-center stitches. There are 22 stitch intervals between neighboring corner centers, or 23 stitches when you count both endpoints.
Measure the square from edge to edge. The target is 5 inches. If the square isn't that size, adjust your hook or tension and make the correction before crocheting the second square.
Make the second floral square exactly the same way, using the same yarn colors and number of rounds.
Crochet the Holly Leaf Granny Square
This is the square that gives the stocking its special Christmas look. The ivory background is made first, followed by four pointed green leaves, four cranberry hearts, and one small center berry.
The leaves are sewn on separately. That's easier than trying to crochet four shaped leaves into a granny-square round, and it lets you position them before attaching anything permanently.
Ivory Granny-Square Background: Make 1
Round 1
- With ivory yarn, ch 4 and join to form a ring.
- Ch 2, then work 3 dc into the ring and ch 2.
- Repeat 3 dc and ch 2 three more times.
- Join to the first dc.
Count: 12 dc and 4 corner ch-2 spaces.
Round 2
- Slip stitch into the next corner ch-2 space.
- Ch 2, then work 3 dc, ch 2, 3 dc into the corner. Ch 1.
- Repeat that corner group and ch 1 in each of the three remaining corners.
- Join to the first dc.
Count: 24 dc, 4 corner ch-2 spaces, and 4 side ch-1 spaces.
Round 3
- Slip stitch into the next corner ch-2 space.
- Ch 2, then work 3 dc, ch 2, 3 dc into the corner. Ch 1.
- Work 3 dc and ch 1 into the next side ch-1 space.
- Repeat around all four sides and join.
Count: 36 dc, 4 corner ch-2 spaces, and 8 side ch-1 spaces.
Round 4
- Slip stitch into the next corner ch-2 space.
- Ch 2, then work 3 dc, ch 2, 3 dc into the corner. Ch 1.
- Work 3 dc and ch 1 into each of the next two side ch-1 spaces.
- Repeat around all four sides and join.
Count: 48 dc, 4 corner ch-2 spaces, and 12 side ch-1 spaces.
Round 5
- Slip stitch into the next corner ch-2 space.
- Ch 2, then work 3 dc, ch 2, 3 dc into the corner. Ch 1.
- Work 3 dc and ch 1 into each of the next three side ch-1 spaces.
- Repeat around all four sides and join.
Count: 60 dc, 4 corner ch-2 spaces, and 16 side ch-1 spaces.
Round 6: Matching Border
- Slip stitch into the next corner ch-2 space.
- Ch 1, then work 3 sc into the starting corner ch-2 space. Mark the middle sc.
- Across the next side, work 1 sc into each of the 15 dc and 1 sc into each of the 4 ch-1 spaces. (19 sc along the side)
- At the next corner ch-2 space, work 3 sc and mark the middle stitch. Then work 19 sc across the following side in the same way.
- Repeat the corner-and-side sequence for the remaining two corners and sides.
- Join to the first sc and fasten off. (88 sc total)
Round 6 count: 88 sc.
The holly background now has the same outside border stitch count as the floral squares.
Size checkpoint before adding the leaves: Measure the ivory background now and compare it with your completed floral square. Both should measure approximately 5 inches across, with 88 sc around their borders. If the holly square is noticeably smaller or larger, correct its gauge before making or sewing on the leaves and hearts. Use a slightly larger hook if it's too small or a smaller hook if it's too large, then remake the background with the same stitch counts. Don't add extra border rounds to make the pieces match. They should lie flat and have matching outside measurements before you continue.
Crochet the Four Green Holly Leaves
Make four identical leaves with evergreen yarn. Each leaf is worked along both sides of a short foundation chain.
Leaf: Make 4
- Ch 10.
- Working into the second chain from your hook, make 1 sl st.
- Work 1 sc in the next chain.
- Work 1 hdc in the next chain.
- Work 1 dc in the next chain.
- Work 1 tr in the next chain.
- Work 1 dc in the next chain.
- Work 1 hdc in the next chain.
- Work 1 sc in the next chain.
- Work 1 sl st in the last chain.
You have worked nine stitches along the first side of the foundation chain.
Now work along the opposite side:
- Do not turn the work over. Rotate the leaf so you can crochet into the unused loops along the opposite side of the foundation chain.
- Work 1 sl st into the opposite loop of the same end chain.
- Work 1 sc in the next chain loop.
- Work 1 hdc in the next.
- Work 1 dc in the next.
- Work 1 tr in the next.
- Work 1 dc in the next.
- Work 1 hdc in the next.
- Work 1 sc in the next.
- Finish with 1 sl st in the last chain loop.
- Fasten off, leaving a long sewing tail.
Leaf count: 18 stitches worked around the foundation chain, nine on each side.
Each leaf should have a narrow end and a wider middle. You can flatten it gently with your fingers before sewing it down.
Make three more leaves the same way.
Crochet the Four Cranberry Heart Appliqués
Make four small cranberry hearts to sit between the green holly leaves. Each heart has two rounded upper lobes and a pointed lower end.
Small Crochet Heart: Make 4
- With cranberry yarn, ch 4 and join with a sl st to form a ring.
- Ch 3. This beginning chain does not count as a stitch.
- Work 3 tr and 3 dc into the center ring.
- Ch 1, work 1 tr into the ring, then ch 1. The center tr forms the lower point of the heart.
- Work 3 dc and 3 tr into the same center ring.
- Ch 3, then sl st into the center ring.
- Fasten off, leaving a sewing tail approximately 10 inches long.
Heart stitch count: Each heart contains 7 tr and 6 dc, plus the beginning and ending chains.
Flatten the piece gently with your fingers. The two groups of taller stitches form the rounded lobes, while the central tr forms the lower point.
Make three more hearts in the same way.
The hearts should fit inside the four spaces between the green leaves without extending over the ivory square border. Check their size against the finished square before sewing them down.
Make the Small Center Berry
- With cranberry yarn, ch 2.
- Work 5 sc into the second chain from your hook.
- Join with a sl st to the first sc.
- Fasten off, leaving a sewing tail.
Arrange and Sew the Holly Design
- Lay the finished ivory square flat with its right side facing you.
- Place the four green leaves around the center, with their narrow bases meeting in the middle.
- Point one leaf toward the top edge, one toward the bottom, one toward the left, and one toward the right.
- Leave a little ivory background visible around all four leaf tips.
- Place one cranberry heart in each of the four diagonal spaces between the green leaves.
- Turn each heart so its two rounded lobes face outward and its pointed end faces toward the center.
- Adjust the hearts until all four fit inside the ivory border without covering the green leaf tips.
- Pin the leaves and hearts in place.
- Using the yarn tails, sew each leaf to the ivory square. Stitch around the outside edge and secure the center so the leaves remain flat.
- Sew each cranberry heart to the background along its outside edge, keeping both rounded lobes visible.
- Place the small cranberry center berry where the four leaves meet. Sew it down firmly.
- Weave all tails into the wrong side of the square.
Holly square checkpoint: You should have four green leaves, four cranberry hearts arranged between them, and one small cranberry berry at the center. The square must still lie flat and measure approximately 5 inches across.
Don't pull the leaf stitches so tightly that the ivory square wrinkles. You want the leaves attached, not stretched.
Granny Square Stocking Layout and Assembly Map
Now that all three squares are finished, lay them out in the order they'll appear on the front of the stocking.
It's a simple arrangement, but get it right before sewing. The two matching floral squares go at the top and bottom, with the holly design between them.
Front Square Arrangement
- Square A: Floral granny square, directly below the cuff.
- Square B: Holly leaf granny square, in the middle.
- Square C: Second floral granny square, placed diagonally across the foot. Its upper corner nearest the toe sits approximately 2 2/3 inches higher than its upper corner nearest the heel.
All three squares should measure 5 inches across. The upper floral square and holly square form a straight, 10-inch-long section. Position the lower floral square separately at an angle of approximately 32 degrees toward the toe. Its upper corner nearest the toe belongs near Row 30 of the cranberry panel, approximately 1 1/8 inches inside the toe-side edge. Keep the entire square, including all four corners, on the cranberry backing. Its upper ivory border meets or slightly overlaps the holly square near the toe side, while cranberry remains visible near the heel. Leave approximately 1/4 inch of cranberry fabric between the lower square's outside border and the stocking's side-seam edges at their closest points. The squares themselves need no additional rounds or shaping.
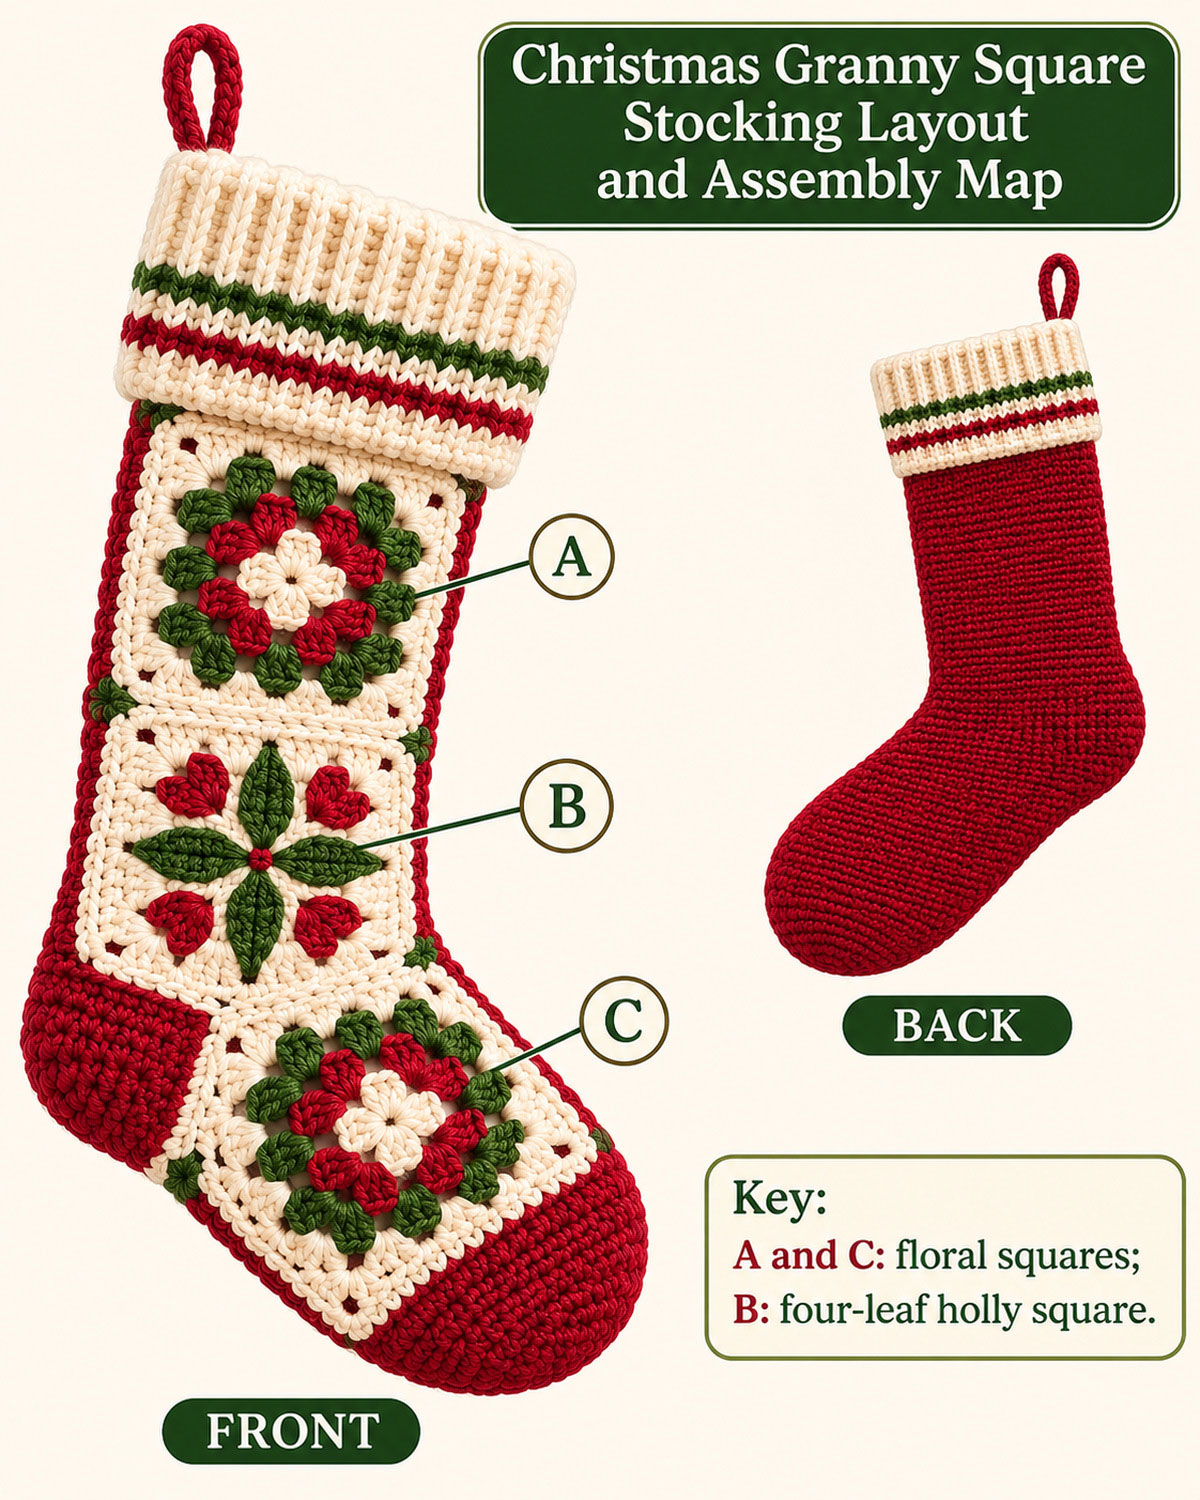
Check the Layout Before Sewing
- The top floral square sits directly below the cuff.
- The holly leaves point toward the four sides of the middle square.
- The bottom floral square sits above the shaped cranberry toe.
- The cranberry heel extends from the left edge of the stocking when the finished front faces you.
- The back panel remains plain cranberry.
Keep the first two squares aligned. Position the lower floral square on a clear diagonal, with its upper edge rising approximately 2 2/3 inches toward the toe. Its upper border should meet or slightly overlap the holly square near the toe side. Cranberry backing will remain visible toward the heel. Check that no corner extends beyond the stocking panel before sewing.
The cranberry fabric supplies the heel, the wider foot, and the rounded appearance of the toe. All three granny squares stay the same finished size.
How to Join and Arrange the Three Granny Squares
We're going to join the upper floral square and the holly square first. Keep the lower floral square separate for now. It belongs on the foot section, where it needs to sit a little farther toward the toe.
Join the Upper Floral Square to the Holly Square
- Lay the upper floral square above the holly square, with both right sides facing up.
- Bring the floral square's bottom border against the holly square's top border.
- Match the marked corner-center stitches at both ends.
- Check that both edges contain 23 stitches when you count the two corner-center stitches.
- Thread a yarn needle with ivory yarn.
- Beginning at one corner center, use small mattress stitches to sew the corresponding border stitches together across the full edge.
- Keep the seam flat. Don't pull the two squares tightly together.
- Secure the yarn on the wrong side and weave in the tail.
Checkpoint: You should have one joined section measuring approximately 5 inches across and 10 inches long. The floral motif is at the top and the holly design is directly underneath.
Prepare the Lower Floral Square
Leave the second floral square separate. Don't sew its entire upper edge to the holly square.
Once the cranberry front panel is finished, you'll position this square slightly toward the toe and sew it to the backing. The two ivory borders will overlap a little where the holly square meets the lower floral square.
That's all the joining you need to do right now. Set the prepared motifs aside while you crochet the stocking body.
Crochet the Cranberry Stocking Body, Heel and Toe
Now we'll make the cranberry stocking body. It has two matching panels, one for the decorated front and one for the plain back.
The heel sticks out on one side, and the foot gets wider toward the toe. That change in width is what gives our stocking its familiar Christmas shape. The three granny squares will sit on top of the finished front panel.
Stocking Panel: Make 2
Yarn: Cranberry red, medium-weight #4.
Hook: Use the size needed to obtain 14 hdc stitches and 12 rows across 4 inches.
Construction: Work flat in turned rows. Turn at the end of each completed row unless instructed otherwise. At the beginning of every row from Row 2 through Row 54, ch 1 before working the first hdc, increase, or decrease. This includes rows that say "Repeat" or "Repeat the same shaping." When an individual row already tells you to ch 1, use that one beginning chain and do not add another. Beginning chains do not count as stitches.
Choose one long edge as the heel edge. When looking at the decorated front with its top opening above you, the heel will be on the left. The opposite edge is the toe side, where we'll widen the foot later.
Place a removable marker along the heel edge after Row 24. Move it up as you work so you always know which edge receives the heel shaping. The marked edge alternates between the beginning and end of the working row because you're turning your work.
Rows 1–24: Straight Upper Stocking
Row 1: Ch 24. Hdc in the third chain from the hook and in each remaining chain. Turn. (22 hdc)
Rows 2–24: Ch 1, hdc in every stitch across. Turn at the end of each row. (22 hdc per row)
Checkpoint: After Row 24, the panel should measure approximately 6 1/4 inches wide and 8 inches long at the target gauge.
Rows 25–30: Increase the Heel
Increase by one hdc at the marked heel edge on every row. If the heel edge is at the beginning of the row, work 2 hdc in the first stitch. If it's at the end, work 2 hdc in the last stitch.
Work one ordinary hdc in every other stitch.
Row 25: Ch 1, work across with one heel-edge increase. Turn. (23 hdc)
Row 26: Ch 1, work across with one heel-edge increase. Turn. (24 hdc)
Row 27: Ch 1, work across with one heel-edge increase. Turn. (25 hdc)
Row 28: Ch 1, work across with one heel-edge increase. Turn. (26 hdc)
Row 29: Ch 1, work across with one heel-edge increase. Turn. (27 hdc)
Row 30: Ch 1, work across with one heel-edge increase. Turn. (28 hdc)
The panel now extends six stitches beyond its original edge on the heel side.
Rows 31–34: Widest Part of the Heel
Rows 31–34: Ch 1, hdc in every stitch across. Turn after every row. (28 hdc per row)
Checkpoint: The widest section of the heel measures approximately 8 inches across at the target gauge.
Rows 35–40: Bring the Heel In and Begin the Foot
Now we'll begin turning the stocking toward the toe. Instead of decreasing only at the heel, work one decrease at the heel edge and one increase at the opposite toe edge on every row.
The decrease and increase balance each other, so the row stays at 28 stitches while the fabric gradually shifts toward the toe.
When the marked heel edge comes first, work hdc2tog over the first two stitches and 2 hdc in the final stitch. When the heel edge comes last, work 2 hdc in the first stitch and hdc2tog over the final two stitches. Work 1 hdc in each intervening stitch.
Row 35: Ch 1. Work one heel-edge decrease and one toe-edge increase. Turn. (28 hdc)
Row 36: Repeat the decrease-and-increase sequence. Turn. (28 hdc)
Row 37: Repeat. Turn. (28 hdc)
Row 38: Repeat. Turn. (28 hdc)
Row 39: Repeat. Turn. (28 hdc)
Row 40: Repeat. Turn. (28 hdc)
Checkpoint: The heel edge has moved inward by six stitches while the opposite edge has extended six stitches toward the toe. The working width remains 28 stitches.
Rows 41–44: Continue Turning the Foot
Keep working one decrease at the marked heel edge and one increase at the toe edge. The width remains constant, but the lower section continues moving toward the toe.
Row 41: Ch 1. Work one heel-edge decrease and one toe-edge increase. Turn. (28 hdc)
Row 42: Repeat. Turn. (28 hdc)
Row 43: Repeat. Turn. (28 hdc)
Row 44: Repeat. Turn. (28 hdc)
Checkpoint: Since Row 34, the lower working section has shifted ten stitch positions toward the toe. The heel side now slopes inward, while the opposite edge extends outward.
Rows 45–47: Complete the Wider Foot
Row 45: Ch 1. Work 2 hdc in the toe-edge stitch and 1 hdc in every other stitch. Turn. (29 hdc)
Row 46: Ch 1, hdc in every stitch across. Turn. (29 hdc)
Row 47: Ch 1, hdc in every stitch across. Turn. (29 hdc)
Foot checkpoint: The widest foot section contains 29 stitches, approximately 8 1/4 inches at the target gauge. The foot should now extend noticeably toward the toe rather than hanging straight beneath the heel.
Rows 48–54: Shape the Rounded Cranberry Toe
We'll narrow the foot gradually while extending its outer edge for the first three toe rows. Then we'll bring both edges inward to form the end of the stocking.
For the following instructions, consecutive heel-edge decreases are worked over consecutive pairs of stitches. Two hdc2tog use four existing stitches; three hdc2tog use six. Work the decreases at the beginning or end of the row according to the marked heel edge.
Row 48: Ch 1. Work two hdc2tog at the heel edge, 2 hdc in the toe-edge stitch, and 1 hdc in every intervening stitch. Turn. (28 hdc)
Row 49: Repeat the same shaping. Turn. (27 hdc)
Row 50: Repeat the same shaping. Turn. (26 hdc)
Row 51: Ch 1. Work two hdc2tog at the heel edge and one hdc2tog at the toe edge. Work 1 hdc in each intervening stitch. Turn. (23 hdc)
Row 52: Repeat the Row 51 shaping. Turn. (20 hdc)
Row 53: Ch 1. Work three consecutive hdc2tog at the heel edge and one hdc2tog at the toe edge. Work 1 hdc in each intervening stitch. Turn. (16 hdc)
Row 54: Repeat the Row 53 shaping. Do not turn. (12 hdc)
Fasten off, leaving a long sewing tail.
Toe checkpoint: The toe narrows from 29 stitches after Row 47 to 12 stitches after Row 54. The outer edge reaches its farthest point at Row 50, then curves inward toward the final row.
Check the Completed Stocking Panel
- Row 1: 22 stitches
- Row 24: 22 stitches
- Row 30: 28 stitches
- Row 34: 28 stitches
- Row 40: 28 stitches
- Row 44: 28 stitches
- Row 45: 29 stitches
- Row 47: 29 stitches
- Row 48: 28 stitches
- Row 49: 27 stitches
- Row 50: 26 stitches
- Row 51: 23 stitches
- Row 52: 20 stitches
- Row 53: 16 stitches
- Row 54: 12 stitches
- Total rows: 54
- Expected length before adding the cuff: Approximately 18 inches
At the stated gauge, this panel contains 1,312 completed hdc stitches, counting each hdc2tog as one completed stitch. Both matching panels contain 2,624 completed stitches.
Before making the second panel, lay the first one flat. The heel should project to the left, the lower foot should move toward the right, and the final toe edge should contain exactly 12 stitches.
Check the heel and foot directions before starting the second panel. The heel projects from one side, and the foot widens on the opposite side.
Crochet the Matching Back Panel
Repeat Rows 1–54 to make the plain cranberry back.
Lay the panels together with the heel bulges aligned and the toe sections pointing in the same direction. Turn the back panel over if needed so the outlines match. Its plain surface can face either direction.
Both panels must have identical row counts and matching outside edges. Don't sew them together yet. We'll decorate the front first.
Attach the Upper Floral and Holly Squares
- Place the cranberry front panel flat with the heel on the left and the toe extending toward the right.
- Lay the joined floral-and-holly section on the upper stocking panel. The top floral square covers the straight leg section, while the lower portion of the holly square extends into the beginning of the shaped heel area. Keep both squares aligned with the original straight leg edges rather than centering the holly square across the wider heel.
- Center the upper floral square across the 6 1/4-inch-wide section, leaving approximately 5/8 inch of cranberry visible along each side.
- Place its upper edge approximately 1/4 inch below the top opening.
- Keep the holly square directly below the upper floral square.
- Pin the outside borders to the cranberry fabric.
- With ivory yarn and a yarn needle, sew around the outside of both squares, catching the cranberry backing underneath.
- Secure the horizontal seam between the two squares to the cranberry backing as well.
- Remove the pins and check that the joined squares lie flat.
Position the Lower Floral Square on the Foot
Now place the second floral square below the holly design.
- Lay the cranberry front panel flat with the heel on the left and the toe extending toward the right. Keep the floral square's right side facing outward.
- Place the floral square diagonally below the holly design, with its upper edge rising toward the toe.
- Pin the upper toe-side corner near Row 30, approximately 1 1/8 inches inside the toe-side edge of the cranberry panel. Position the upper heel-side corner near Row 38. Before securing the remaining corners, check that the square's ivory border stays approximately 1/4 inch inside the cranberry side-seam edges, particularly near Rows 34 and 51. Shift the entire square slightly if needed, without stretching or changing its five-inch shape.
- Position the lower toe-side corner near Row 43 and the lower heel-side corner near Row 51.
- Check that the square measures 5 inches along each edge and lies flat at an angle of approximately 32 degrees. All four corners and the complete ivory border must remain within the cranberry panel.
- Pay particular attention to the lower heel-side corner near Row 51. Keep it inside the cranberry side seam. Do not stretch the square or pull its border across the seam to make it fit. If the square crosses an edge, recheck the square size and stocking-body gauge before sewing.
- Near the toe side, let the upper ivory border overlap the holly square's lower border where they meet naturally. Don't force the full border into a straight seam.
- With ivory yarn and a yarn needle, sew around the lower floral square's outside border, catching the cranberry backing underneath.
- Where the ivory borders overlap, sew through both borders and the backing to secure them together.
- Secure the sewing yarn on the wrong side, weave in the tail, and remove the temporary pins.
The lower floral square should lie diagonally across the foot, rather than hanging directly below the holly square. Check the four corner positions before sewing. Keep the fabric flat and do not stretch any corner to force the placement.
Front panel checkpoint: You should see the top floral square, the four-leaf holly square, and the second floral square positioned toward the toe. The rounded heel area remains cranberry, as does the toe beyond the last square.
Join the Front and Back Panels
- Lay the decorated front and plain back together with their outer shapes aligned.
- Keep the decorated side facing outward.
- Match the top corners and use markers to align Rows 24, 30, 34, 40, 47, and 54 on both panels.
- Thread a yarn needle with a long cranberry strand.
- Starting at the top corner above the heel, sew down the heel-side edges, matching the row ends on both panels.
- Continue around the projecting heel, keeping the corresponding rows aligned.
- Continue along the lower heel-side edge toward the toe.
- At the toe, sew across the final 12 stitches, matching the stitches from the front and back panels.
- Continue sewing up the opposite edge, matching row ends as you pass the widening foot section.
- Finish at the remaining top corner.
- Fasten off securely and weave the sewing tail into the inside seam.
Important: Leave the entire top opening unsewn. That's where we'll add the cuff.
Check the seams around the toe. Keep the stitches even and ease the corners gently rather than pulling them into sharp points. The two matching tapered panels will form the closed toe section.
Turn the stocking so the decorated front faces you. You should have a cranberry heel, a wider foot, three large granny-square motifs, and a closed cranberry toe.
Crochet the Ivory Ribbed Cuff With Christmas Stripes
Now for the cuff. The ivory ribbing gives the stocking a nice finished look, and the narrow red and green stripes bring the whole color scheme together.
We'll crochet the cuff directly around the open top, so there's no separate piece to measure or sew on afterward.
Prepare the Opening
Flatten the stocking with its front facing you. The top edge has 22 foundation stitches across the front and 22 across the back.
Join ivory yarn at one side seam. Work into the available foundation loops of the original stitches, avoiding the unused beginning chains at the corners.
Round 1: Ivory Lower Cuff Band
Ch 1, then work 1 sc into each of the 22 front foundation stitches and each of the 22 back foundation stitches. Join to the first sc.
Count: 44 sc.
Opening checkpoint: Before starting the next stripe, flatten the stocking and check the cuff foundation. You should have 22 sc across the front and 22 across the back. The opening should lie smoothly without puckering or spreading into a wavy edge. If it pulls inward noticeably, undo only Round 1 and work the same 44 sc with a slightly larger hook or looser tension. If it flares outward, use a smaller hook or firmer tension. Don't add or remove stitches to make the round fit. Check it now, before adding the other cuff rounds.
Round 2: Complete the Ivory Lower Band
Ch 1, sc in each stitch around. Join and fasten off ivory.
Count: 44 sc.
Round 3: First Cranberry Stripe
Join cranberry yarn at the side seam. Ch 1, sc in each stitch around. Join.
Count: 44 sc.
Round 4: Second Cranberry Stripe
Ch 1, sc in each stitch around. Join and fasten off cranberry.
Count: 44 sc.
Round 5: Ivory Divider
Join ivory yarn at the side seam. Ch 1, sc in each stitch around. Join and fasten off ivory.
Count: 44 sc.
Round 6: Evergreen Stripe and Ribbing Foundation
Join evergreen yarn at the side seam. Ch 2, which does not count as a stitch. Work 1 dc in each stitch around. Join to the first dc and fasten off evergreen.
Count: 44 dc.
Stripe checkpoint: Looking from the bottom of the cuff upward, you should now see two ivory rounds, two cranberry rounds, one ivory divider, and one evergreen round. The next rounds will build the raised ivory ribbing directly above the evergreen stripe.
Rounds 7–11: Ivory Ribbed Cuff
Round 7: Join ivory yarn to the top of the first evergreen dc from Round 6. Ch 2, which does not count as a stitch. Work 1 FPdc around that same first dc and 1 BPdc around the next dc. Repeat this two-stitch sequence around the cuff. Join with a sl st to the first FPdc. (44 post stitches)
Rounds 8–11: Ch 2. Work 1 FPdc around each FPdc and 1 BPdc around each BPdc from the previous round. Join with a sl st to the first FPdc at the end of each round. (44 post stitches per round)
Continue through Round 11, keeping the raised and recessed ribbing columns aligned. Do not increase or decrease.
Round 12: Finish the Cuff Edge
Ch 1, sc in each stitch around. Join to the first sc.
Count: 44 sc.
Fasten off ivory and weave in the end.
Cuff checkpoint: The cuff should fit smoothly around the opening without drawing it closed. Starting at the lower edge, you should see an ivory band, two cranberry rounds, a narrow ivory divider, an evergreen stripe, and raised ivory ribbing above it. The colors should follow this order all the way around, without a twisted stripe or a noticeable gap at the side seam.
If the cuff pulls inward too tightly, check your post-stitch tension. Use a slightly larger hook for the cuff if needed, but keep the same 44 stitches in every round.
Crochet the Hanging Loop and Finish the Christmas Stocking
We're almost finished! The last piece is the cranberry hanging loop, followed by a careful check of the seams and yarn ends.
Crochet the Hanging Loop
With cranberry yarn:
- Ch 17.
- Row 1: Sc in the second chain from your hook and in each remaining chain. (16 sc)
- Row 2: Ch 1, turn, sc across. (16 sc)
- Row 3: Ch 1, turn, sc across. (16 sc)
- Fasten off, leaving a long yarn tail for sewing.
Fold the strip into a loop with its two short ends together.
Attach the Loop
- Lay the stocking flat with the decorated front facing you.
- Choose the upper corner above the heel side for the hanging loop.
- Position both short ends of the folded loop against the inside of the cuff, approximately 3/4 inch below the upper edge.
- With cranberry yarn, sew through both loop ends and several cuff stitches.
- Make additional small stitches across the loop ends to reinforce the attachment.
- Secure the yarn and weave the tail into the inside of the stocking.
The loop should stand above the cuff without twisting.
Final Finishing Checklist
- Check that all three granny squares are attached securely along their outside edges.
- Check that the upper floral-to-holly seam and the overlapping join above the lower floral square lie flat.
- Check all four holly leaves, four cranberry hearts, and the small center berry for loose sewing stitches.
- Inspect the cranberry side seams, especially around the heel and toe.
- Check that the cuff has 44 stitches in every round and hasn't been pulled too tightly.
- Weave in any remaining yarn ends.
- Remove all temporary stitch markers and sewing pins.
- Gently shape the stocking with your hands so the heel, toe, and granny-square front lie neatly.
If you decide to block the stocking, follow the care directions for your chosen yarn. Avoid stretching the cuff or pulling the holly leaves out of shape.
The finished stocking is intended as a Christmas decoration. Hang it from a secure hook or holder appropriate for the weight of the stocking and anything placed inside. Keep it out of children's reach when displayed.
And there you have it! Three cheerful crochet squares, a little holly in the middle, and a roomy stocking for Christmas Eve.
Christmas Granny Square Stocking Pattern FAQs
Can I make the stocking smaller?
Yes, but you'll need to reduce the square size and body dimensions together. Simply making smaller granny squares won't change the size of the cranberry stocking body. For a proportional smaller version, calculate a new body stitch and row count using the same percentage reduction.
Can I use different Christmas colors?
Of course. A cream stocking with dusty red flowers and sage-green leaves would be pretty. You could also use bright red and Christmas green for a more traditional look. Just keep the yarn weight consistent so your squares finish at the same size.
Do I have to crochet the holly leaves separately?
For this particular design, yes. The four separate leaves give you better control over their placement and help keep their pointed shapes recognizable. Crochet all four first, arrange them on the ivory square, and then sew them down.
Can I decorate the back with granny squares too?
Yes. You can make two additional floral squares and another holly square for the back. Attach them to the second cranberry panel before sewing the stocking together. You'll need extra yarn, and the finished stocking will be thicker than the pictured version.
Can I add a child's name to the stocking?
You can embroider a name or initials with a yarn needle. Keep the lettering small enough to fit neatly on the ivory cuff. I'd position it before the hanging loop is attached so the stitching is easier to reach.
Once your stocking is finished, take a look at the free Christmas granny square pattern collection for other motifs you can use in matching holiday projects.
When you click on links to various merchants on this site and make a purchase, this may result in this site earning a commission. This does not affect the price you pay.

UBGI Gold Standard 2026
Reviewed under the site's
editorial checklist.
Photos, decorating ideas, party setups and reader submissions are shared for inspiration unless a page is specifically presented as a pattern, tutorial, reference guide or step-by-step project. Follow the instructions, measurements, safety guidance and manufacturer directions provided for the particular project or product.
About Jan | Contact | Baby Nursery Ideas (Blog) | Site Map | Privacy Policy | Disclosure Policy | Disclaimer | Affiliate Disclosure | Earnings Disclosure | Facebook | Pinterest
I am a participant in the Amazon Services LLC Associates Program, an affiliate advertising program designed to provide a means for us to earn fees by linking to Amazon. As an Amazon Associate I earn from qualifying purchases.
Copyright © 2006-2026. All Rights Reserved.