DIY Macrame Owl Wall Hanging for a Woodland Nursery (Step-by-Step Design Guide)
A DIY macrame owl wall hanging is one of those nursery projects that looks much more complicated than it actually is once you get started. The shape comes together slowly from a few simple knots, and somewhere in the middle it stops looking like loose cotton cord and starts looking like a perfect little woodland accent with real personality. What I like about this one is that it feels handmade in the best way. Soft, textured, a little imperfect, and warm enough to make a blank nursery wall look really special.
Try Another Nursery Wall Project

Go here to see more and the recommended cord for this project
If you like this owl design, you can find more step-by-step projects in my free baby patterns collection.
Skill Level: Beginner to early intermediate
Basic familiarity with square knots and double half-hitch knots is recommended.
Estimated Time: 2–3 hours
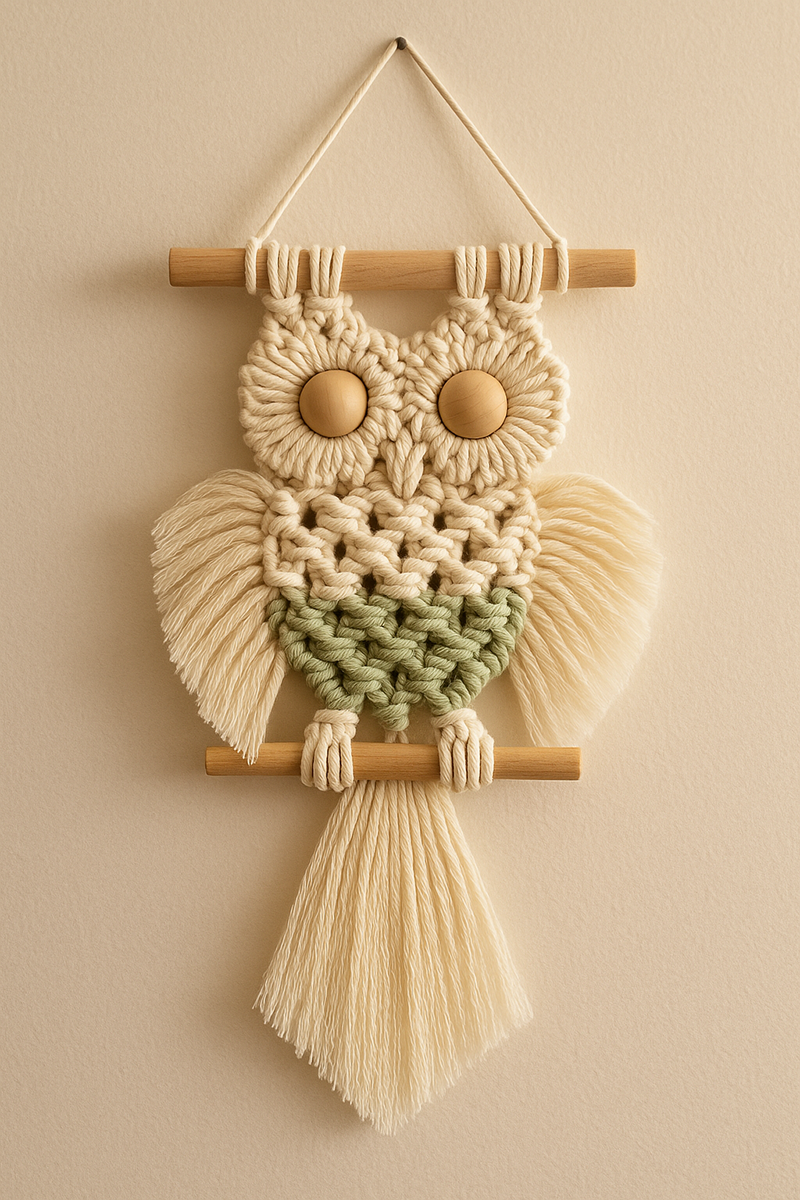
Finished Size: Approximately 14–18 inches wide × 20–24 inches long (depending on trimming length)
Project Overview: This DIY macrame owl wall hanging uses 4 mm single-strand cotton cord, square knots, and double half-hitch techniques to form the owl head, body, wings, and feathered tassel base. The steps below include exact cord counts, knot sequence structure, and layout progression.
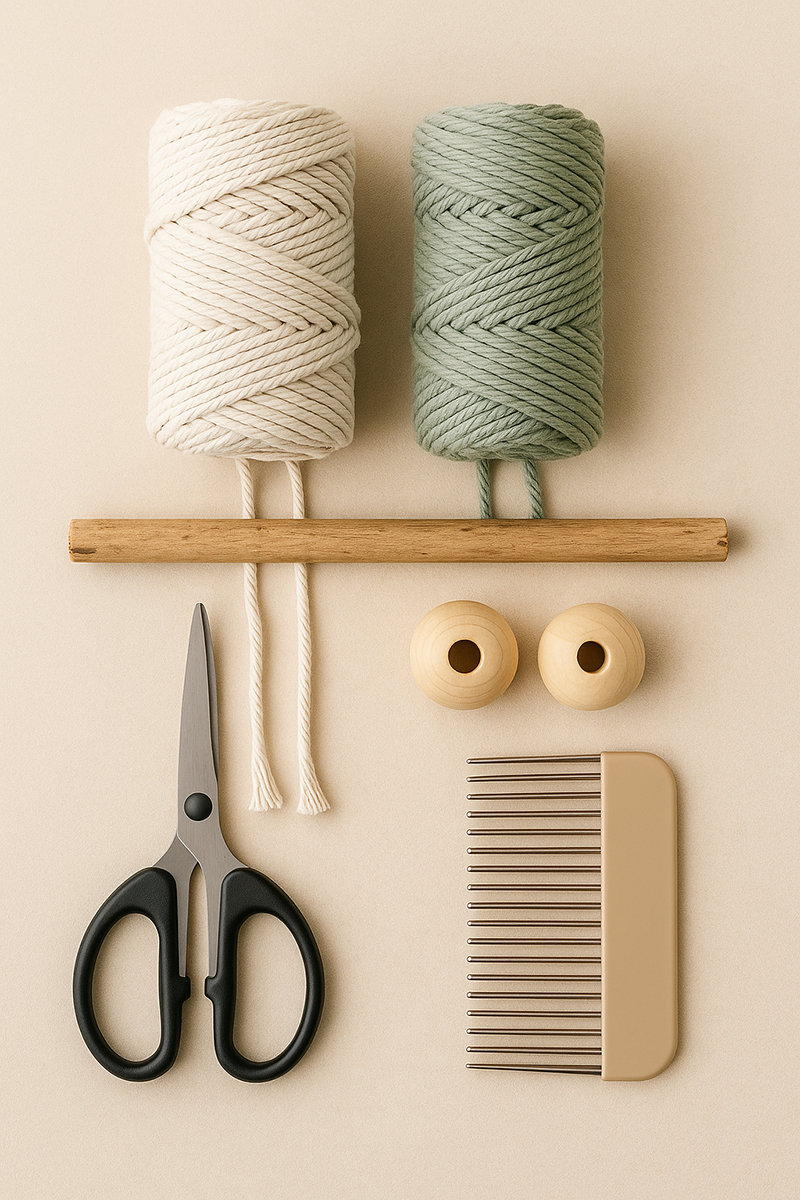
Materials Used in This Design for Your DIY Macramé Owl Wall Hanging
See my favorite cords and supplies here
Macramé Cord
• 12 cords at 6 feet each (cream)
• 4 cords at 5 feet each (sage accent)
Use 4 mm single-strand cotton cord for best brushing results.
This equals 16 total cords folded in half, resulting in 32 working strands on your dowel.
Total cord used in this pattern is approximately 95–105 feet, depending on knot tension and trimming length.
Wooden Dowel or Natural Branch
1 dowel approximately 16 inches wide.
Wooden Beads for Eyes
2 round wooden beads (¾–1 inch diameter).
Scissors + Comb
Sharp scissors for shaping and a small comb for feathering tassels.
Safe Nursery Placement
If hanging near a crib, mount securely and position high enough to remain fully out of reach. Review crib safety standards for placement guidance.
Step-by-Step Pattern Instructions
Begin by preparing your cords and dowel on a flat surface with all materials within reach. Once attached, the owl shape will build from top to bottom in structured rows.
Knot Reference for This Pattern
Square Knot: A basic macramé knot formed by alternating left and right half knots around two center cords.
Double Half-Hitch Knot: A directional knot tied around a guide cord to create angled lines or outlines, used here for shaping the wings.
1. Attach the Cords (Lark’s Head Knots)
Fold each cord in half and attach to the dowel using Lark’s Head knots. You should now have 32 working strands hanging evenly spaced.
2. Form the Owl’s Head (Square Knots)
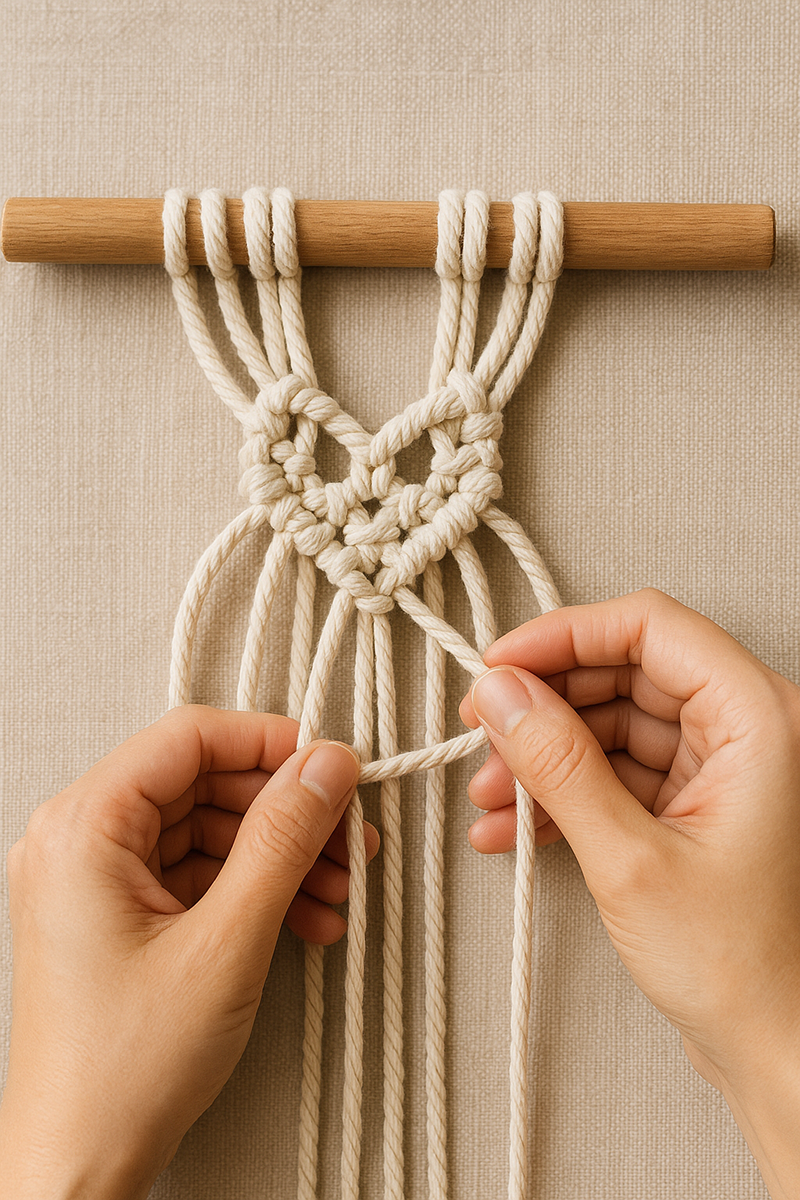
Using groups of 4 strands, tie 4 rows of square knots across the center section to create the owl’s rounded head shape. The finished head section should measure approximately 6–8 inches wide before moving into the body rows. Leave 2–3 outer strands loose on each side for wing formation later.
3. Add the Wooden Bead Eyes
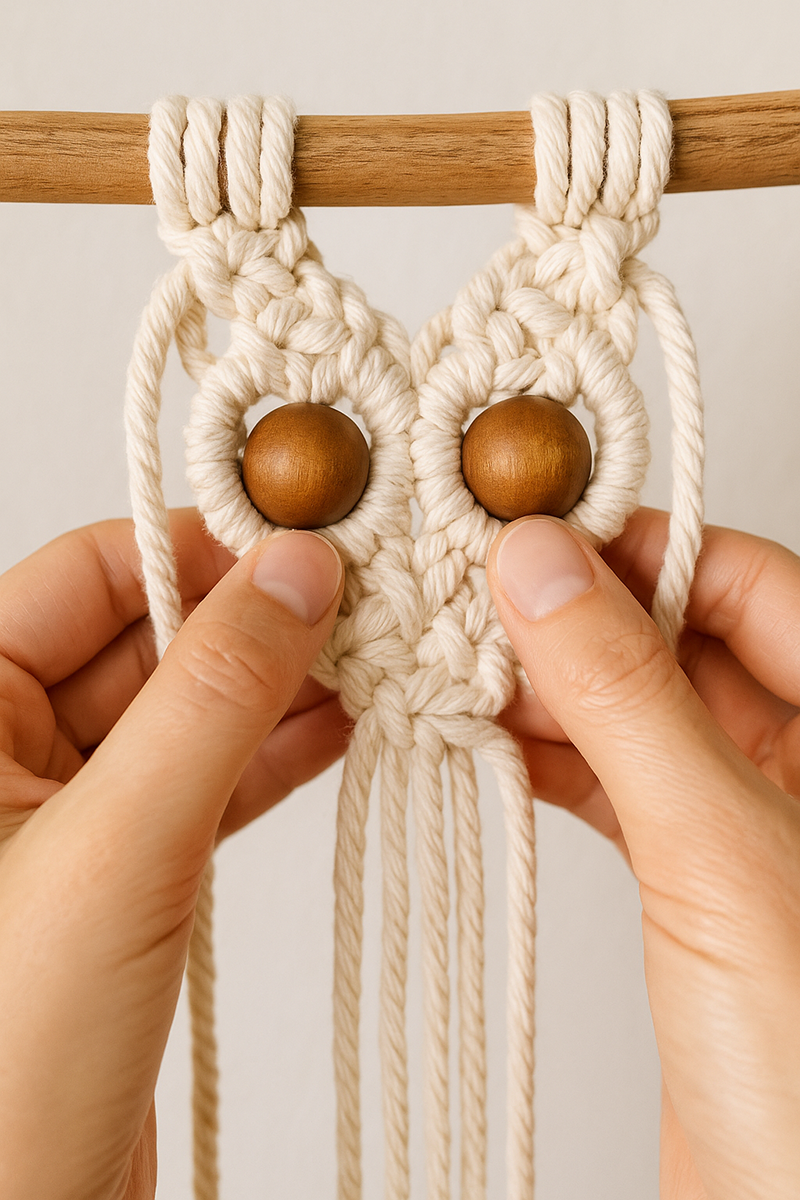
Thread one strand through each bead and secure with a small overhand knot behind the bead. Position evenly within the square knot grid.
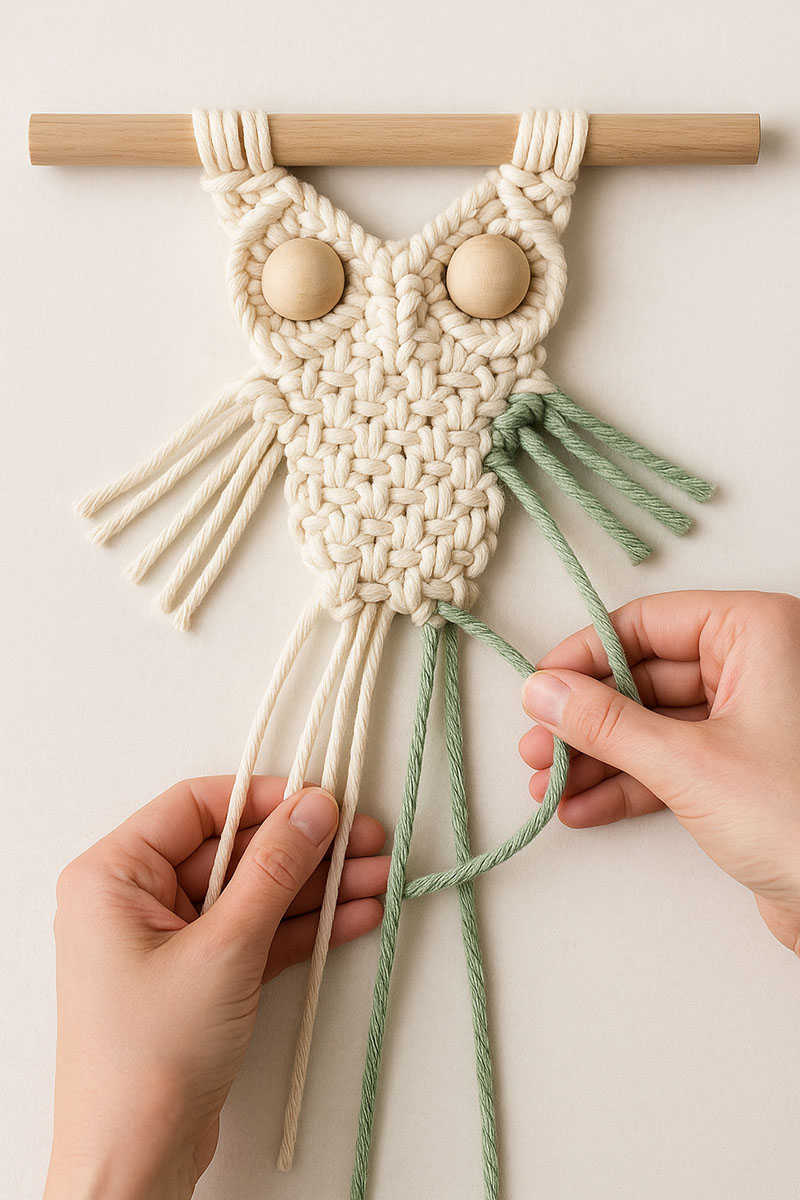
4. Create the Body With Accent Rows
Insert the sage cords into the center section and alternate square knot rows with cream cords to form a diamond-shaped body pattern. The number of body rows you tie will determine the final owl length, so add or subtract rows if you prefer a longer or shorter finished piece.
If you like soft, nature-inspired designs like this, you may also enjoy browsing my DIY nursery decor ideas for more wall accents and handmade touches.
For additional woodland inspiration, see neutral baby nursery.
5. Form the Wings (Double Half-Hitch Knots)
If you are learning how to make a macrame owl for the first time, follow the steps in order and complete each row before trimming or shaping the base.
On each side, angle outer strands downward using double half-hitch knots to create wing outlines. Mirror on both sides.
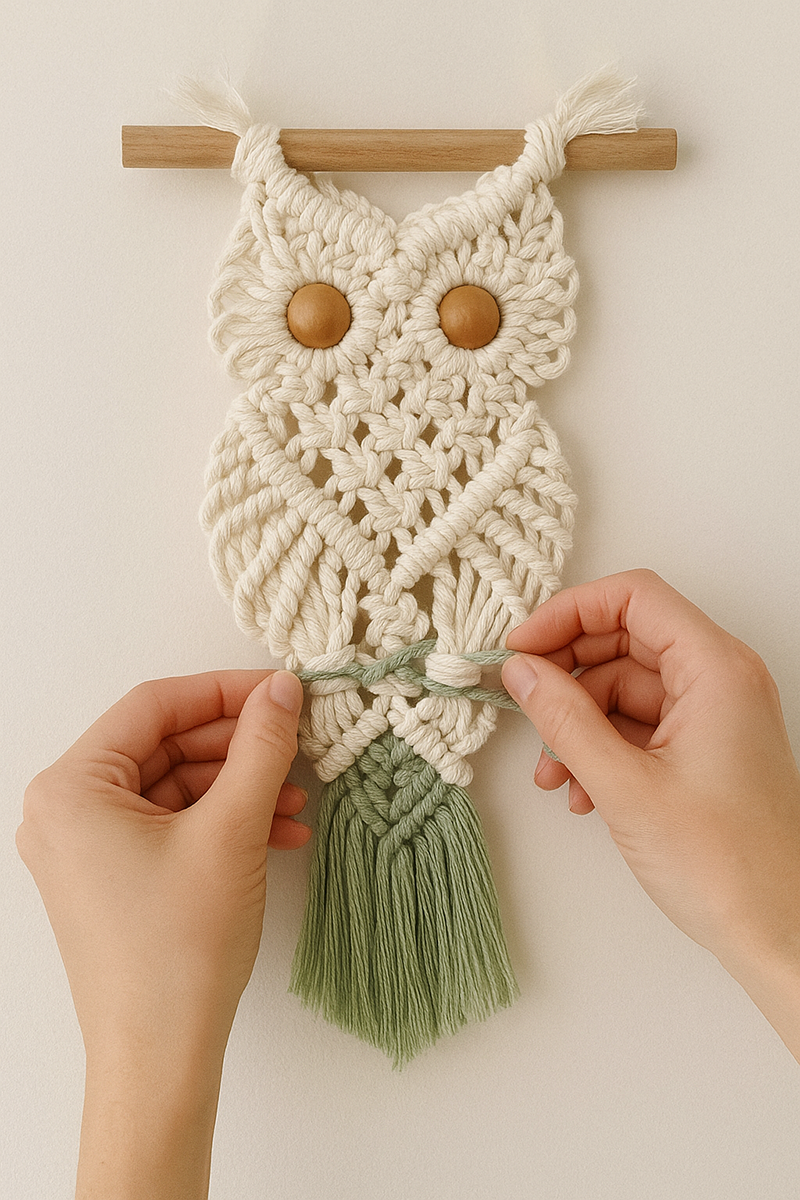
6. Create the Feathered Base
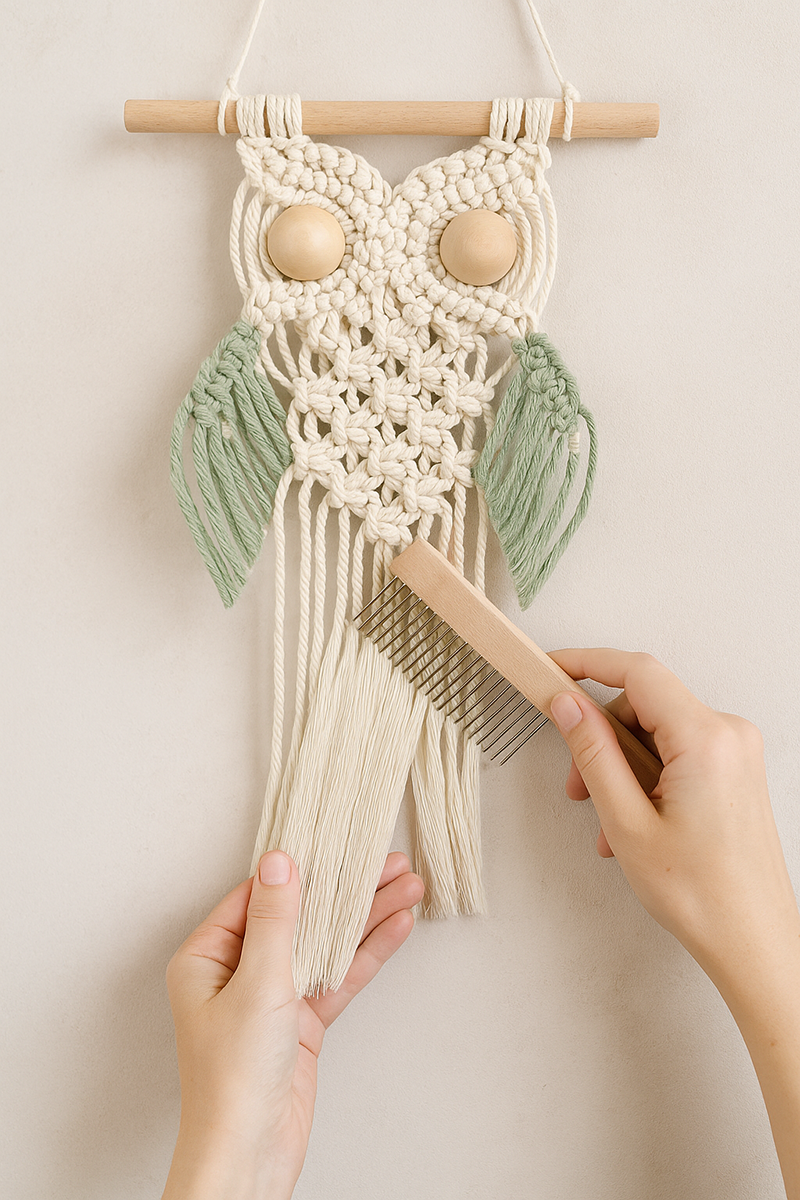
Leave lower strands untied. Comb gently to separate fibers and trim into a soft feather shape. Before trimming, step back and check that both sides of the owl are symmetrical and that the wing angles mirror each other evenly.
7. Final Trim + Finished Owl
Trim the base evenly or shape into a gentle “V” depending on your preferred finish.
Your DIY macrame owl wall hanging pattern is now complete and ready for decorative nursery placement.
This pattern is intended for decorative wall use only.
Where to Hang Your Finished Macramé Owl
Once your DIY macrame owl wall hanging is finished, deciding where to place it in the nursery makes all the difference. I love styling it above a dresser, over a small floating shelf, or centered on a blank accent wall where it becomes a quiet focal point.
In a woodland nursery, the owl pairs beautifully with warm wood tones, woven baskets, soft cream textiles, and muted sage accents.
A handmade crib mobile can extend that woodland look upward, and this DIY woodland crib mobile uses simple forest-inspired shapes that coordinate naturally with owl wall decor, woven textures, and nursery animal accents.
Woodland rooms also feel more collected when several forest animals are layered into the design instead of focusing on only one, and these forest friends nursery decorating ideas show how foxes, deer, rabbits, bears, and owls can work together in one cozy storybook-inspired space.
To see how those elements come together across a full room, these complete owl baby nursery ideas walk through layout, color, and styling choices.
It doesn’t need a lot around it. In fact, this piece works best when it has a little breathing room so the texture and feathered tassels can stand out.
If you’re designing a smaller room, consider reviewing my small nursery layout ideas before finalizing placement. Thoughtful spacing keeps the room feeling calm instead of crowded.
This wall hanging also coordinates naturally with other owl and woodland themes. If you're building a cohesive look, you might enjoy browsing my owl nursery inspiration page or exploring the broader woodland nursery theme collection.
Above all, keep placement secure and fully out of reach of the crib. Decorative texture should always enhance the room without interfering with safe sleep space.
Frequently Asked Questions About a DIY Macrame Owl Wall Hanging
Is this a beginner-friendly macrame pattern?
Yes. This DIY macrame owl wall hanging uses basic square knots and double half-hitch rows. If you understand how to tie consistent square knots, you can complete this project successfully.
How much cord does this pattern require?
This pattern uses 16 total cords (12 cream and 4 sage), cut to the specified lengths. Once folded, this produces 32 working strands attached to the dowel.
Can I change the size of the owl?
Yes. You can increase or decrease the number of body rows to lengthen or shorten the owl. Thicker cord will also produce a larger finished design.
Is it safe to hang macrame above a crib?
This wall hanging is designed for decorative use only. If placed in a nursery, it must be mounted securely and positioned completely out of reach of the crib sleep space.
This DIY macrame owl wall hanging is designed strictly for decorative wall use. Mount securely and position completely outside of crib reach.
For broader nursery planning context, explore my nursery ideas page or browse my DIY nursery decor ideas collection for more inspiration.
When you click on links to various merchants on this site and make a purchase, this may result in this site earning a commission. This does not affect the price you pay.
UBGI Gold Standard 2026
Verified for performance, SEO,
and accessibility compliance.
Photos, decorating ideas, party setups, and reader submissions are shared for inspiration only and are not intended as step-by-step decorating, construction, or DIY instructions.
About Jan | Contact | Baby Room Ideas (Blog) | Site Map | Privacy Policy | Disclosure Policy | Disclaimer | Affiliate Disclosure | Earnings Disclosure | Facebook | Pinterest
I am a participant in the Amazon Services LLC Associates Program, an affiliate advertising program designed to provide a means for us to earn fees by linking to Amazon.
Copyright © 2006-2026. All Rights Reserved.