Free Crochet Santa Blanket Lovey Pattern
By Jan Bay
This free crochet Santa blanket lovey pattern combines a Christmas cheer with a soft, cuddly handmade blanket that babies will love to snuggle with. Such a sweet thing for baby's first Christmas. Santa Claus has an embroidered face, rosy pink cheeks, a fluffy white beard and the expected red Christmas hat trimmed with holly and a big pom pom. I designed his textured red blanket to look like Santa's coat, complete with a crocheted black belt, golden buckle, tiny embroidered Christmas decorations and a pretty scalloped border to give a look of fur trim. This is a jolly little Santa with plenty of personality, ready to become a treasured handmade Christmas keepsake.
Explore More Free Crochet Baby Patterns
Easy Baby Lovey Crochet Patterns
Santa Crochet Patterns Collection
Free Crochet Santa Snuggler Lovey Pattern
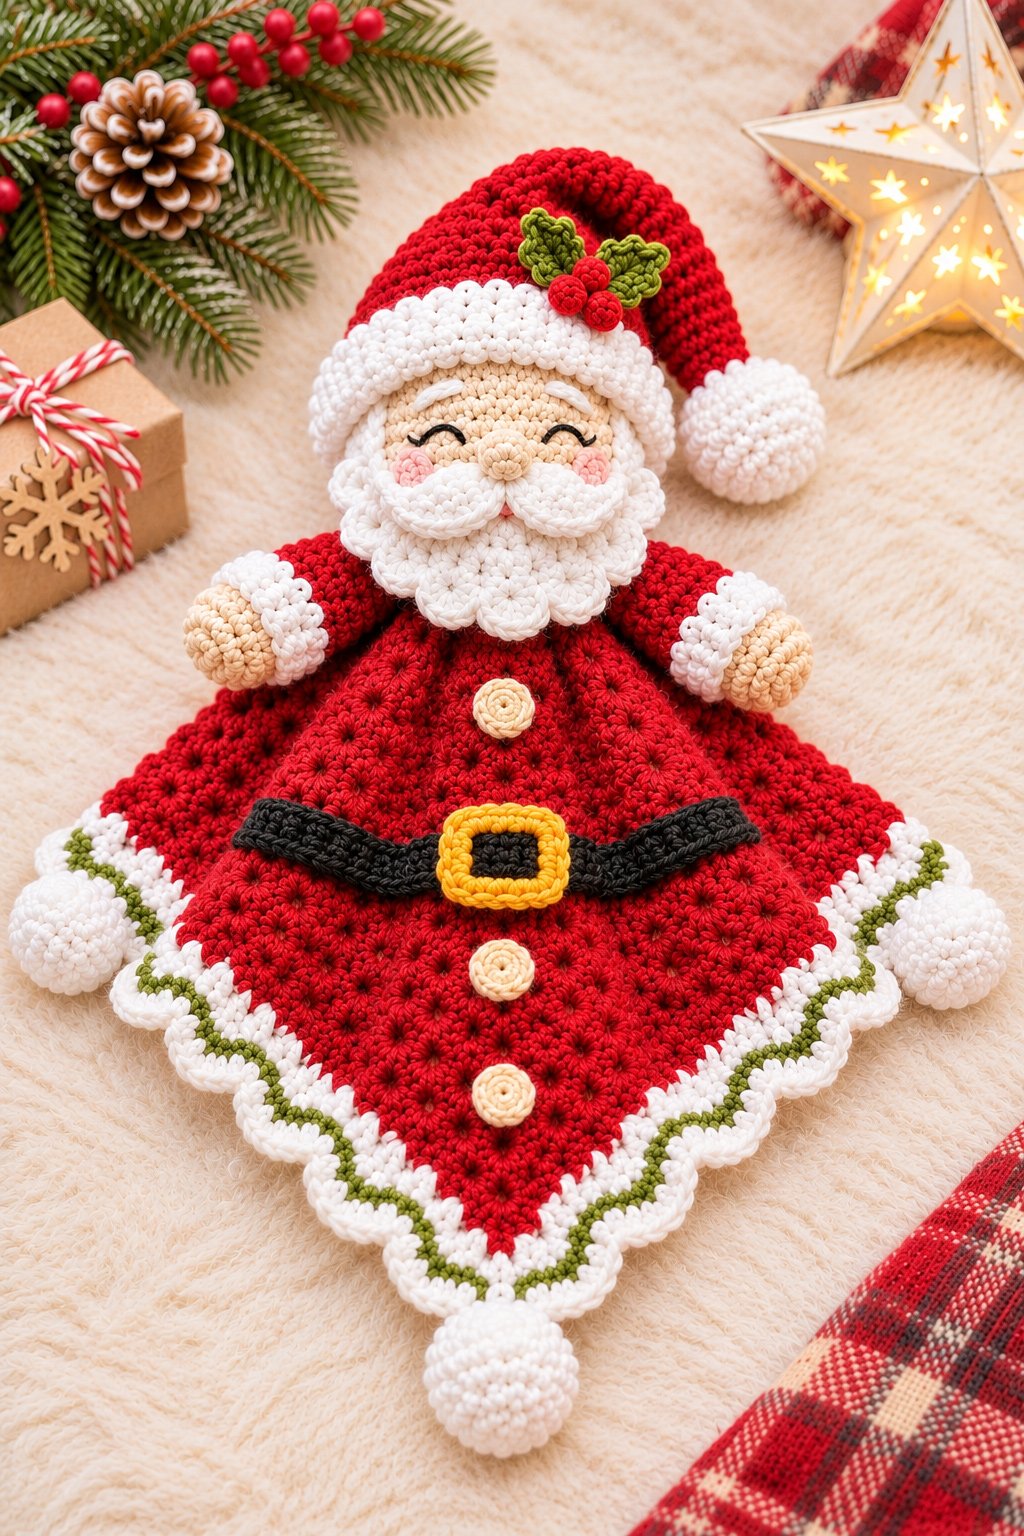
See Supplies for This Crochet Santa Lovey Project Here.
Jump to a Section
Crochet the Red Santa Lovey Blanket
White and Green Scalloped Border
Embroidered Eyes, Nose and Rosy Cheeks
Santa's White Beard and Mustache
Crochet Santa's Arms and Hands
Santa's Crocheted Belt and Gold Buckle
Embroidered Christmas Decorations
Crochet the Soft Corner Pom-Poms
Yarn, Hook and Supplies for the Free Crochet Santa Blanket Lovey Pattern
You'll be working with traditional Christmas red, snowy white and just a little green and gold. The green is an important little detail here. It picks up the holly on Santa's hat and gives the white scalloped edging a pretty finish.
The amounts below are planning allowances for the complete lovey. Actual yarn consumption depends on your gauge and yarn.
- Christmas red worsted-weight yarn: approximately 300–375 yards for the blanket, hat, arms and sleeves.
- White worsted-weight yarn: approximately 150–200 yards for the beard, hat trim, cuffs, border and pom-poms.
- Skin-tone beige yarn: approximately 35–50 yards for the head, hands and nose.
- Black yarn: approximately 15–20 yards for the belt and embroidered eyes.
- Golden-yellow yarn: approximately 8–12 yards for the buckle.
- Olive-green yarn: approximately 20–30 yards for the border accent and holly on Santa's hat.
- Pink yarn: a small amount for the cheeks.
- Cream yarn: a small amount for the three embroidered cream circle buttons.
- 5 mm (H/8) crochet hook: for the blanket.
- 3.5 mm (E/4) crochet hook: for Santa's head, hat and smaller pieces.
- Polyester fiberfill: approximately 1–2 ounces for the stuffed components.
- Yarn needle: for assembly and embroidery.
- Stitch markers, scissors and measuring tape.
Choose a smooth worsted-weight yarn with good stitch definition. You can certainly make the entire project with the same yarn brand. That keeps the different colors and crochet textures looking like they belong together.
There's no wire inside the hat, no wooden buttons on the coat and no plastic eyes. The gold buckle is made from yarn, too.
Finished Santa Lovey Size and Crochet Gauge
The planned blanket measures approximately 20–22 inches square, measured from one finished edge to the opposite edge. Santa's head is expected to measure approximately 4–5 inches across when stuffed. The hat adds approximately 4–5 inches of tapered length before its soft tip bends sideways.
These are calculated targets, not measurements from a completed sample.
Blanket gauge: Four completed granny-cluster rounds should give a square measuring approximately 4.5–5 inches across. At the end of Round 16, aim for a square measuring approximately 18–20 inches before the decorative border.
Measure the blanket across its flat edges, not from one corner to the opposite corner. A corner-to-corner measurement will be considerably larger.
Amigurumi gauge: Aim for approximately 16–18 single crochet stitches and 19–21 rounds over 4 inches with the smaller hook. The stitches must be close enough that the stuffing doesn't show through.
Check the blanket gauge after Round 4. If it's much larger than 5 inches, try a smaller hook. If it's noticeably smaller than 4.5 inches, try a larger hook. Keep the planned 16-round construction unchanged and measure again at Round 16.
The head and smaller pieces are made at a tighter gauge than the blanket. Don't expect the same stitch count per inch from both hooks.
Crochet Stitches and Abbreviations
This pattern uses US crochet terminology.
- ch: chain
- sl st: slip stitch
- sc: single crochet
- hdc: half double crochet
- dc: double crochet
- st/sts: stitch/stitches
- inc: work 2 sc into the same stitch
- dec: single crochet decrease, using an invisible decrease where practical
- MR: magic ring
- BLO: back loops only
- FO: fasten off
- rep: repeat
Granny group: Work 3 dc into the indicated space. Each group counts as three double crochet stitches.
Corner: Work (3 dc, ch 2, 3 dc) into the same corner space. Each corner adds two granny groups with a two-chain space between them.
Important: The beginning ch 3 of a granny round counts as the first dc of its beginning group. Chains between granny groups are not counted as double crochet stitches.
All stuffed components are worked in continuous spiral rounds unless a section says otherwise. Mark the first stitch of each round.
Crochet the Red Santa Lovey Blanket
Let's make Santa's red blanket first. This is the largest piece, and everything else will be arranged around it.
The blanket is worked from the center outward as a square. Its repeated groups of three double crochet stitches give it a raised, clustered appearance. Small spaces between the groups add texture without needing a complicated stitch pattern.
Use Christmas red worsted-weight yarn and the 5 mm hook.
Round 1: Make the Center Square
Make a magic ring.
- Ch 3. This counts as your first dc.
- Work 2 dc into the ring. You now have the first 3-dc group.
- Ch 2.
- Work 3 dc into the ring, then ch 2.
- Repeat the previous step twice more.
- Join with a slip stitch to the top of the beginning ch 3.
- Pull the center ring closed.
Round 1 count: Four groups of 3 dc, for 12 dc total, with four ch-2 corner spaces.
Round 2: Add the First Side Groups
Slip stitch across the next two dc and into the first corner space.
- Ch 3 and work 2 dc into the same corner space.
- Ch 2 and work another 3 dc into that corner space.
- Ch 1.
- In the next corner space, work (3 dc, ch 2, 3 dc), then ch 1.
- Repeat Step 4 in each of the remaining two corner spaces.
- Join to the top of the beginning ch 3.
Round 2 count: Eight groups, 24 dc, four ch-2 corner spaces and four ch-1 spaces.
Round 3: Build the Square
Slip stitch across the next two dc and into the first corner space.
- Work the beginning corner: ch 3, 2 dc, ch 2, 3 dc.
- Ch 1.
- Work 3 dc into the next ch-1 space.
- Ch 1.
- Work (3 dc, ch 2, 3 dc) into the next corner space.
- Ch 1, work 3 dc into the next ch-1 space, then ch 1.
- Repeat Steps 5 and 6 for the remaining corners and sides.
- Join to the top of the beginning ch 3.
Round 3 count: Twelve groups and 36 dc, with four ch-2 corners and eight ch-1 spaces.
Shape checkpoint: Lay the square flat before continuing. Round 3 should have four clearly defined ch-2 corners, one ordinary 3-dc side group between each pair of corners, and twelve granny groups altogether.
If the square looks lopsided, count the groups and corner spaces now. An extra group or a missed corner space can pull one side out of shape. If the center is cupping, check that all four ch-2 corner spaces are present and that the center ring has not been pulled so tightly that it gathers the first round. Correct any missing or extra stitches before working Round 4.
Rounds 4–16: Continue the Textured Red Blanket
Every remaining round follows the same pattern. The corners contain two groups separated by ch 2. Every ch-1 space along a side receives one group of 3 dc.
For each round:
- Slip stitch into the nearest corner space.
- Work the beginning corner: ch 3, 2 dc, ch 2, 3 dc.
- Ch 1.
- Work 3 dc into each ch-1 side space. Ch 1 after every side group, including the final group before the next corner.
- At the next corner, work (3 dc, ch 2, 3 dc).
- Ch 1 after that corner before beginning the next side. Repeat the same sequence around all four sides. After the final side group and its ch 1, join directly to the top of the beginning ch 3.
For exact counting, here is how many groups each completed round contains:
- Round 4: 16 groups, 48 dc.
- Round 5: 20 groups, 60 dc.
- Round 6: 24 groups, 72 dc.
- Round 7: 28 groups, 84 dc.
- Round 8: 32 groups, 96 dc.
- Round 9: 36 groups, 108 dc.
- Round 10: 40 groups, 120 dc.
- Round 11: 44 groups, 132 dc.
- Round 12: 48 groups, 144 dc.
- Round 13: 52 groups, 156 dc.
- Round 14: 56 groups, 168 dc.
- Round 15: 60 groups, 180 dc.
- Round 16: 64 groups, 192 dc.
At the end of Round 16, the blanket has four matching sides and four corner spaces. Each side contains 14 non-corner groups between the two corner pairs.
Each completed round adds four more groups than the round before it.
Fasten off the red yarn after Round 16. Weave in the end on the wrong side.
Measurement checkpoint: The red square is expected to measure approximately 18–20 inches across. If your gauge differs, the finished dimensions will differ too. The following border counts assume that you have completed all 16 rounds.
Crochet the White and Green Scalloped Border
The white edging makes the red blanket look like Santa's Christmas coat, but I wouldn't leave out the little line of green. It's a pretty contrast against the red and ties the blanket in with the holly on his hat.
We'll work a white inner trim, a narrow olive-green accent round and then the white scalloped finish, matching the color order shown in the example image.
Round 17: White Inner Trim
With the right side of the blanket facing you, join white yarn in any ch-2 corner space.
- Ch 1, then work 3 sc into that corner space.
- Mark the middle stitch of those 3 sc.
- Working continuously toward the next corner, make 1 sc in each dc and 1 sc in each ch-1 space as you encounter them. Across this side, work into 48 dc stitches and 15 ch-1 spaces, for 63 sc before the next ch-2 corner.
- In the next ch-2 corner space, work 3 sc. Mark the middle stitch.
- Continue around all four sides, placing 1 sc into every dc, 1 sc into every ch-1 space and 3 sc into every ch-2 corner.
- Join to the first sc.
Round 17 count: 264 sc.
That's 192 sc worked into the double crochet stitches, 60 sc into the ch-1 spaces and 12 sc across the four corners.
Border checkpoint: Lay the blanket flat before adding the olive-green accent. The white inner trim should follow the red edges without pulling the corners inward or making the sides noticeably wavy.
If the edges pull inward, first check the count: there should be 63 sc along each side between the corner spaces and 3 sc in each corner. Check that none of the 15 ch-1 spaces on each side were missed. If the count is correct but the white edge is still too tight, rework that round with slightly longer single crochet loops or a hook 0.5 mm larger, keeping the same stitch count.
If the white border ripples, check for an extra sc in a chain space or an extra corner stitch. If the count is correct, rework the round with slightly shorter loops rather than removing any required stitches.
Make the correction now, before the olive-green accent and outer scallops are added. The red square should still lie flat when this round is complete.
Fasten off the white yarn.
Round 18: Olive-Green Accent Foundation
Join olive-green yarn in any marked middle corner stitch.
- Ch 1.
- Work 3 sc into the marked corner stitch, placing the new marker in the middle of those three stitches.
- Work 1 sc into every ordinary stitch along the next side.
- At each remaining marked corner, work 3 sc into the marked stitch and move the marker to the center stitch of the new group.
- Continue around all four sides.
- Join with a slip stitch to the first sc and fasten off the olive-green yarn. Leave the four corner markers in place for Round 19.
Round 18 count: 272 sc.
Each corner adds two stitches to the previous round, for eight additional stitches overall.
Round 19: White Scalloped Finish
The final edging uses a four-stitch repeat. Each repeat makes one little fan.
With the right side facing, join white yarn three stitches before any marked corner-center stitch. The first slip stitch goes into the next stitch, followed by one skipped stitch. Work the first five-dc shell into the marked corner-center stitch. Continue the four-stitch repeat around the blanket. Each of the four corner-center stitches will receive a shell.
- Slip stitch into the next stitch.
- Skip the following stitch.
- Work 5 dc into the next stitch.
- Skip the following stitch.
- Repeat Steps 1–4 around the entire blanket.
- After the final repeat, join to the first slip stitch and fasten off.
Round 19 count: 68 five-dc scallops.
Because the blanket has 272 stitches and each scallop repeat consumes four stitches, the scallops fit without adding or removing stitches. The four corner-center stitches are separated by 68 stitches, so one shell can be centered on each corner.
Weave in the white yarn end on the wrong side.
Lay the blanket flat and look at the corners. The finished square has a red clustered center, white inner trim, an olive-green accent line and white scalloped edges.
That's the blanket finished. Now Santa gets his face.
Crochet Santa's Head
Santa's face is rounded, with a little nose, pink cheeks and a generous white beard. His eyes are embroidered right into the yarn, so there are no plastic eyes to attach.
Use skin-tone beige worsted-weight yarn and the 3.5 mm hook.
Work in continuous rounds. Stuff the head firmly enough to hold its shape, but don't stretch the stitches.
Head Instructions
Round 1: Make 6 sc in a magic ring. (6)
Round 2: Inc in every stitch. (12)
Round 3: (1 sc, inc) 6 times. (18)
Round 4: (2 sc, inc) 6 times. (24)
Round 5: (3 sc, inc) 6 times. (30)
Round 6: (4 sc, inc) 6 times. (36)
Round 7: (5 sc, inc) 6 times. (42)
Round 8: (6 sc, inc) 6 times. (48)
Round 9: (7 sc, inc) 6 times. (54)
Round 10: (8 sc, inc) 6 times. (60)
Rounds 11–20: Sc in every stitch. (60 per round)
Stop here and place temporary markers for Santa's facial features. Keep the beginning-round marker toward the back of the head.
The top of the head is formed by the magic ring. The lower rounds will become the chin and neck area.
Continue shaping:
Round 21: (8 sc, dec) 6 times. (54)
Round 22: (7 sc, dec) 6 times. (48)
Round 23: (6 sc, dec) 6 times. (42)
Round 24: (5 sc, dec) 6 times. (36)
Round 25: (4 sc, dec) 6 times. (30)
Round 26: (3 sc, dec) 6 times. (24)
Add polyester stuffing now. Keep the face smooth, with no large lumps.
Round 27: (2 sc, dec) 6 times. (18)
Round 28: (1 sc, dec) 6 times. (12)
Round 29: Dec 6 times. (6)
Fasten off, leaving a long yarn tail. Thread the tail through the front loops of the remaining six stitches and pull the opening closed. Secure the end inside the head.
The head contains 29 completed rounds. Its maximum circumference is 60 stitches.
Embroider Santa's Eyes, Nose and Rosy Cheeks
I love the cheerful expression on this Santa. The little closed eyes make him look as though he's smiling, and they give the face personality without plastic eyes.
Turn the head so the round-start marker lies at the back.
Embroidered Closed Eyes
- Mark two points on the front of the head between Rounds 13 and 14, approximately 13 stitches apart.
- Each eye will span about four stitches horizontally.
- Thread a yarn needle with black yarn.
- Bring the yarn out at the outer end of the first eye.
- Make three short satin-style stitches following a gentle upward curve toward the center of the face.
- Add one tiny angled stitch at the outer end to suggest an eyelash.
- Repeat for the other eye, reversing the curve so the eyes match.
- Secure the yarn ends inside the head.
The eyes are embroidered directly into the crocheted fabric. Don't attach plastic or glass safety eyes.
White Embroidered Eyebrows
Thread a yarn needle with white yarn. Embroider a short, gently curved eyebrow above each black eye, approximately three stitches wide and centered over the eye below.
- Position the first eyebrow approximately one to two rounds above the black eye, around Head Rounds 11–12.
- Make three short, slightly overlapping white yarn stitches to form a shallow arch.
- Anchor the beginning and ending stitches through the surrounding beige single crochet stitches.
- Repeat above the second eye, reversing the curve so both eyebrows match.
- Secure the yarn ends inside the stuffed head.
Both eyebrows belong below Santa's hat brim and above his black embroidered eyes.
Santa's Little Nose
Use beige yarn and the smaller hook.
Round 1: Work 6 sc into a magic ring. (6)
Round 2: Inc in every stitch. (12)
Round 3: Sc in every stitch. (12)
Round 4: (2 sc, dec) 3 times. (9)
Fasten off with a long tail. Add a small amount of stuffing, then thread the tail through the front loops of all nine stitches from Round 4. Pull the opening closed and make one securing stitch through the closure.
Place the closed end against Santa's face, centered over Rounds 15–18. Sew the base of the nose all the way around to the head, passing through the surrounding nose stitches rather than relying on one central attachment stitch. His mustache will sit immediately below.
Pink Crocheted Cheeks
Make two.
With pink yarn, make a magic ring and work 6 sc into it. Join with a slip stitch, leaving a sewing tail.
Flatten each little circle and sew one below each eye, around Round 17. Stitch around the entire edge so the circle lies flat against the head.
Keep the two cheeks approximately level with each other.
Crochet Santa's White Beard and Mustache
Santa's beard is one of the details that makes this design so much fun. It's full and fluffy, with a rounded mustache and a few little curls along the bottom.
We're making the beard as a shaped panel and adding soft crocheted curls over it. That gives the face a layered look without making every single beard curl a separate stuffed piece.
White Beard Foundation
Use white yarn and the 3.5 mm hook. Ch 15.
Row 1: Sc in the second ch from the hook and across. Ch 1, turn. (14 sc)
Row 2: Inc in the first stitch, sc in the next 12 stitches, inc in the last stitch. Ch 1, turn. (16)
Row 3: Inc, sc 14, inc. Ch 1, turn. (18)
Row 4: Inc, sc 16, inc. Ch 1, turn. (20)
Row 5: Inc, sc 18, inc. Ch 1, turn. (22)
Row 6: Sc across. Ch 1, turn. (22)
Row 7: Dec, sc 18, dec. Ch 1, turn. (20)
Row 8: Dec, sc 16, dec. Ch 1, turn. (18)
Row 9: Dec, sc 14, dec. Ch 1, turn. (16)
Row 10: Dec, sc 12, dec. Ch 1, turn. (14)
Row 11: Dec, sc 10, dec. Ch 1, turn. (12)
Row 12: Dec, sc 8, dec. Ch 1, turn. (10)
Row 13: Dec, sc 6, dec. Ch 1, turn. (8)
Row 14: Dec, sc 4, dec. (6)
Do not fasten off yet.
Work a single-crochet edging around the entire beard panel, beginning at the end of Row 14. Do not turn.
- Ch 1. Working toward the starting-chain edge, make 1 sc in each row-end space along the first side, except skip the ends of Rows 5 and 10. (12 sc)
- Work 1 additional sc into the Row 1 corner where the first side meets the starting-chain edge. (13 edging stitches so far)
- Work 1 sc into each of the 14 unused foundation-chain loops along the starting edge. (27)
- Work 1 additional sc into the foundation-chain corner at the opposite end. (28)
- Work back down the second side toward Row 14, making 1 sc in each row-end space except the ends of Rows 5 and 10. (40)
- Work 1 additional sc into the Row 14 corner at the end of that side. (41)
- Work 1 sc into each of the six stitches across the narrow end of Row 14. (47)
- Work 1 additional sc into the remaining Row 14 corner. Join with a slip stitch to the first edging sc. (48)
Fasten off with a long sewing tail. The edging contains 48 sc, with matching stitch placement on both sides of the tapered beard.
Position the wide end of the beard around the lower cheeks and the narrow end below the chin. Sew it firmly to the face and underside of the head, leaving no loose edge that can be lifted away.
White Curled Mustache
Make two matching pieces.
Ch 9.
Beginning in the second chain from the hook, work:
- Sc in each of the next 2 chains.
- Hdc in each of the next 2 chains.
- Dc in each of the next 2 chains.
- Hdc in each of the last 2 chains.
You have worked eight stitches.
Ch 1 and turn the piece to expose the unused underside loops of the starting chain. Work 3 sc into the end foundation chain, the same chain where you worked the final hdc. Then work 1 sl st into each of the remaining seven foundation chains along the underside. Fasten off with a long sewing tail.
Check the shape before making the second half. Each mustache piece has eight stitches along its first side, three sc around the outer end and seven slip stitches along the underside. The three sc should round the outer tip without leaving a gap or twisting the foundation chain.
For the second mustache half, make the same piece and turn it over so the two halves curve in opposite directions.
Sew the thicker ends below the nose. Point the curled tips outward toward the cheeks.
Decorative Beard Curls
Make five small white curls.
For each curl, ch 7. Work 2 sc into the second chain from the hook and 2 sc into each of the remaining five chains. (12 sc)
The increases make the strip curl naturally.
Fasten off with a long tail.
Arrange three curls across the lower front of the beard and one at each side. Flatten the curls into overlapping rounded loops, then sew down the full length of each strip.
Keep the bottom point of the beard visible. The finished beard should look layered, rather than like five dangling strands.
Crochet Santa's Red Christmas Hat with White Trim and Holly
Santa needs a proper Christmas hat. This one has a thick white brim, a long tapered red top and a soft white pom-pom. The little holly decoration adds just enough color without covering up the red.
Use the 3.5 mm hook.
White Hat Brim
With white yarn, ch 7.
Row 1: Sc in the second chain from the hook and across. Ch 1, turn. (6)
Rows 2–36: Sc in BLO across. Ch 1 and turn after every row. (6 sc per row)
Halfway fitting checkpoint: You now have 36 rows of ribbing. Hold the strip around approximately half the circumference of Santa's completed head at the planned hat-brim position. It should reach about halfway around with gentle stretch, without pulling the head out of shape.
If the strip falls noticeably short, the ribbing stitches are too narrow for the planned 72-row band. Rework with a slightly larger hook. If it extends well beyond halfway and feels loose against the head, rework with a slightly smaller hook. Keep six stitches in every row and retain the planned 72 rows.
Rows 37–72: Continue working sc in BLO across. Ch 1 and turn after every row except Row 72. (6 sc per row)
The BLO stitches form a ribbed band.
The band has 72 rows and six stitches across its width. Before joining the short ends, place the ribbed band around Santa's completed head at the intended hat-brim position. The ends should meet with gentle stretch without pulling the head out of shape.
The actual band length depends on the ribbing row gauge, which may differ from the stated amigurumi round gauge. The 72-row construction is retained, but its unstretched length is not treated as a verified measurement.
Once the band fits, bring its two short ends together and slip stitch them together to form a loop. Fasten off. The following red hat instructions are written for the specified 72-row band.
Attach red yarn to the upper edge.
Red Hat Shaping
Round 1: Work 1 sc into the end of each white brim row. (72)
Round 2: (4 sc, dec) 12 times. (60)
Rounds 3–4: Sc around. (60)
Round 5: (8 sc, dec) 6 times. (54)
Round 6: Sc around. (54)
Round 7: (7 sc, dec) 6 times. (48)
Round 8: Sc around. (48)
Round 9: (6 sc, dec) 6 times. (42)
Round 10: Sc around. (42)
Round 11: (5 sc, dec) 6 times. (36)
Round 12: Sc around. (36)
Round 13: (4 sc, dec) 6 times. (30)
Round 14: Sc around. (30)
Round 15: (3 sc, dec) 6 times. (24)
Round 16: Sc around. (24)
Round 17: (2 sc, dec) 6 times. (18)
Rounds 18–19: Sc around. (18)
Round 20: (1 sc, dec) 6 times. (12)
Rounds 21–22: Sc around. (12)
Round 23: Dec 6 times. (6)
Fasten off, leaving a long tail. Close the opening by threading the tail through the front loops of the remaining six stitches.
Keep the hat soft and mostly unstuffed so the pointed end can bend gently to one side.
White Hat Pom-Pom
With white yarn:
Round 1: 6 sc in MR. (6)
Round 2: Inc around. (12)
Round 3: (1 sc, inc) 6 times. (18)
Rounds 4–6: Sc around. (18)
Round 7: (1 sc, dec) 6 times. (12)
Round 8: Dec 6 times. (6)
Add a little stuffing before closing. Fasten off and close the final opening.
Sew the finished ball to the tip of the hat, going through the joining area several times and hiding the yarn end inside.
Crocheted Holly Leaves
Make two leaves with olive-green yarn.
Ch 9.
Starting in the second chain from the hook, work:
- Sl st in the first chain.
- Sc in the next chain.
- Hdc in the next chain.
- Dc in the next two chains.
- Hdc in the next chain.
- Sc in the next chain.
- Sl st in the last chain.
Ch 1, rotate the work and continue along the opposite side of the foundation chain.
Working along the opposite side of the eight foundation chains, make 1 sl st in the first chain, 1 sc in the next chain, 1 hdc in the next chain, 1 dc in each of the next two chains, 1 hdc in the next chain, 1 sc in the next chain and 1 sl st in the final chain. Join at the leaf tip and fasten off with a sewing tail.
Repeat for the second leaf.
Arrange the two leaves at an angle on the front-right side of the red hat, immediately above the white brim. Point the leaf tips outward and position their bases close together, leaving room for the three red berries at the center. Sew around the full edges of both leaves, keeping them flat against the red crocheted fabric.
Holly Berries
Make three.
With red yarn, make 5 sc into a magic ring. Pull the ring closed, slip stitch to the first sc and fasten off.
These are small flat embroidered-style crochet circles, not loose beads.
Position the three berries together where the two leaves meet. Stitch each berry securely through its center and outer stitches so it lies flat against the hat.
The holly is finished. Keep the white brim wide enough to sit just above Santa's embroidered eyes.
Crochet Santa's Arms and Hands
Santa has two short red sleeves, fluffy white cuffs and little beige hands. They sit just below his head, one on each side, as though he's holding open his Christmas coat.
Make two identical arms.
Use the 3.5 mm hook.
Beige Hands
Begin with beige yarn.
Round 1: Make 6 sc into a magic ring. (6)
Round 2: Inc in every stitch. (12)
Round 3: (1 sc, inc) 6 times. (18)
Rounds 4–6: Sc around. (18)
Round 7: (1 sc, dec) 6 times. (12)
Add a small amount of stuffing to the hand.
Change to white yarn.
White Cuffs
Round 8: Working in BLO, sc around. (12)
Round 9: (1 sc, inc) 6 times. (18)
Round 10: Sc around. (18)
The white cuff is wider than the wrist, giving the sleeve its fluffy appearance.
Change to Christmas red.
Red Sleeves
Round 11: Working in BLO, sc around. (18)
Rounds 12–19: Sc around. (18)
Round 20: (1 sc, dec) 6 times. (12)
Stuff the sleeve lightly. Keep it soft enough to flatten a little where it joins the blanket.
Fasten off with a long sewing tail.
Make the second arm exactly the same way.
Positioning checkpoint: Each arm has 20 rounds. The white cuffs sit between the beige hands and red sleeves. There are no separate glove pieces.
Put the arms aside until the final assembly.
Crochet Santa's Black Belt and Golden Buckle
Now for the part that makes the blanket look like Santa's coat. The black belt runs across the red fabric, with a little gold buckle in the center.
Everything is crocheted from yarn. No metal buckle, no wooden decoration and nothing that needs to be fastened or unfastened.
Black Belt
With black yarn and the 3.5 mm hook, ch 46.
Row 1: Sc in the second chain from the hook and across. Ch 1, turn. (45 sc)
Row 2: Sc across. Ch 1, turn. (45)
Row 3: Sc across. (45)
Fasten off, leaving a long sewing tail.
The strip is expected to measure approximately 10 inches long at the planned small-piece gauge. It will lie horizontally across the upper front portion of the red blanket.
Keep both ends flat. This is a sewn-on decorative belt, not a loose strap.
Golden Crocheted Buckle
Use golden-yellow yarn and the 3.5 mm hook.
Ch 16. Join with a slip stitch to the first chain, taking care not to twist the chain. The foundation ring contains 16 chains.
Round 1: Ch 1. Working into the 16 foundation chains in order, sc in each of the first 4 chains, work 3 sc in the next chain, sc in the next 2 chains, work 3 sc in the next chain, sc in the next 4 chains, work 3 sc in the next chain, sc in the next 2 chains, then work 3 sc in the final chain. Join to the first sc. (24 sc)
You now have four groups of 3 sc. Each group forms one corner of the rectangle.
Round 2: Ch 1. Work 1 sc in each stitch around, except at the center stitch of each 3-sc corner group. Work 3 sc into each of those four center stitches. Join and fasten off, leaving a long sewing tail. (32 sc)
Shape the finished buckle into a small rectangle, with the longer sides horizontal. Keep the black belt visible through its center opening. The buckle will be sewn down during final assembly.
The buckle is a decorative crocheted outline. It doesn't open or close.
Embroider Santa's Three Cream Circle Buttons
These three little cream circles are one of my favorite details on Santa's coat. They're simple, but they give the red blanket just the right amount of decoration. No flowers mixed with holly, and no separate buttons to sew on.
We're making the circles with cream yarn embroidered directly onto the red blanket. Each one has a small raised center and a rounded spiral outline, similar to the soft circle buttons in the example image.
Mark the Center Line
- Lay the completed red blanket flat with one corner pointing down and the opposite corner pointing up.
- Mark the center line between those two corners using removable stitch markers.
- Lay the completed black belt across the upper front of the blanket to establish its position, but don't sew it down yet.
- Mark the center of the future gold buckle.
- Mark one circle position approximately 1–1 1/2 inches above the belt.
- Mark a second circle approximately 1 1/2 inches below the belt.
- Mark the third circle approximately 3–4 inches below the belt, in line with the first two circles.
All three circles belong on the same center line. The belt separates the first circle from the other two, just as it does in the finished example image.
Embroider the Three Cream Spiral Circles
Use cream worsted-weight yarn and a yarn needle. Make three identical circles, each approximately 5/8–3/4 inch across.
For each circle:
- Bring the cream yarn needle from the wrong side to the right side at the marked center point.
- Make four short satin stitches across the center, keeping them close together to form a small filled circle approximately 1/4 inch across.
- Bring the needle up beside the filled center.
- Using short stem stitches approximately 1/8 inch long, embroider a continuous spiral around the center.
- Keep the stitches close together as the spiral expands outward.
- Complete approximately two turns around the center, stopping when the circle measures 5/8–3/4 inch across.
- Take the yarn to the wrong side and weave it through several surrounding crochet stitches, changing direction before trimming.
Work every stitch through the red crochet fabric. These are embroidered circles, not separate crocheted appliques.
Where possible, position the circle centers over solid double crochet groups rather than the open chain spaces. Keep the spiral stitches short and anchored into the existing crochet fabric.
Repeat the embroidery at the remaining two marked positions.
Check the Button Arrangement
Lay the black belt across the marked position again.
You should have one cream circle centered above the belt and two centered below it. Check that the circles are reasonably even in size and that none will be hidden behind the gold buckle.
Remove the temporary placement markers once the circle positions are established.
That's enough decoration for Santa's coat. The holly belongs on his hat, and the cream circles belong on the blanket. They don't need anything else mixed in.
Crochet the Soft White Corner Pom-Poms
Our Santa has three white corner pom-poms on his blanket, plus the pom-pom on his hat. The three blanket pom-poms belong at the left, right and bottom corners when the square is displayed like a diamond.
Make three identical blanket pom-poms using white yarn and the 3.5 mm hook.
Corner Pom-Pom Instructions
Round 1: 6 sc in a magic ring. (6)
Round 2: Inc in every stitch. (12)
Round 3: (1 sc, inc) 6 times. (18)
Round 4: (2 sc, inc) 6 times. (24)
Rounds 5–7: Sc around. (24)
Round 8: (2 sc, dec) 6 times. (18)
Round 9: (1 sc, dec) 6 times. (12)
Add a little stuffing.
Round 10: Dec 6 times. (6)
Fasten off, leaving a long sewing tail. Thread the yarn through the remaining front loops and close the opening.
Make two more the same way.
These are crocheted balls rather than cut-yarn pom-poms, so there are no loose bundles of yarn forming the surface.
Each finished ball is expected to measure approximately 1 1/2–2 inches across, depending on gauge and stuffing.
Set all three aside until the blanket is assembled.
Assemble the Crochet Santa Blanket Lovey
Now we can bring Santa together. Spread the blanket out with one corner pointing up and one pointing down. The upper corner will be hidden behind his head, and the two side corners will show off those white pom-poms.
Before you sew anything down, arrange the pieces on top of the blanket. You'll get a much better idea of the finished proportions that way.
Step 1: Arrange the Blanket and Santa's Head
- Lay the completed blanket right side up, with its four corners pointing up, down, left and right.
- Choose the upper corner as Santa's attachment point.
- Place Santa's head over that corner, with his face looking toward the lower point of the blanket.
- Position the head so the bottom of the beard overlaps the red blanket slightly.
- Check that the embroidered eyes face straight forward and that the head is centered on the blanket's vertical diagonal.
The upper corner should disappear behind Santa's head. The other three corners remain visible.
Step 2: Attach Santa's Head
Thread a yarn needle with a matching length of red yarn.
- Turn the blanket and head together carefully so the joining area is accessible.
- Position the upper blanket corner against the lower back of the head.
- Stitch through the blanket fabric and the lower head stitches, working across an attachment area approximately 2–3 inches wide.
- Use closely spaced stitches along the full attachment area rather than attaching the head at only one point.
- Reinforce the connection with a second line of stitching just below the first.
- Bring the yarn ends inside the head or weave them securely through multiple blanket stitches.
Turn the lovey right side up and check the position. Santa's head should sit over the top corner without leaning noticeably to either side.
Don't leave a long loop of yarn between the head and blanket.
Step 3: Attach the Christmas Hat
- Place the white ribbed brim around the upper part of Santa's head, above both the white embroidered eyebrows and the black embroidered eyes, so all four embroidered features remain visible.
- Center the front brim on his forehead.
- Position the crocheted holly on the front-right side.
- Allow the red tapered portion to bend gently toward Santa's left, which appears on the viewer's right.
- Sew the lower edge of the brim directly to the head around its complete circumference.
- Secure the bent hat tip against the upper side of the hat with several concealed yarn stitches.
The hat is permanently attached. It isn't a removable accessory.
Step 4: Position and Sew Santa's Arms
Place the two red arms on either side of Santa's lower head, with the beige hands pointing outward.
- Position one arm on the left side of the head and one on the right.
- Keep the white cuffs and beige hands visible in front of the red blanket.
- Angle each arm slightly downward so it follows the upper blanket shape.
- Flatten the open end of the first red sleeve.
- Using the sleeve's long yarn tail, sew the flattened opening closed.
- Attach that closed end to the upper blanket approximately 1–2 inches out from the head attachment area.
- Continue sewing along the underside of the red sleeve for approximately 1 inch to keep the arm close to the blanket.
- Repeat with the second arm, matching the angle and position.
Position the hands beside the upper edges of the red blanket, with both white cuffs and beige hands visible. Keep the two arms at matching angles and secure their attachment seams before finishing.
Step 5: Attach the Black Belt
Lay the black strip horizontally across the upper front of the blanket, below Santa's beard and between the two arms.
- Center the strip on the vertical line of the coat embroidery.
- Position it approximately 3–4 inches below the lower edge of Santa's beard, allowing for the blanket's finished dimensions.
- Gently curve the outer ends to follow the fabric.
- Sew the entire perimeter of the black strip to the red blanket.
- Check that no section of the belt can be pulled away from the blanket as a loose loop.
- Center the gold crocheted buckle over the black strip.
- Sew around the complete outer edge of the buckle, leaving the center opening filled by the black belt underneath.
The belt is decorative. It doesn't wrap around the blanket, and it doesn't have a working closure.
Step 6: Attach the Three White Corner Pom-Poms
Place one finished white pom-pom on the left corner, one on the right corner and one on the bottom corner.
- Position the first pom-pom over the left corner of the white scalloped border.
- Thread its long yarn tail through a yarn needle.
- Stitch the closed base of the ball to the corner, passing through multiple solid crochet stitches beneath the scallops.
- Continue stitching around the entire contact area between the ball and blanket.
- Reinforce the attachment with a second pass.
- Repeat at the right and bottom corners.
- Hide the yarn ends inside the pom-poms or through the blanket stitches.
Don't attach the pom-poms only to the outer tips of the scallops. They belong against the underlying blanket fabric, where there are more stitches to hold the connection.
Step 7: Check the Finished Arrangement
Lay Santa flat again and compare the finished arrangement with the example image.
- The smiling face is centered above the red blanket.
- The white beard overlaps the upper part of the coat.
- The hat bends to one side, with holly visible near the brim.
- Two arms extend outward beside the head.
- The black belt runs across the red blanket, with the gold buckle centered.
- Three cream embroidered spiral-circle buttons decorate the coat, with one above the belt and two below it.
- The white-and-green scalloped border surrounds the square.
- Three white pom-poms finish the visible blanket corners.
Check the positions before trimming any of the remaining sewing tails.
Finishing Details for the Crochet Santa Lovey
We're almost there. The last little details are worth checking because this project has quite a few sewn-on pieces.
Weave in Yarn Ends
Thread each remaining yarn tail through a needle and weave it through several nearby stitches on the wrong side of the work. Change direction at least once before trimming the end.
For the head, pom-poms and other stuffed pieces, bury yarn ends inside the stuffing after securing the seams.
Check Every Attachment
Examine the hat, beard, mustache, cheeks, nose, arms, buckle, embroidered circle buttons, holly, berries and pom-poms individually.
Each piece needs complete, secure stitching around its attachment area. There should be no loose bead-like embellishments, long decorative loops or exposed lengths of joining yarn.
Check the embroidery on the back of the blanket as well. Secure any yarn floats that could catch on something. Remove all temporary stitch markers and placement markers, including the four markers used to position the scalloped border corners.
Shape the Blanket
Spread the blanket on a flat surface and gently arrange the four sides into a square.
Shape the white scallops with your fingers. Keep the three pom-poms pointing outward, and arrange the hat so its tip bends toward the viewer's right.
Heavy stretching isn't necessary. If you choose to block the blanket, follow the yarn manufacturer's care instructions and avoid saturating the stuffed head.
Finished Project Measurements
The expected finished measurements are:
- Blanket: approximately 20–22 inches square, including the crocheted edging.
- Santa's head: approximately 4–5 inches across.
- Santa's hat: approximately 4–5 inches of red tapered length, excluding the white brim and tip pom-pom.
- Blanket corner pom-poms: approximately 1 1/2–2 inches across.
These are estimated dimensions based on the specified stitch counts and target gauge. A finished physical sample has not been measured.
A Note About Baby Loveys
This Santa is a decorative handmade comfort toy and Christmas keepsake, not infant bedding. The American Academy of Pediatrics advises keeping stuffed toys, loose blankets and other soft objects out of an infant's sleep space. Its baby sleep recommendations explain why these items don't belong in cribs or bassinets during infant sleep.
Using yarn instead of plastic eyes and hard buttons removes those particular hard components, but it doesn't establish that the finished item meets children's toy requirements. Attachment integrity, material suitability and any applicable product requirements remain separate considerations.
Free Crochet Santa Blanket Lovey Pattern FAQs
Can I Make This Santa Lovey Without Plastic Safety Eyes?
Yes. This particular design calls for embroidered closed eyes made with black yarn. There are no plastic safety eyes anywhere in the pattern.
Are the Gold Buckle and Coat Decorations Made From Yarn?
Yes. The buckle is a crocheted gold rectangle sewn over the black belt. The three cream circle buttons are embroidered directly onto the blanket. There are no wooden buttons, metal closures or hard decorations.
How Many White Pom-Poms Does This Santa Lovey Have?
Four in total. Three are attached to the visible blanket corners, and one finishes the tip of Santa's Christmas hat.
Can I Make the Blanket Larger?
Yes. You can make the blanket larger by continuing the granny-cluster rounds. Every additional red round adds four groups and twelve double crochet stitches.
For a larger blanket, let N equal the total number of completed red rounds. The white inner trim will contain (16 × N) + 8 single crochet stitches. The olive-green accent foundation will contain (16 × N) + 16 single crochet stitches. Divide the olive-green foundation count by four to determine the number of white scallops.
For example, a 17-round red blanket has 68 groups and 204 double crochet stitches. Its white inner trim contains 280 sc, its olive-green accent foundation contains 288 sc, and its final white edging contains 72 scallops.
Additional rounds increase the finished dimensions, so the stated 20–22-inch size and yarn allowances no longer apply to an enlarged version.
Can I Wash the Finished Santa Lovey?
That depends on the yarn and stuffing selected. Check the care instructions for every material. A finished item with multiple sewn-on components needs particular attention at the attachment points before and after cleaning.
Is This the Same as a Santa Amigurumi Doll?
Not quite. An amigurumi Santa is usually a fully stuffed figure with a separate body and legs. This design combines a crocheted Santa head and arms with a soft square blanket.
If you'd rather make a little Santa figure instead, take a look at the free crochet Santa snuggler lovey pattern. It's a different Christmas project, with a different shape and construction.
And there you have it. A cheerful little crocheted Santa, complete with his red Christmas coat, embroidered smile, white beard and holly-trimmed hat. Those three little embroidered circle buttons are simple, but they give the finished blanket its own Christmas personality.
For another festive handmade project, browse the free Christmas amigurumi patterns.
When you click on links to various merchants on this site and make a purchase, this may result in this site earning a commission. This does not affect the price you pay.

UBGI Gold Standard 2026
Reviewed under the site's
editorial checklist.
Photos, decorating ideas, party setups and reader submissions are shared for inspiration unless a page is specifically presented as a pattern, tutorial, reference guide or step-by-step project. Follow the instructions, measurements, safety guidance and manufacturer directions provided for the particular project or product.
About Jan | Contact | Baby Nursery Ideas (Blog) | Site Map | Privacy Policy | Disclosure Policy | Disclaimer | Affiliate Disclosure | Earnings Disclosure | Facebook | Pinterest
I am a participant in the Amazon Services LLC Associates Program, an affiliate advertising program designed to provide a means for us to earn fees by linking to Amazon. As an Amazon Associate I earn from qualifying purchases.
Copyright © 2006-2026. All Rights Reserved.