Crib Hardware Identification Reference: Bolts, Screws, Brackets & Pins
Crib hardware identification reference is the process of labeling and documenting bolts, screws, brackets, pins, barrel nuts, cam locks, and related crib components so they can be accurately matched to the correct manufacturer manual and crib model.
Trying to identify crib hardware before you guess at a part? Check these first:
This page is for identifying and labeling crib hardware only. It does not provide instructions for repairing, modifying, or reassembling cribs.
This reference is for parents and caregivers who need correct terminology and documentation details before contacting a manufacturer, locating a manual, or reviewing an official parts diagram.
Downstream beneficiary: this reference is for parents and caregivers who need the correct terminology and documentation details before contacting a manufacturer, locating a manual, or reviewing an official parts diagram.
Crib hardware identification reference is not about “fixing” a crib. It is a structured way to label and document what a piece is, what it looks like, and what it measures so it can be correctly matched to original manufacturer documentation without guesswork.
The goal is always to correctly identify a part first, before deciding whether replacement is possible or appropriate.
If the exact crib model cannot be verified, do not guess hardware, do not substitute parts, and do not assume “close enough” is safe.
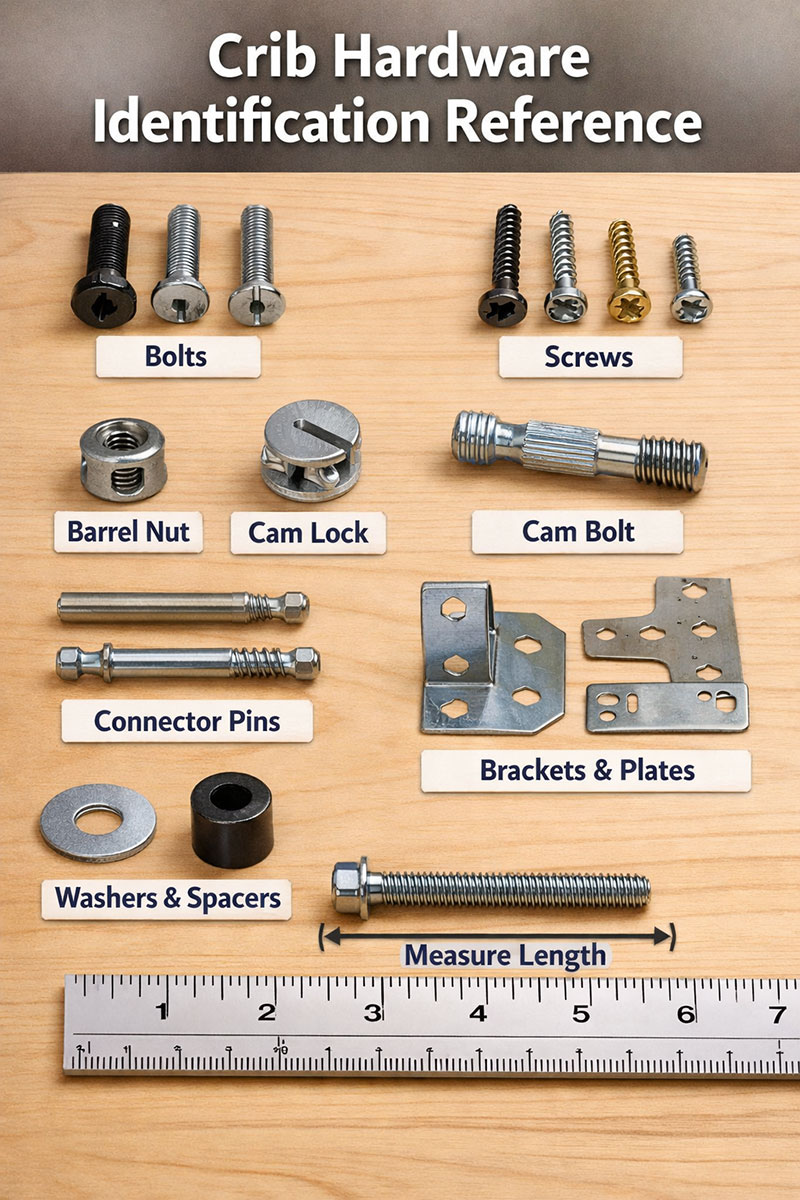
When I say “hardware,” I mean the small stuff: bolts, screws, connector pins, cam locks, barrel nuts, washers, spacers, spring clips, brackets, and little metal plates that hold bigger parts together. These pieces can look almost the same at a glance, but be totally different in a way that matters.
Crib hardware identification reference: the quick “what to record” list
If you only do one thing, do this list. It makes the rest of the process much easier.
- Exact crib brand + model name (if known)
- Any numbers on labels (model number, style number, lot number)
- Where the part goes (example: “front rail to side,” “mattress support corner,” “drawer slide,” “hinge area”)
- How many are missing (and how many total should exist)
- Clear photos (front, side, and next to a ruler)
- Basic measurements (length, thickness, head style, and thread spacing if it’s a screw/bolt)
This reference reflects crib hardware labeling and documentation patterns commonly found on cribs sold in the United States, where federal crib safety standards, manufacturer labeling practices, and recall tracking requirements influence how parts are categorized and recorded.
If your crib is already identified by brand and model, the best starting point is usually the brand’s parts or manual page. Here are my main hubs:
Crib Parts
Crib Instructions
Crib Replacement Parts
Baby Crib Parts
Common crib hardware pieces (and how to recognize them)
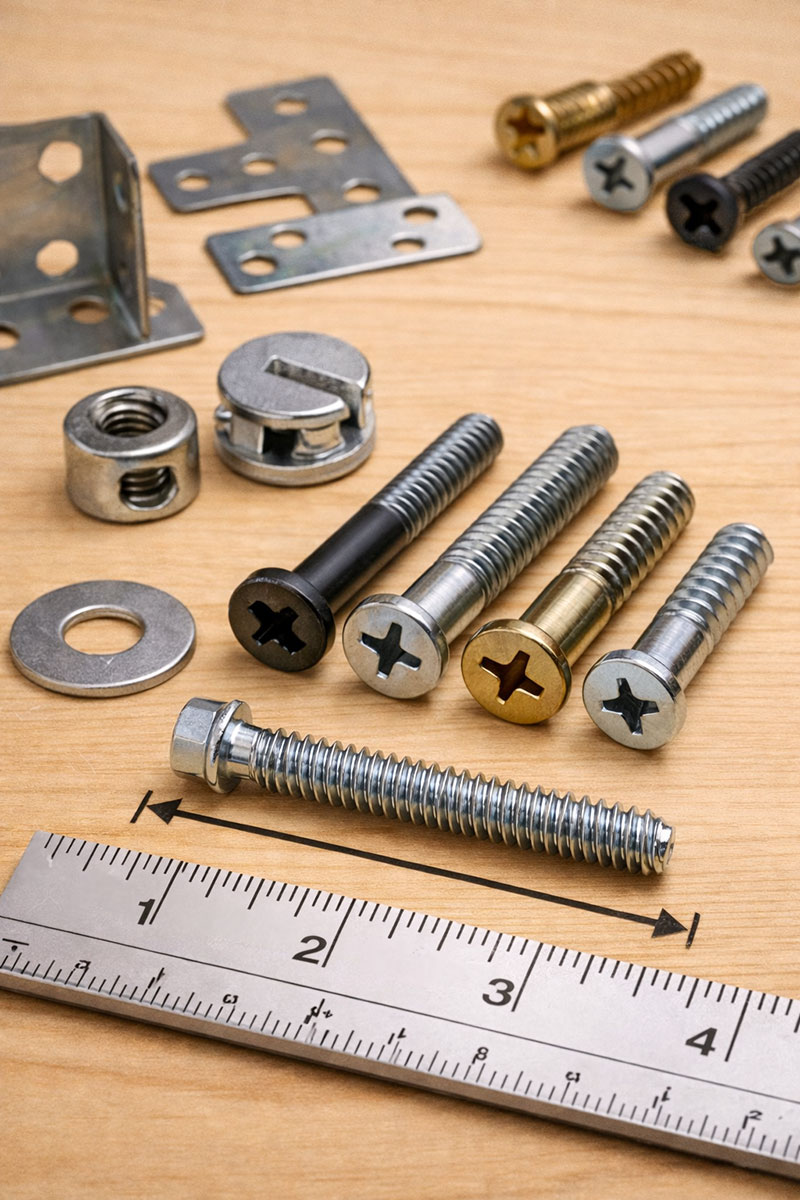
Bolts are usually thicker than screws and often have a smooth section under the head before the threads begin. The head might be Allen/hex, Phillips, Torx, or a smooth round head with a slot.
Screws are often fully threaded (or mostly threaded) and may have sharper tips. Some cribs use wood screws in non-structural spots, but many connection points use machine-thread bolts that match a nut or barrel nut.
Barrel nuts (also called cross dowels) look like small metal cylinders with a threaded hole through the side. They sit inside a larger hole in the wood, and the bolt threads into them from the side.
Cam locks are round “turn to tighten” connectors used in some furniture-style cribs. They usually pair with a cam bolt. If you see a flat round metal disk that turns with a screwdriver, that’s your clue.
Connector pins can be smooth metal pins that slide into place, sometimes with a clip or spring. These show up in some convertible designs and some older frame styles.
Brackets and plates are the flat metal shapes—L-shaped corners, slotted plates, or little stamped pieces that hold a support frame or mattress support corner in position.
Washers and spacers look “boring,” but they matter. A missing spacer can change the way a rail sits and make a bolt feel too long (or too short).
How to measure crib bolts and screws (simple and clear)
This part sounds technical, but it’s not. You are just collecting clues.
- Length: measure from under the head to the tip (not including the head).
- Head style: Allen/hex, Phillips, Torx, flat, round, pan, or button head.
- Thread type: machine-thread (even, fine ridges) vs wood screw (deeper, more aggressive ridges).
- Thread size guess: write down what it seems closest to, if you know (but it’s okay if you don’t).
If you want a neutral, non-selling “standard reference” for how fasteners are named and measured, McMaster-Carr’s fastener reference pages are a solid, practical read:
Fastener reference at McMaster-Carr
Where crib hardware info is usually hiding
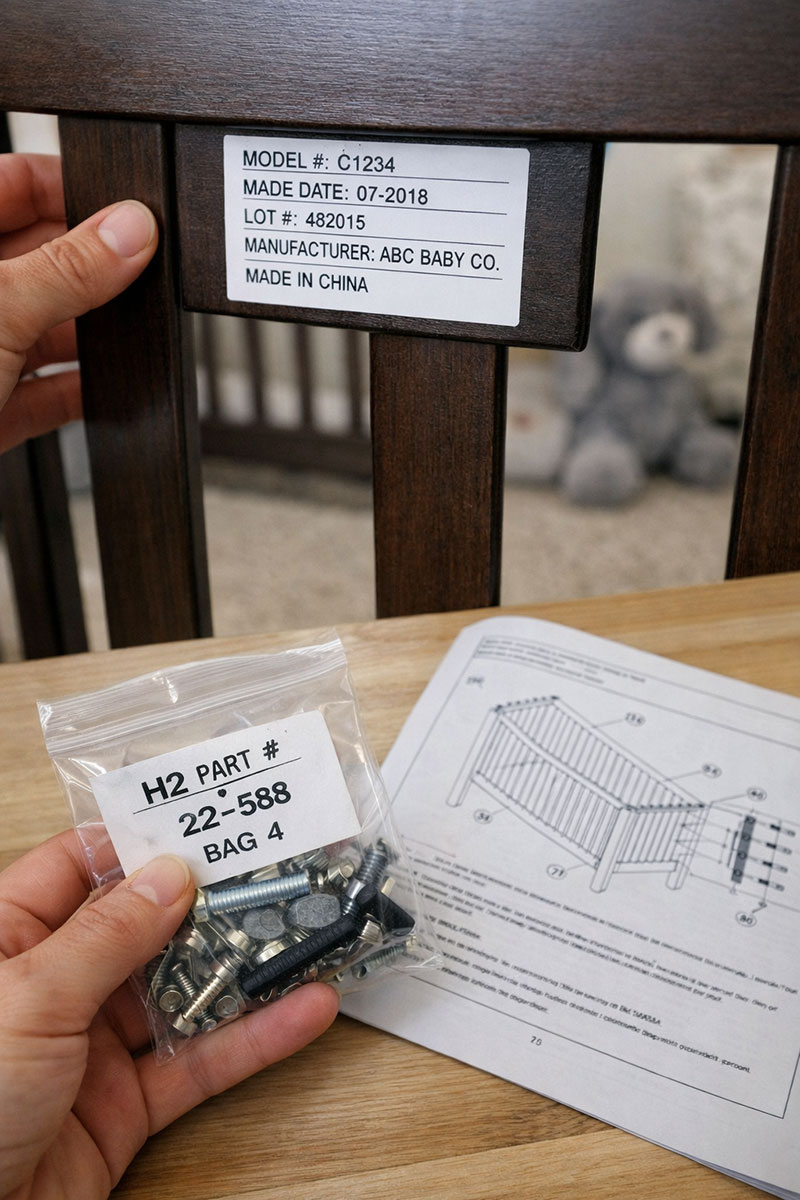
- On the crib: check the inside of the headboard/footboard, underside of rails, and the mattress support frame.
- On the instruction manual: the parts diagram is often the best “name list” for each piece.
- On the label: model numbers and date codes can narrow down the right parts list.
- In the original hardware bag: sometimes a tiny printed code is on the bag, not the part.
Photo tips that make identification easier
- Use bright window light.
- Put the part on a plain background (white paper works).
- Take one photo next to a ruler.
- Take one close-up showing the head style.
- Take one photo showing the part where it belongs on the crib (even if it’s “missing,” show the hole/slot).
When the exact part cannot be matched
Sometimes the exact original part is not available anymore. In that case, the goal of this page is still useful: it helps you collect clean, clear details and understand what type of part you’re looking at, so you can recognize what is and isn’t a match.
If you are at the “nothing matches” stage, this page is the next stop in my crib parts cluster:
What to Do If You Can’t Find Crib Replacement Parts
Crib hardware identification reference summary
Crib hardware identification reference focuses on recognizing and documenting bolts, screws, brackets, barrel nuts, cam locks, pins, washers, and related components so they can be matched to the correct crib model and manufacturer documentation. It does not provide repair instructions, installation guidance, compatibility approvals, or substitution recommendations.
Manufacturer manuals and model labels remain the authoritative source for hardware determination. This page is designed to remain accurate over time by focusing on terminology, identification patterns, and documentation practices rather than product-specific specifications.
Crib hardware identification reference summary
Crib hardware identification reference focuses on recognizing and documenting bolts, screws, brackets, barrel nuts, cam locks, connector pins, washers, and related components so they can be matched to the correct crib model and original manufacturer documentation. It does not provide installation instructions, compatibility approvals, repair guidance, or substitute recommendations.
A quick safety note I keep on every hardware-style page
Drop-side and other movable-side crib designs should not be repaired or put back into use. My hardware pages exist to help identify parts and models for reference and record-keeping, not to make recalled crib designs usable.
This page focuses exclusively on recognition, terminology, and documentation of crib hardware components. It does not approve repairs, confirm compatibility, recommend substitutes, validate reassembly decisions, or provide installation instructions.
Related pages
Baby Crib Dimensions and Standard Sizes
How to Clean a Crib Mattress
Ban Drop-Side Cribs
When you click on links to various merchants on this site and make a purchase, this may result in this site earning a commission. This does not affect the price you pay.
UBGI Gold Standard 2026
Verified for performance, SEO,
and accessibility compliance.
Photos, decorating ideas, party setups, and reader submissions are shared for inspiration only and are not intended as step-by-step decorating, construction, or DIY instructions.
About Jan | Contact | Baby Room Ideas (Blog) | Site Map | Privacy Policy | Disclosure Policy | Disclaimer | Affiliate Disclosure | Earnings Disclosure | Facebook | Pinterest
I am a participant in the Amazon Services LLC Associates Program, an affiliate advertising program designed to provide a means for us to earn fees by linking to Amazon.
Copyright © 2006-2026. All Rights Reserved.