Owl Baby Quilt Pattern That Matches Your Nursery Crib Mobile
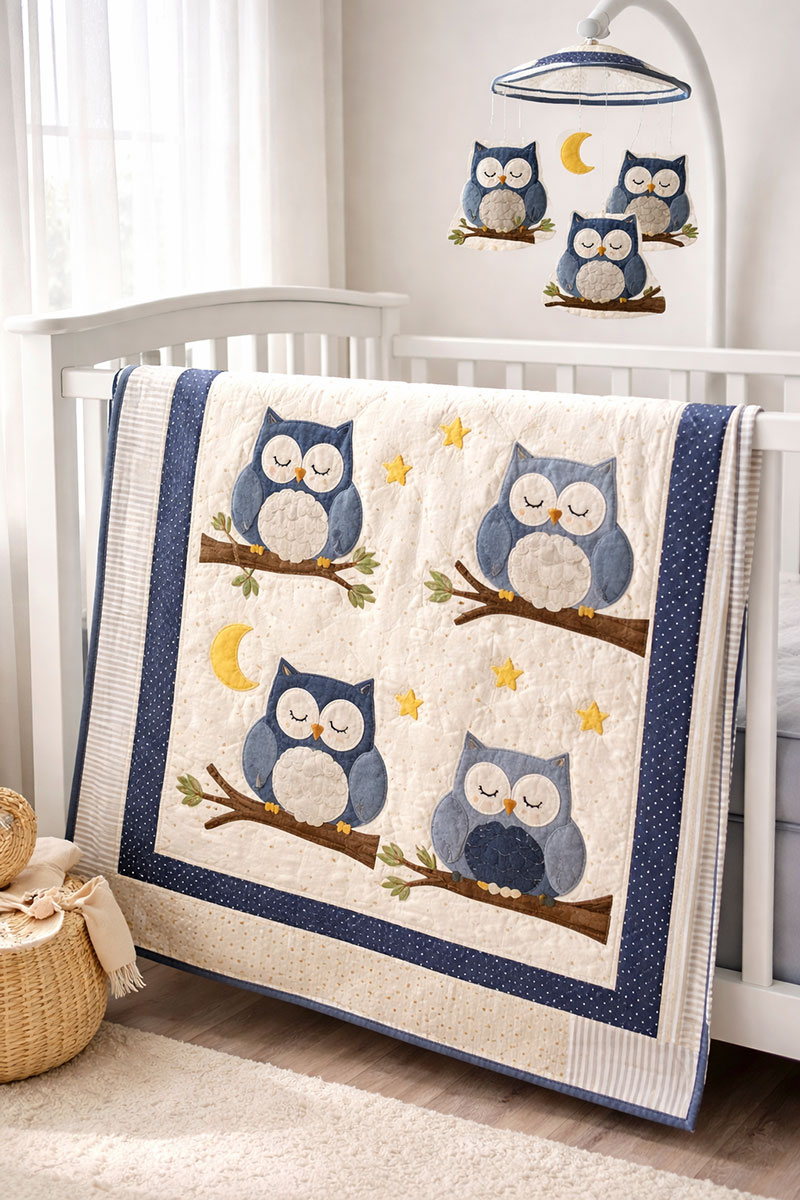
Owl baby quilt pattern designs like this one can pull the whole nursery together without making it feel busy. When the quilt echoes the crib mobile with the same soft colors, sleepy owl shapes, and gentle look, the room starts to feel finished in a natural way.
Try Another Baby Quilt Pattern
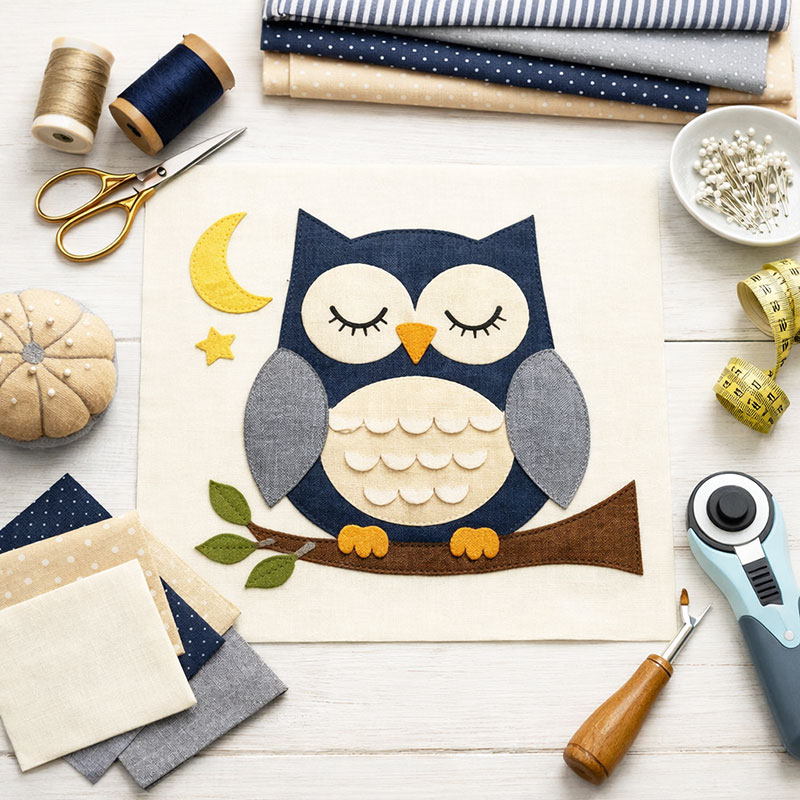
Owl baby quilt pattern designed to match a DIY felt fabric nursery crib mobile.
See a quilt-making supply option here
Quick answer: An owl baby quilt pattern works best when the owl shapes, spacing, and colors relate to the crib mobile above it, the printable pattern pieces stay simple enough to sew cleanly, and the finished quilt remains close to crib scale so it looks balanced in the nursery.
Match Owl Baby Quilt Pattern to Crib Mobile
Most parents notice the same thing once the mobile is finally hanging. The upper part of the room looks finished, but the crib still feels plain.
That is often the moment when a matching quilt starts to feel like the missing piece.
For more ways to create that same cozy look through the rest of the room, my woodland nursery ideas show how soft forest details can make the whole space feel settled and complete.
An owl baby quilt pattern works best when it picks up the same visual ideas used in the mobile without copying them piece by piece. If the mobile uses rounded owl bodies, closed eyes, and a moon or star detail, the quilt should stay in that same direction. If the mobile is built around navy, cream, gray, or a similar set of nursery colors, the quilt should repeat that mix in a way that still feels like its own project.
The spacing matters just as much as the colors. That spacing detail matters more than most pages give it credit for. If the mobile has a few owls hanging with open space between them, the quilt should not be packed with tiny owl faces from edge to edge. The eye notices spacing before it notices the smaller details, so that layout choice changes the whole feel of the nursery.
You can see the mobile style this page is designed to coordinate with on owl nursery decor diy. The goal is not to turn the quilt into a copy of the mobile. The goal is to make the crib and the wall above it feel like they belong together.
Do not copy the mobile piece for piece.
Printable Owl Baby Quilt Pattern Pieces That Are Easy to Use
Here’s the thing. Printable pattern pieces only help if they are clean enough to cut quickly and simple enough to sew without fighting the shapes. Most parents do better with a pattern that uses a few clear pieces instead of one that breaks the owl into too many tiny sections.
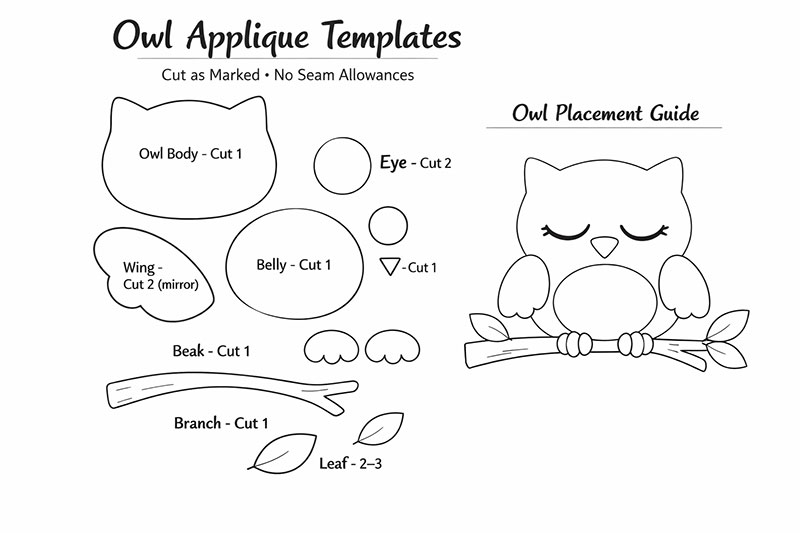
For this owl baby quilt pattern, the easiest printable template set includes one body piece, one belly piece, two wing pieces, two eye circles, one beak, and one optional moon or branch accent. That gives you an owl that reads clearly from across the room and still feels personal up close.
A practical printable set for one owl block usually includes:
- 1 owl body template
- 1 belly template
- 2 wing templates
- 2 eye templates or one stitched-eye guide
- 1 beak template
- 1 optional moon, star, or branch template
When you prepare printable pieces, it helps to label them by size and placement before you print. Parents often notice this after the first test block. Pieces that look obvious on a screen can get mixed up fast once they are cut out and sitting on the table. A simple typed key under the printable page saves time later.
Suggested typed key for the printable page:
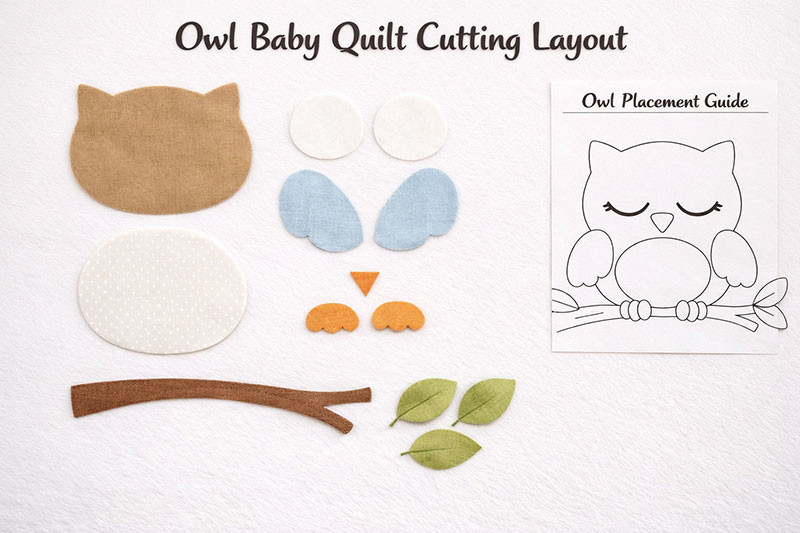
- Body Piece A. Cut 1 from owl print or solid fabric
- Belly Piece B. Cut 1 from contrast fabric
- Wing Piece C. Cut 2 mirror image pieces
- Eye Piece D. Cut 2 from cream or white fabric
- Beak Piece E. Cut 1 from gold, tan, or rust fabric
- Accent Piece F. Cut 1 if using moon, branch, or star
Small changes in the wing shape, eye placement, or belly curve can give the owl a more personal look. That way, the finished quilt still has the look you want but does not look exactly like every other owl design you may have seen before.
Cutting Guide for Owl Baby Quilt Pattern Pieces
Cutting is where the project either starts smoothly or turns into a mess. Most parents are not struggling with the idea of the quilt. They are struggling with what to cut first and how to keep the pieces organized once everything is spread out.
The easiest method is to print the pattern pieces, cut paper templates first, pin them to fabric, and cut one full test owl before cutting the rest of the set. That test block tells you right away whether the body feels too large, whether the wings look balanced, and whether the eyes read clearly from a few feet away.
Suggested cutting order:
- Print and cut the paper templates.
- Cut one full owl test set from scrap or extra fabric.
- Lay the test owl on a plain background square.
- Adjust scale if the owl feels too small or too crowded.
- Cut the remaining owl sets once the first one looks right.
This usually saves more time than cutting everything at once. One test owl may feel like an extra step, but it prevents the bigger problem of finishing six blocks and realizing the faces are too small to read across the room.
A balanced layout for this page is usually four to six owl blocks with open background sections between them. That keeps the crib from looking crowded and makes the mobile and quilt relate better visually.
How to Construct the Owl Baby Quilt Step by Step
Once the pieces are cut, the construction should feel steady, not confusing. Most parents do better when the block is built in the same order every time instead of jumping around from wings to borders to backing.
Step 1. Build each owl front.
Place the belly on the body piece first. Add the wings next. Then place the eyes and beak. If you are using appliqué, press each piece in place and stitch around it before joining the block to the background.
Step 2. Attach the owl to the background square.
Center the finished owl on the background section and stitch it down. This is where the open space matters. The background is what keeps the owl readable.
Step 3. Add accent details sparingly.
A moon, branch, or one small star can help the block feel finished. Too many accents will start to compete with the owl itself.
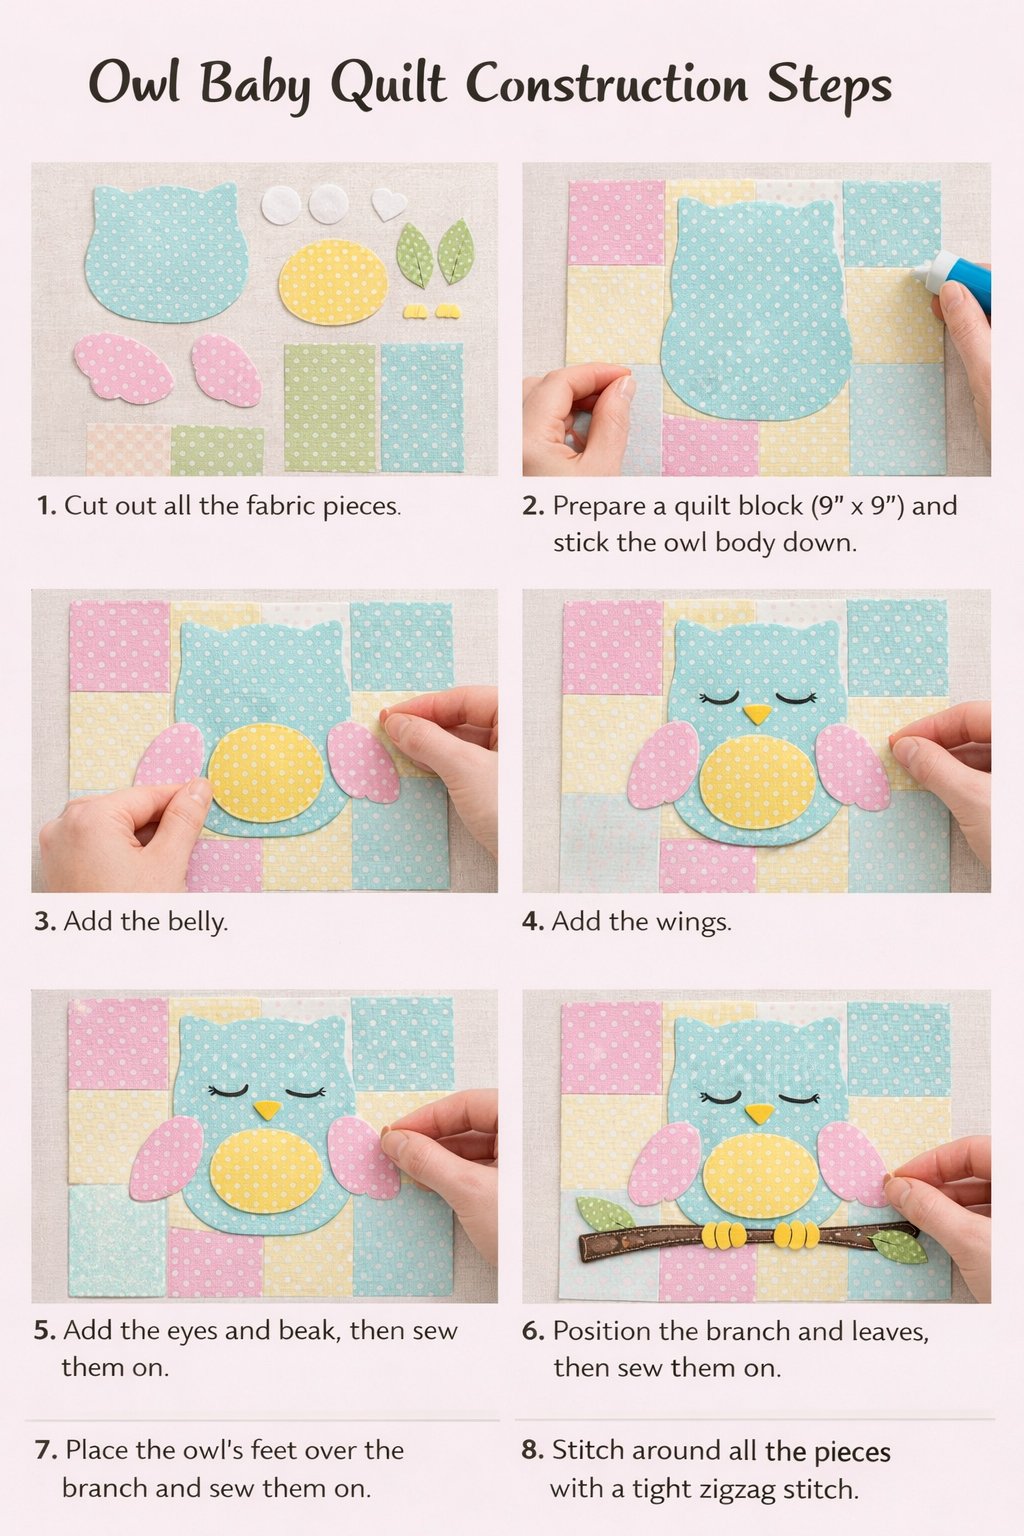
Step 4. Join the finished blocks into rows.
Sew the owl blocks together with plain spacer strips or plain squares between them. This is where the nursery look really starts to come together. The spacing gives the quilt the same visual rhythm as the mobile.
Step 5. Add the border.
Use one border color that ties back to the mobile. A narrow border usually works better than a heavy one for crib scale.
Step 6. Make the quilt sandwich.
Layer the quilt top, batting, and backing. Smooth everything out before pinning or clipping it in place.
Step 7. Quilt and bind.
Use simple straight-line quilting, light echo quilting around the owls, or another restrained pattern that does not overpower the block shapes. Finish with a binding that picks up one of the main colors from the owl or border.
Typed construction notes that help in real life:
- Press after each major step so the owl pieces stay flat.
- Photograph the first finished block before repeating it so you can match placement later.
- Keep left and right wings stacked separately if they are mirror pieces.
- Do not add too many extra accents once the first row is complete.
Parents often notice this by the second block. The more pieces added just because they are cute on their own, the less the finished quilt matches the room. Restraint is what makes the final quilt feel intentional.
Crib Size for Owl Baby Quilt Pattern That Looks Right
Size changes everything. A quilt can have the right colors and the right pattern and still look off if it is too large for the crib. That usually happens when a baby quilt starts borrowing proportions from a throw quilt or wall quilt.
For most nurseries, an owl baby quilt pattern looks right when the finished size lands around 36 by 45 inches to 40 by 50 inches. That gives the design enough room to show while still staying in proportion with the crib.

If safety comes up, current United States guidance matters here. The U.S. Consumer Product Safety Commission safe sleep guidance explains that quilts and other loose bedding should not be left in a crib for unsupervised sleep. In most homes, a quilt like this is used for display, photos, tummy time outside the crib, or supervised cuddle time instead.
That keeps the nursery looking finished while still following current safety advice.
How the Owl Baby Quilt Finishes the Nursery
This is where the room starts to feel complete. The mobile draws the eye up. The quilt brings that same idea down into the crib area. Then the crib stops feeling like a separate piece and starts feeling like part of the room.
I think that is why a coordinated quilt works so well here. You are not just sewing another owl project. You are giving the nursery one more piece that supports the rest of the space instead of competing with it.
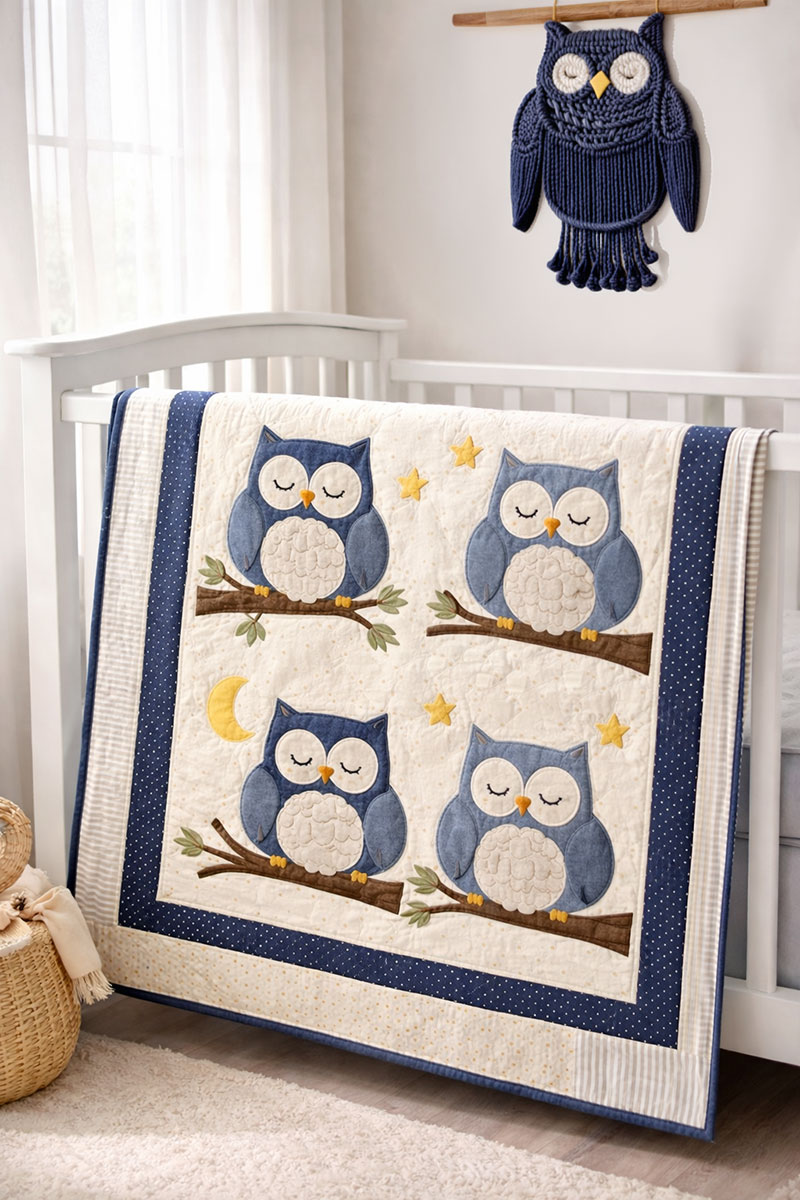
One of the easiest ways to style the finished quilt is to fold it across the front rail for photos or keep it draped nearby during the day instead of laying it flat inside the crib. That lets the owl design show without making the room look overfilled.
If you are working one of the owl baby nursery themes that are so versatile, this page works naturally with owl baby nursery. It also belongs inside the baby quilts section and under nursery ideas for parents pulling together the whole room.
The point is simple. Make the main pieces relate.
FAQ About Owl Baby Quilt Pattern Pieces and Construction
What printable pieces do I need for an owl baby quilt pattern?
Most patterns work well with one body piece, one belly piece, two wings, two eyes, one beak, and one optional accent like a moon or branch.
Should I test one owl block before cutting the whole quilt?
Yes. One test block makes it much easier to judge the scale, eye placement, and spacing before cutting the rest of the fabric.
What construction method works best for this kind of quilt?
Simple appliqué or patchwork with larger shapes usually works best because the finished owls stay readable across the room.
What size should the finished quilt be for a crib?
A finished size around 36 by 45 inches to 40 by 50 inches usually looks balanced with a crib and still shows the design clearly.
Can I leave the quilt inside the crib for sleep?
No. Quilts are generally used for display or supervised time, not for unsupervised sleep in a crib.
When you click on links to various merchants on this site and make a purchase, this may result in this site earning a commission. This does not affect the price you pay.
UBGI Gold Standard 2026
Verified for performance, SEO,
and accessibility compliance.
Photos, decorating ideas, party setups, and reader submissions are shared for inspiration only and are not intended as step-by-step decorating, construction, or DIY instructions.
About Jan | Contact | Baby Room Ideas (Blog) | Site Map | Privacy Policy | Disclosure Policy | Disclaimer | Affiliate Disclosure | Earnings Disclosure | Facebook | Pinterest
I am a participant in the Amazon Services LLC Associates Program, an affiliate advertising program designed to provide a means for us to earn fees by linking to Amazon.
Copyright © 2006-2026. All Rights Reserved.