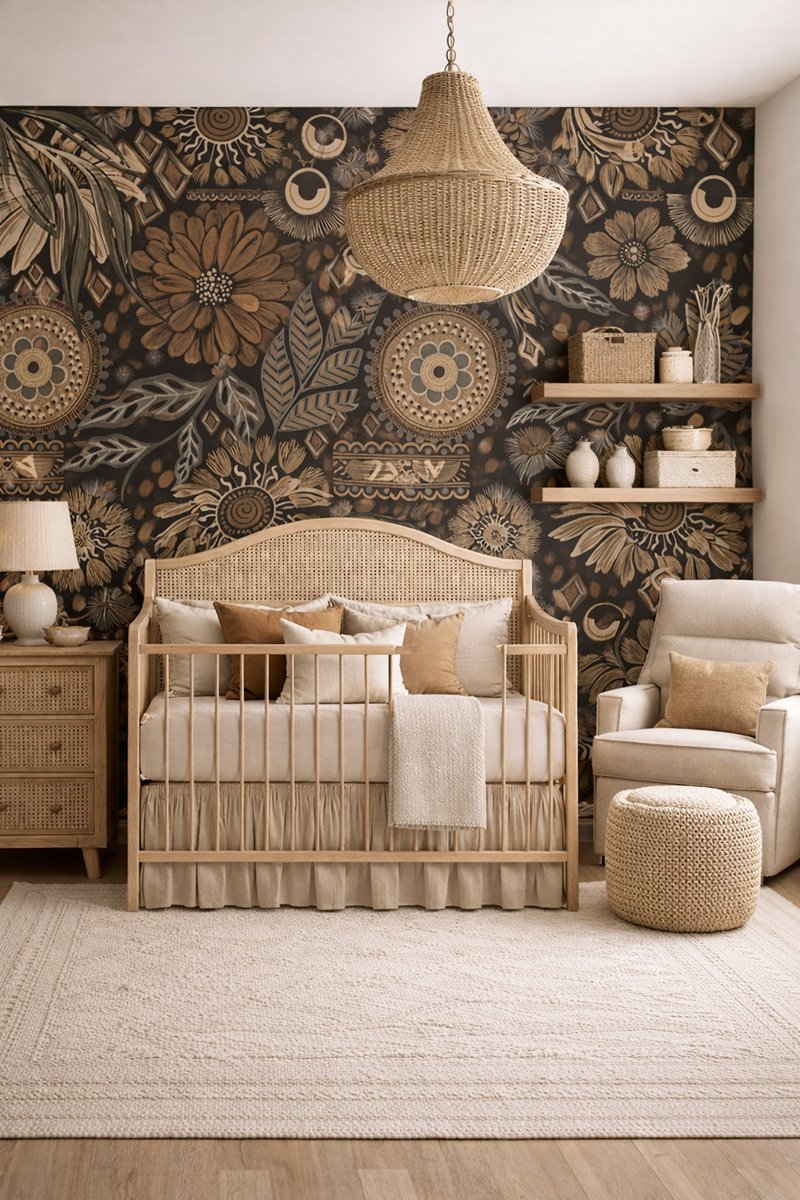
Nursery Furniture Layout Ideas for Small and Large Rooms
A nursery furniture layout is the planned placement of the crib, dresser, and chair so the room supports safe sleep, smooth nighttime routines, and easy movement. The best nursery furniture layout places the crib on a clear interior wall, positions the dresser and changing area within a few steps, and preserves a clean walking path from the door to the crib.
Jump to the exact layout help you need:
Quick nursery furniture layout plan (5-minute setup)
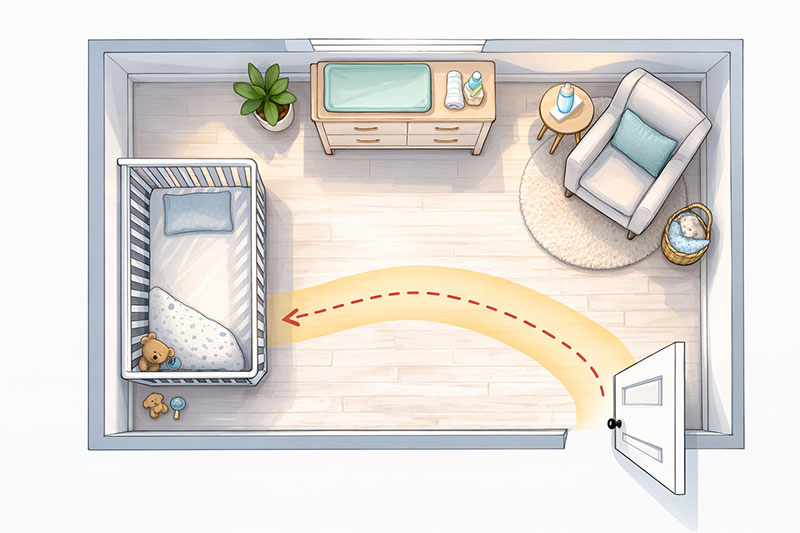
At a glance: A well-planned nursery furniture layout keeps the crib on a stable interior wall, positions the dresser and changing area within easy reach, and places a feeding chair in a calm corner while preserving a clear walking path from the door to the crib.If you want a layout that works immediately (and keeps working as your baby grows), make one decision first: where your walking path will be. Your “main path” should run from the door to the crib without squeezing between furniture. Then place everything else around that path like a calm perimeter.
This is where most parents make the mistake of designing for photos instead of real movement.
Use this simple order that avoids overthinking:
- Choose the walkway: door → crib must stay open and easy.
- Claim one “care wall”: dresser + laundry + diaper storage live together.
- Choose one “quiet corner”: chair + small table + soft lamp for night feedings.
- Leave one open zone: floor space for tummy time and later toy rotation.
How to arrange nursery furniture in order:
- Identify the clear walking path from the door to the crib.
- Anchor the crib on a stable interior wall.
- Place the dresser within a few steps of the crib.
- Position the feeding chair in a quiet corner that doesn’t block traffic.
- Leave one open floor zone for movement and future play.
Crib placement that’s safe and practical
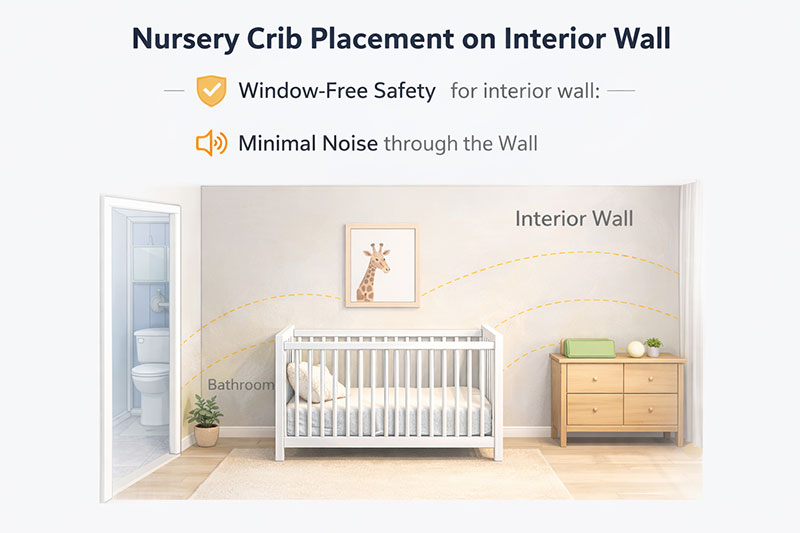
Where to put the crib: Place the crib on a stable interior wall, away from windows and door swing paths, with at least one fully accessible side and no cords or wall décor within reach.
For most rooms, the best crib spot is a stable interior wall where the crib isn’t directly under a window and isn’t in the swing of the door. This keeps the room feeling grounded and prevents the crib from becoming the “traffic lane.”
In the United States, cribs are regulated as durable infant products, with federal standards enforced through the Consumer Product Safety Commission (CPSC) to reduce entrapment and structural hazards. Your nursery furniture layout should support that safety framework by keeping the sleep area clear, stable, and uncluttered. (No add-ons, no hanging items within reach.)
Hard fact: If the crib area feels “decorated,” it’s usually too busy.
Practical crib placement rules that won’t age out:
- Keep at least one side of the crib accessible without moving furniture.
- Avoid placing the crib where cords, drapes, or wall décor would be within reach.
- Keep the sleep zone visually calm so you can scan it fast at night.
For official product standards and crib safety requirements in the United States, refer to guidance from the Consumer Product Safety Commission (CPSC): CPSC crib safety guidance.
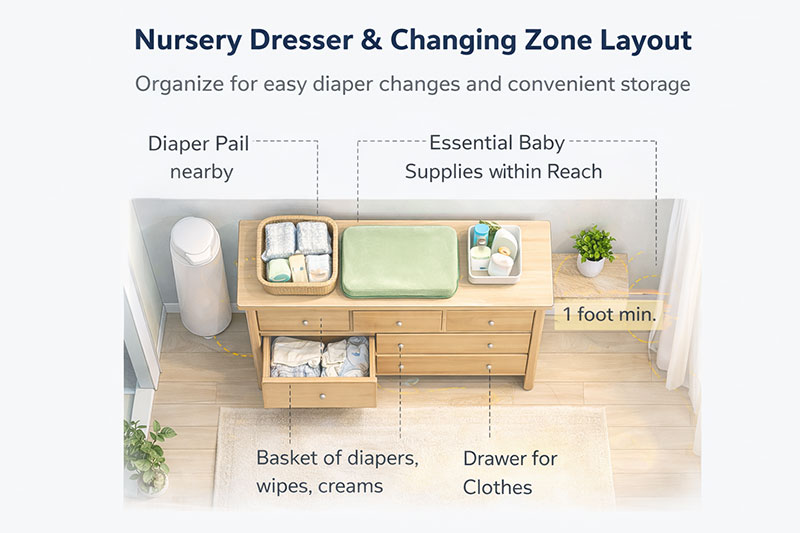
Dresser + changing zone setup
Your dresser is the true workhorse of the nursery.
If you are deciding exactly where that changing area should sit, this guide to changing table placement in a nursery can help you keep diapers, drawers, crib access, and walking space working together.
For a more specific example of how these two pieces can work together in one practical setup, see this crib and dresser nursery layout guide.
A smart nursery furniture layout treats the dresser as a “care station,” not just storage. Place it where you can stand comfortably, open drawers fully, and reach essentials without turning your back on the crib for long.
What to prioritize:
- Reach zone: diapers, wipes, cream, and a spare onesie should be within one arm’s reach.
- Drop zone: a small surface area for the “in and out” stuff (burp cloths, swaddles).
- Laundry logic: hamper close enough that you actually use it.
If you’re still deciding what pieces you even need (so you don’t over-furnish the room), your downstream guide is here: How Much Furniture Do You Need for a Nursery.
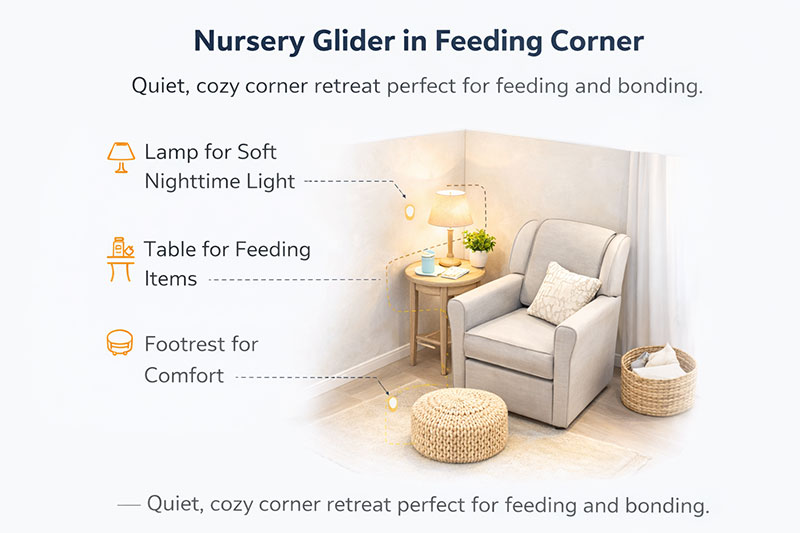
Glider / feeding corner placement
The chair belongs where you can settle in without blocking the room.
A reclining chair needs extra planning room, so this guide to nursery recliner spacing can help you check wall clearance, footrest depth, and walking space before choosing the final corner.
If you are choosing between comfort and floor space, my nursery recliner vs glider comparison can help you decide which chair style fits the room before you lock in the layout.
If you are still choosing between chair styles, my nursery rocking chair comparison explains where rockers, gliders, and chair regrets usually show up after nightly use begins.
For an informative chair-style breakdown, see my nursery glider vs rocking chair vs recliner guide before choosing the final feeding corner.
The best spot is typically the corner farthest from the door, angled so you can see the crib while seated. That single choice makes the room feel calmer instantly.
For more information on chair placement, my guide to where to put a recliner in a nursery shows how to choose a spot that works with wall clearance, footrest space, and the main walking path.
Keep the feeding corner simple and useful:
- Light: a soft lamp you can reach while seated.
- Surface: a small side table for water and a phone.
- Foot support: ottoman or pouf if you like, but keep it easy to slide aside.
If you’re building a harmonious look across the whole room (not just the layout), explore coordinated design inspiration in my baby nursery themes guide.
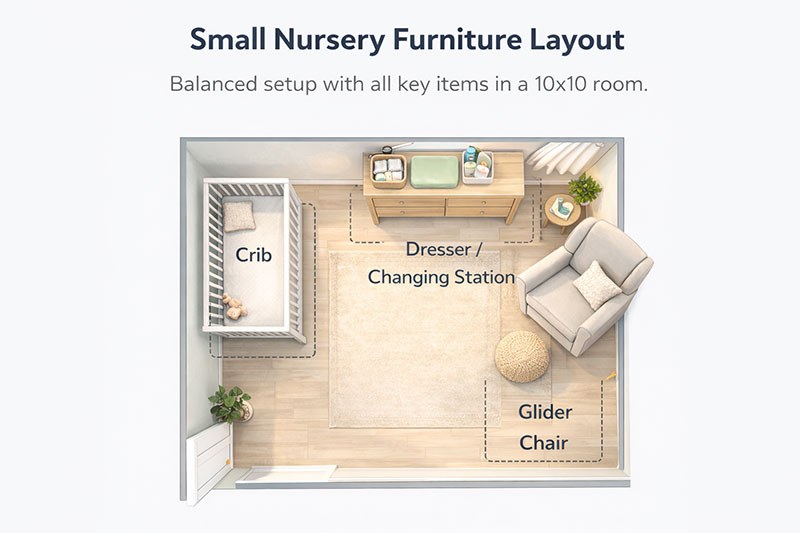
Small nursery furniture layout ideas (tight rooms)
Small rooms don’t need “tiny furniture.” They need fewer decision points. The goal is one clean path and two compact zones: sleep + care.
One of the smartest decisions is choosing the right crib size from the start, and this guide to best mini cribs for tight nursery spaces shows which compact options actually work without overpowering the room.
Three small-room layouts that work:
- Wall-to-wall plan: crib on the longest wall, dresser on the opposite wall, chair in the corner that doesn’t pinch the door swing.
- Diagonal chair plan: chair placed at a slight angle in a corner so it feels tucked in rather than bulky.
- Minimal piece plan: crib + dresser only, with a compact seat added later if the room feels tight.
Small-room sanity rule: if you have to rotate sideways to walk through the room, something is in the wrong place.
Families setting up one room for two babies usually need more deliberate crib spacing and traffic flow, so these twin nursery layout ideas can help you create a shared nursery that still feels open and easy to use.
To map those traffic lanes before you start moving pieces around, use this nursery floor plan layout guide for a simple way to sketch crib placement, dresser spacing, and open walking paths.
For a true small-footprint example, this small 8x10 nursery layout plan shows how to position the crib and dresser while preserving a clean walking path, and these nursery room layout ideas offer a more focused look at what works in different nursery spaces.
When the room has four fairly even walls instead of a long or narrow shape, these nursery layout ideas for square rooms can help you balance the crib, dresser, and chair without crowding the middle of the room.
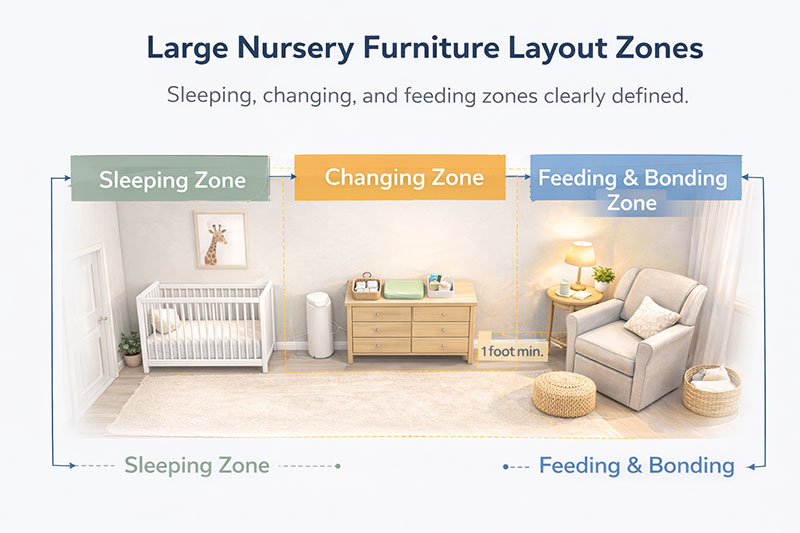
Large nursery layouts (open rooms)
Large rooms feel luxurious until they feel empty and echo-y. The fix is not more furniture, it’s clearer zoning. A large nursery furniture layout works best when it creates two or three “rooms within the room.”
High-performing large-room zones:
- Sleep zone: crib anchored on a strong wall with space to approach from at least one side.
- Care zone: dresser + storage + laundry grouped together, not scattered.
- Comfort zone: chair area with rug placement that visually marks it as its own corner.
If you’re tempted to add extra pieces “because the room can fit it,” pause and ask: will you use it daily? If not, it becomes clutter, just spread out.
For a medium-large room that needs better zone spacing without drifting into wasted floor space, this nursery layout for a 12x12 room shows how to arrange the crib, dresser, and chair so the room feels open but still practical.
One addition that earns its space in an open nursery is a dedicated book wall or low display shelf — explore practical nursery bookshelf ideas that define a zone without overcrowding the layout.
Final layout checklist (before baby arrives)
Use this checklist to confirm your nursery furniture layout is functional, calm, and easy to live with:
- Core query answered: The crib, dresser, and chair are placed to support safe sleep and smooth nightly routines.
- Walkway: You can walk door → crib without squeezing past furniture.
- Crib zone: Clear, uncluttered, and not positioned where cords/drapes would be reachable.
- Dresser access: Drawers open fully, and supplies are reachable without turning away for long.
- Chair placement: You can sit, stand, and swivel without blocking the room.
- Night routine: Lamp + table are placed for one-handed use.
- Future-proof: One open zone remains for tummy time and later play.
For a complete overview of essential pieces and how they work together, explore my full nursery furniture guide.
If you’re working with a compact space, see how these principles adapt in my 10x10 nursery layout guide, which applies the same placement logic to tighter floor plans.
When you click on links to various merchants on this site and make a purchase, this may result in this site earning a commission. This does not affect the price you pay.
UBGI Gold Standard 2026
Verified for performance, SEO,
and accessibility compliance.
Photos, decorating ideas, party setups, and reader submissions are shared for inspiration only and are not intended as step-by-step decorating, construction, or DIY instructions.
About Jan | Contact | Baby Room Ideas (Blog) | Site Map | Privacy Policy | Disclosure Policy | Disclaimer | Affiliate Disclosure | Earnings Disclosure | Facebook | Pinterest
I am a participant in the Amazon Services LLC Associates Program, an affiliate advertising program designed to provide a means for us to earn fees by linking to Amazon.
Copyright © 2006-2026. All Rights Reserved.