How to Measure Crib Screws Correctly
How to measure crib screws correctly matters because measurement details help identify the right replacement hardware by length, diameter, thread type, and head style. When crib hardware has been separated, mixed, or lost, these dimensional references help prevent visually similar fasteners from being confused with the correct parts for a specific baby crib model.
Trying to measure crib screws without matching the wrong part? Check these first:

Crib screw size references are usually tied to hardware identification after a crib has been taken apart, stored, moved, or passed down. Product documentation often uses small dimensional differences to separate one fastener from another, even when the screws look nearly identical side by side.
Manufacturer materials regularly list screw dimensions as part of broader hardware sets rather than as standalone items. As a result, crib screws are often referenced by measurement values, thread designation, and head configuration instead of by generic naming. This approach reflects standards information used to differentiate otherwise similar fasteners within a single crib model.
Why Crib Screw Measurements Appear in Product Materials
Crib hardware is produced as part of coordinated assemblies designed to align rails, corner posts, and mattress support frames. Screws, bolts, barrel nuts, and threaded inserts are typically engineered to function together within narrow tolerances defined during manufacturing. Product specifications often list exact measurements to distinguish fasteners used at different connection points, even when visual differences appear minimal.
In discontinued or older crib models, measurement references become more prominent because original packaging and labeled hardware kits may no longer be available. Manufacturer archives and secondary documentation frequently rely on dimensional identification when listing compatible parts. Measurement values serve as reference markers rather than operational instructions, supporting identification within product records.
For pages that organize crib hardware by manufacturer and part category, see the crib replacement parts hub and the broader baby crib parts reference pages, which group fasteners according to published specifications.
Crib Screw Characteristics Listed in Standards Information
Product specifications for crib screws typically include several descriptive attributes. These attributes appear in manufacturer tables, diagrams, and parts lists rather than procedural text. The most frequently listed characteristics include overall length, threaded diameter, thread format, and head style. Each attribute functions as a classification marker rather than a usage directive, which is why the crib hardware identification reference is useful for comparing fastener types.
Length values are usually expressed in millimeters and describe the distance between the underside of the head and the end of the threaded shaft. Diameter values identify the thickness of the threaded portion and are commonly associated with metric designations. Thread format descriptions distinguish metric threading from non-metric systems used in other furniture categories, which is why general crib screws reference pages often separate size and thread details by model.
Head style descriptions appear alongside dimensional values to indicate how a fastener sits within brackets or rails. Common formats referenced in crib documentation include hex socket heads, Phillips heads, countersunk heads, and rounded button heads. These descriptions are included as identification data rather than functional guidance.
Dimensional References Found in Manufacturer Listings
Manufacturer listings often present crib screw dimensions in grouped tables that correspond to specific crib models or production runs. Within these listings, screws of similar appearance may carry different length or thread values based on their placement within the crib structure. Dimensional distinctions help differentiate fasteners intended for corner joints from those used along side rails or mattress support assemblies.
Metric sizing is commonly referenced in modern crib documentation. Thread designations such as M6 or M8 appear in parts lists as shorthand for diameter categories rather than as instructional labels. These designations function as classification terms within standards information published by manufacturers and distributors.
Visual Reference of Crib Screw Dimensions
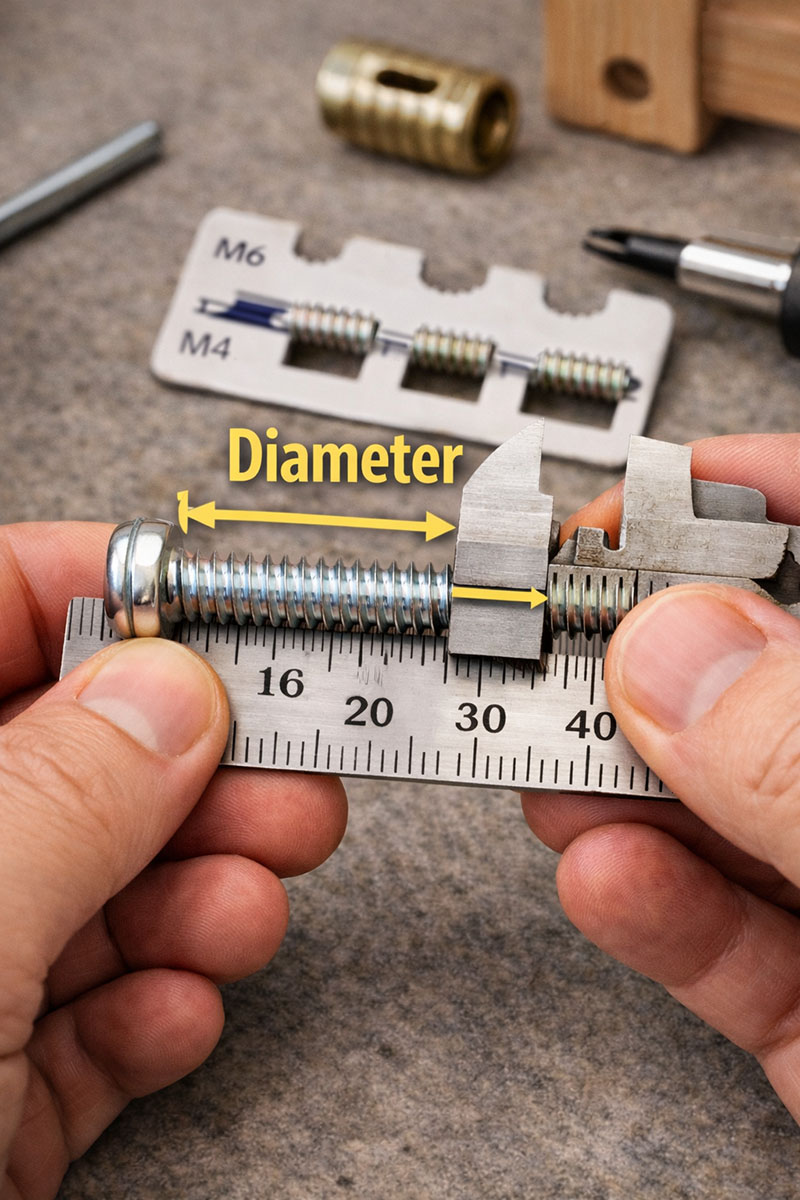
Visual materials accompanying crib hardware listings typically illustrate length and diameter positioning without narrative direction. These visuals are used to clarify dimensional terminology used in product tables and specification sheets. The imagery functions as descriptive support for measurement values rather than as procedural material.
Common Variations Noted Across Crib Models
Across different crib brands and production periods, variation in screw dimensions is a common theme in manufacturer documentation. Even within a single model line, fastener lengths may vary depending on rail thickness, joint depth, or decorative trim. Documentation reflects these differences through discrete measurement entries rather than generalized sizing.
Thread format variation is also noted in crib records. While metric threading dominates modern crib manufacturing, some older models reference alternate formats depending on production location or supplier changes. These distinctions are typically recorded as technical notes within standards information rather than highlighted as functional differences.
How Crib Hardware Is Identified When Screws Are Missing
When original crib screws are missing, manufacturer records often rely on dimensional references and hardware classification details to separate similar-looking fasteners. Small differences in thread pattern, shaft length, or head configuration can affect how crib hardware aligns within specific crib models, which is why hardware store screw substitutions can create mismatches.
Model numbers and manufacturer labels are commonly cited as reference anchors in hardware documentation. These identifiers allow published measurement tables to be cross-referenced with crib production data. The emphasis remains on identification through recorded standards information rather than on procedural direction.
Related Crib Hardware Reference Pages
Quick Reference FAQ
What do crib screw measurement references mean in manufacturer documentation?
In manufacturer documentation, crib screw measurement references describe how fastener dimensions are recorded for identification purposes. They explain how size, thread type, and head-style information appear in specifications rather than providing repair or assembly instructions.
Is this page a step-by-step repair or replacement guide?
No. This page explains crib screw measurement terms for identification and documentation purposes only. It does not approve substitutions, repairs, reassembly, or the use of any specific hardware.
Why do crib manufacturers list exact screw measurements?
Exact measurements are listed to distinguish similar fasteners used at different connection points within a crib. Small dimensional differences help identify original hardware sets across models and production periods.
Are crib screw measurements the same across all crib brands?
No. Manufacturer documentation shows that screw dimensions can vary by brand, model, production year, and supplier. Measurements are used as classification markers rather than universal standards.
Where can I find model-specific crib hardware information?
Model-specific hardware references are typically found in manufacturer manuals, archived parts lists, and crib replacement parts listings organized by brand and model.
Additional pages that organize crib hardware information by classification include:
External Regulatory Listing Reference
For recall listings and regulatory records associated with crib hardware, published materials from the U.S. Consumer Product Safety Commission provide product notices and classification data. These records present standards information related to crib components without offering installation or modification instructions.
Summary
Crib screw measurements function primarily as identification references used in manufacturer hardware records and parts documentation. Published specifications commonly organize fasteners by length, thread type, diameter, and head style so similar-looking crib hardware can be separated accurately across different crib models and production periods.
Across crib brands and model years, dimensional differences remain one of the main ways hardware is classified inside archived manuals and replacement parts listings. These measurement references support crib parts identification within published specifications and regulatory records, including broader crib parts identification across manufacturers documentation.
When you click on links to various merchants on this site and make a purchase, this may result in this site earning a commission. This does not affect the price you pay.
UBGI Gold Standard 2026
Verified for performance, SEO,
and accessibility compliance.
Photos, decorating ideas, party setups, and reader submissions are shared for inspiration only and are not intended as step-by-step decorating, construction, or DIY instructions.
About Jan | Contact | Baby Room Ideas (Blog) | Site Map | Privacy Policy | Disclaimer | Affiliate Disclosure | Earnings Disclosure | Facebook | Pinterest
I am a participant in the Amazon Services LLC Associates Program, an affiliate advertising program designed to provide a means for us to earn fees by linking to Amazon.
Copyright © 2006-2026. All Rights Reserved.