DIY Deer Nursery Wall Sign Tutorial (With Free Template)
DIY deer nursery wall sign projects like this make me so happy because they blend creativity, meaning, and a touch of woodland magic into a baby’s room. As I walked through this tutorial again today, I imagined how sweet it would look above a crib or changing table—bringing that cozy, handmade charm that so many woodland nurseries carry so beautifully.
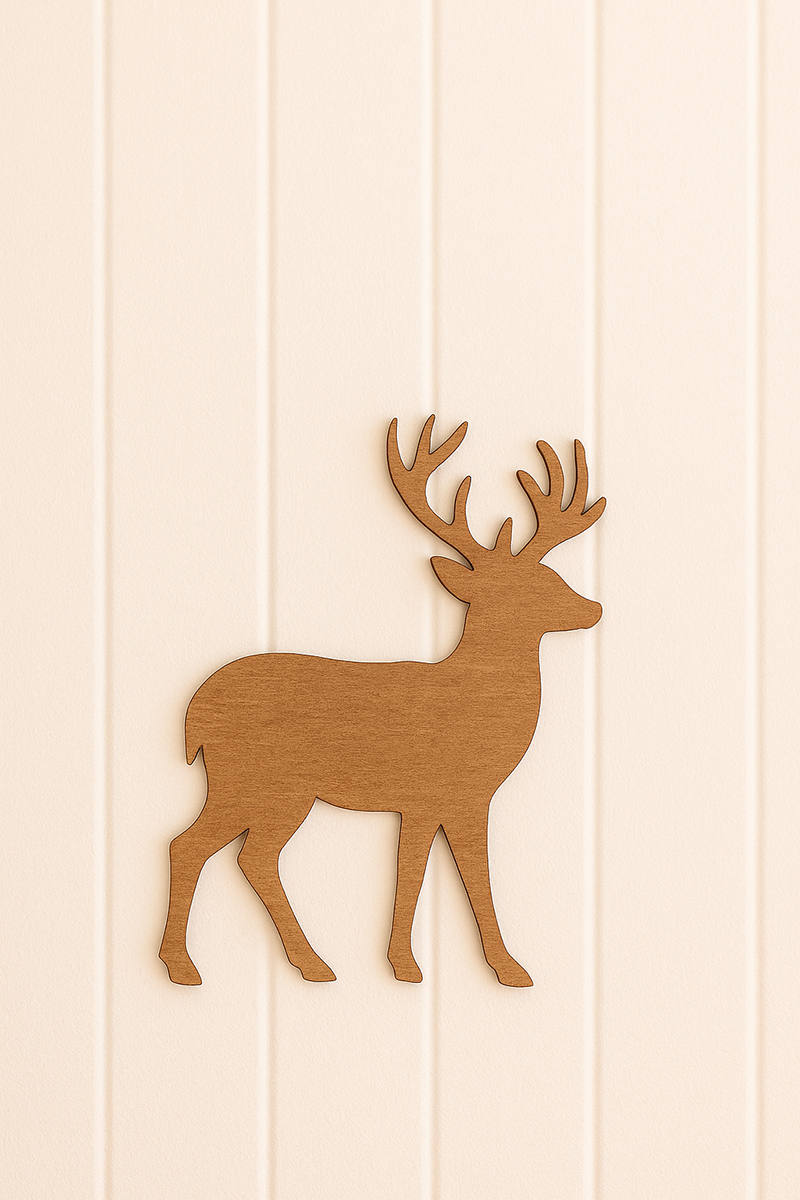
As I held the wooden deer silhouette we had cut out up against the wall for the first time, I could instantly picture how charming it would look in a woodland nursery—whether tucked above a changing table, paired with a cozy reading nook, or balanced over a crib with soft forest-inspired bedding. There’s something so timeless about simple cut-out shapes, and this one brings that handmade, lovingly crafted feel that so many of us want for our baby’s first space.
Get everything I used on Amazon
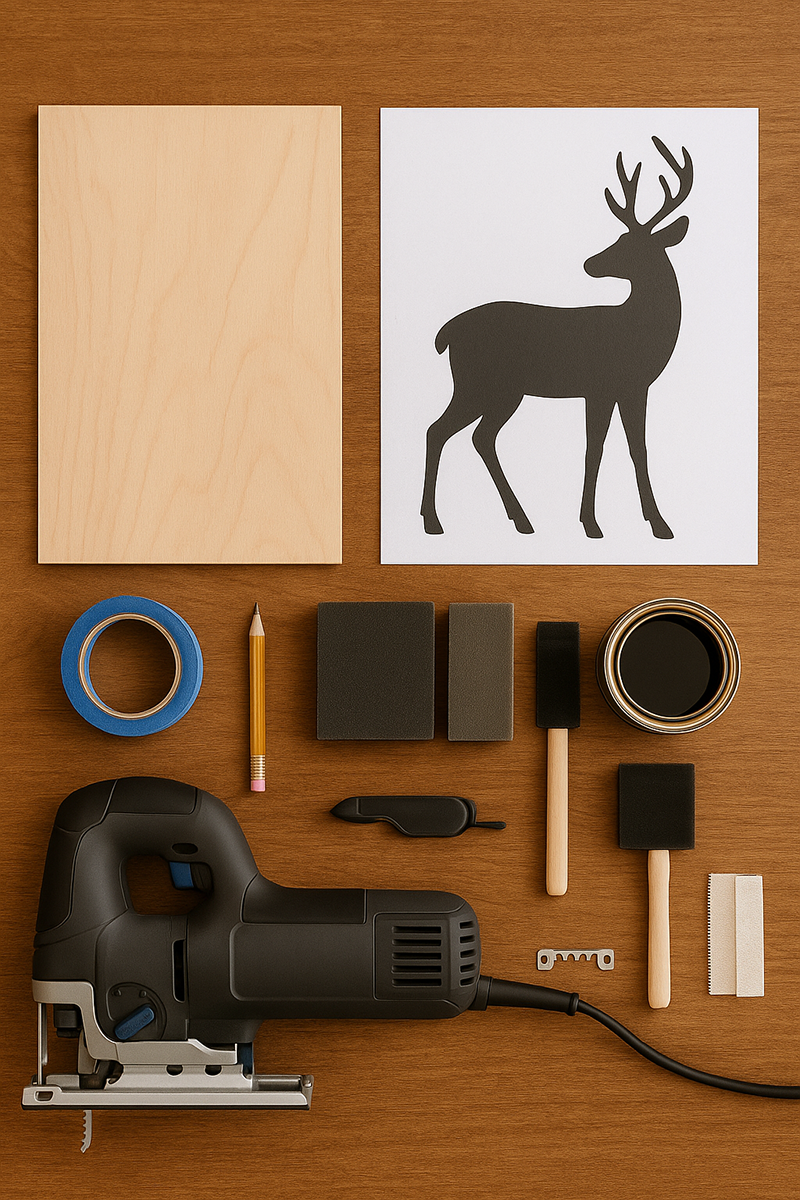
Everything you need to craft your handmade deer nursery wall sign, beautifully arranged and ready for your DIY project.

A Cozy Woodland Craft for Your Baby’s Room
One of my favorite things about a project like this is how flexible it is. You can keep it very minimal and modern, or lean into a rustic, cabin-in-the-woods look. If you’re still deciding on your baby’s room style, you’ll find lots of inspiration on my baby nursery themes page — there are so many ways to tuck this deer into the mix.
Why This DIY Deer Nursery Wall Sign Works So Well
From an decorating point of view, this simple silhouette does a lot of quiet, beautiful work. The warm wood grain adds texture to a flat wall, the clean outline of the deer brings a whimsical focal point, and the neutral tones play nicely with almost any palette — from soft creams, taupes, and warm whites to sage green, pine, or terracotta.
Parents also love that it’s not “babyish.” Your little one can grow into this piece, and it will still feel right at home in a toddler or preschool room. If you already have baskets, natural wood furniture, or forest-inspired bedding like the ones featured on my real nursery ideas page, this sign will feel like it was meant to be there all along.
Choose Colors That Match Your Woodland Nursery
If your nursery leans soft and airy, you might stain the deer in a light oak or whitewash finish. For a deeper, cozy forest look, a mid-tone walnut or chestnut stain is gorgeous. Painted versions also work beautifully — a warm white, soft greige, or muted pine green can all look stunning against a neutral nursery wall. For more wall inspiration, you can peek at my nursery wall décor ideas collection.
Just Imagine: If you pause and picture your own nursery wall for a moment — the crib, the curtains, the lighting — and imagine this deer in place, you’re doing exactly what I hope: slowing down, visualizing the room, and giving yourself a mini “nursery daydream.” Those little pauses almost always lead to better decorating decisions.
DIY Deer Nursery Wall Sign Tutorial (Step-by-Step)
Below is the complete step-by-step guide to creating your DIY deer nursery wall sign. Take your time, enjoy the process, and don’t worry about being “perfect” — a handmade piece is supposed to look lovingly human.
Step 1: Gather Your Materials
You don’t need a huge workshop for this project. Most of what you’ll use is simple and budget-friendly:
- 1/4" craft plywood or MDF board
- Jigsaw or scroll saw
- Printable deer silhouette template (see download section below)
- Pencil and painter’s tape
- Sanding block (120 and 220 grit)
- Wood stain or acrylic paint
- Foam brush or lint-free cloth
- Picture hanging strips or a sawtooth hanger
If you’re new to cutting shapes, starting with a slightly larger deer makes it easier to follow the curves. You can always size down on your next project once you’re comfortable.
Step 2: Print and Trace the Template
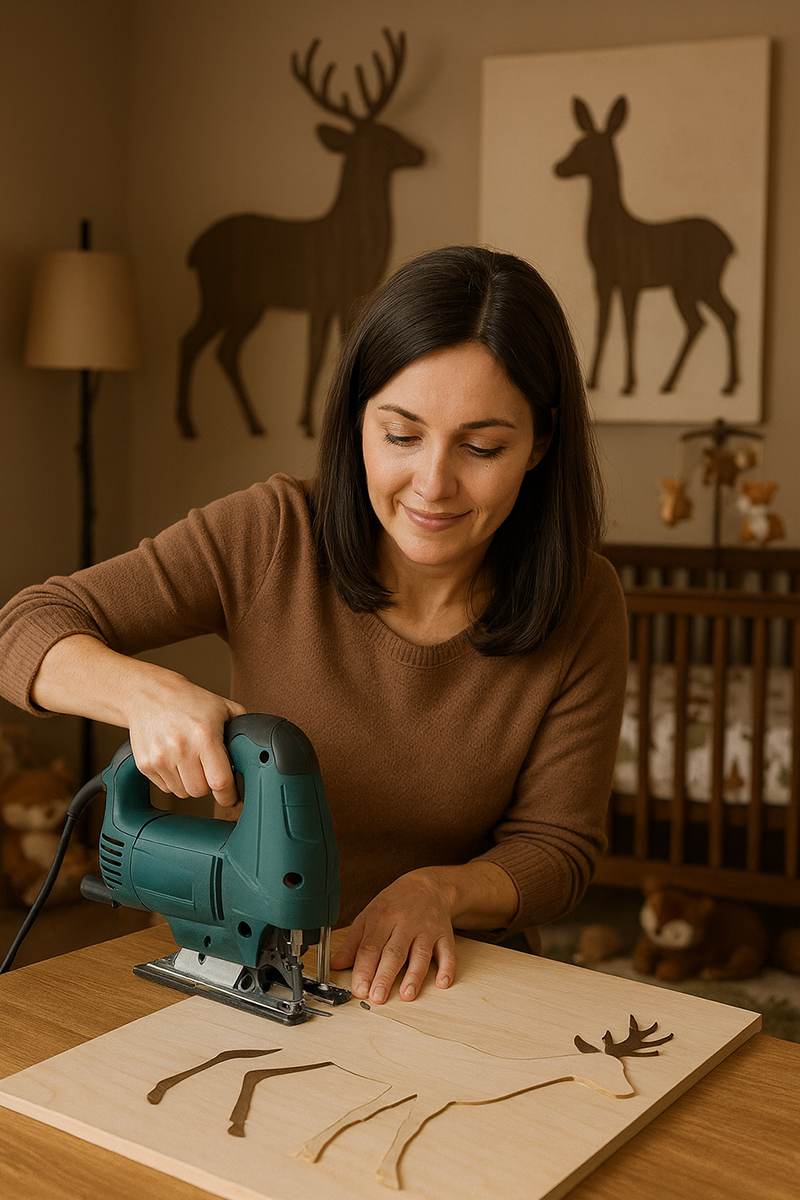
Print the deer silhouette template at the size you want for your wall. Use painter’s tape to secure the paper to your wood panel, then trace around the outline with a sharp pencil. Press firmly so the line is easy to see while you cut. You’ll start to feel attached to this little deer even at this stage — it’s fun to see the shape appear.
See my affordable, favorite jigsaw pick on Amazon
Cutting the wooden deer silhouette is a simple, relaxing DIY step that brings the woodland theme to life.
Step 3: Cut the Deer Shape
Place your wood on a sturdy surface and carefully follow your pencil line with the jigsaw or scroll saw. Move slowly and let the blade do the work; forcing the saw will only create jagged lines. Gentle, patient cutting helps the antlers and legs look graceful and smooth.
I still remember one of my first nursery cut-outs years ago — I had the window open, soft music on, and a little pile of sawdust on the floor. It felt like such a sweet “nesting” moment, and I hope this project gives you a memory like that, too.
Step 4: Sand and Soften the Edges
Start with 120-grit sandpaper to smooth out any rough edges and refine the curves. Then switch to 220-grit for the final pass, especially around the antlers and ears. This is the part where your deer really starts to look polished and finished. Run your fingers along the edge to check for any sharp spots — if it feels smooth to the touch, you’re ready for stain or paint.
Step 5: Stain or Paint the Silhouette
If you’re staining, apply with a lint-free cloth, following the direction of the wood grain. Wipe away any excess to prevent blotches. For a painted deer, use light coats of acrylic paint and let each coat dry before adding another. Soft whites, warm mushroom tones, and gentle greens all work beautifully in a nursery setting.
Allow the piece to dry completely according to the instructions on your stain or paint. This step is worth the wait; fully cured finishes are less likely to smudge or mark your wall.
Step 6: Hang Your Deer on the Nursery Wall
For a clean, hardware-free look on the front, I love using picture hanging strips. They’re especially handy for renters and for parents who like to tweak their wall layouts as baby grows. If your walls are textured, a small sawtooth hanger screwed into the back may be a better choice. Place your deer above the crib, over a reading chair, or in a little gallery wall arrangement.
If you’d like more ideas for arranging artwork, you can browse reader rooms on my baby nursery pictures page. It’s full of real-life layouts that might spark a new idea for you.
Free Deer Nursery Wall Sign Template
To make this project as easy as possible, I’ve created a printable deer silhouette you can download and trace. After you upload your file to SBI, you can link to it with a filename such as deer-nursery-wall-sign-template.pdf. Place your link right here so readers can click, print, and start tracing in just a few minutes.
Download the Free Deer Nursery Wall Sign Template (PDF)
If you’re brand new to cutting wood shapes, this excellent guide to scroll saw basics on Home Depot walks through safety tips and simple techniques. It’s a helpful confidence booster before you begin.
See my favorite saws for crafts projects on Amazon
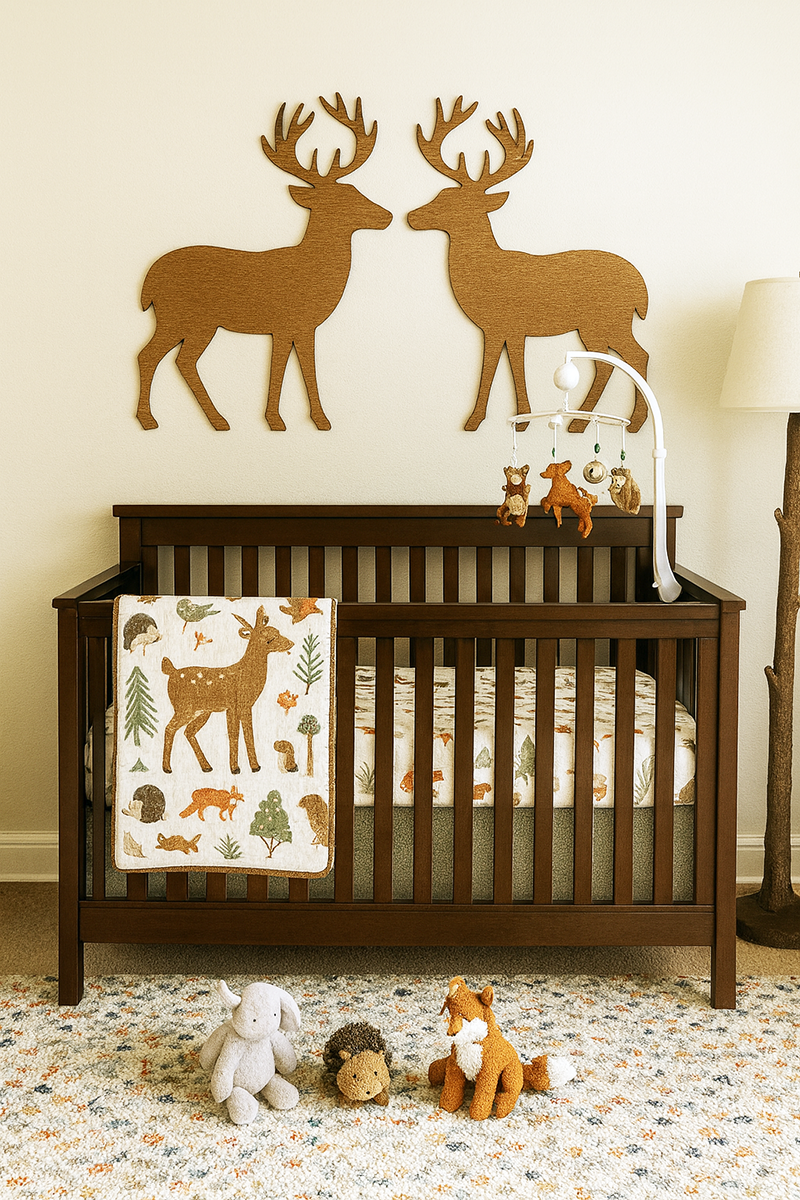
Two nose-to-nose deer wall signs create a sweet woodland focal point above a dark wood crib and cozy forest-themed bedding.
Decorating Ideas to Pair with Your Deer Wall Art
Once your deer is hanging proudly on the wall, you can build a whole woodland story around it. Add a neutral jute rug, a basket filled with soft forest animal toys, and a lamp with a simple linen shade. A cozy throw over the back of a rocker and a few leafy or tree-patterned pillows will pull everything together.
A handmade mobile can carry that woodland story upward, and this DIY woodland crib mobile uses simple forest-inspired shapes that coordinate naturally with deer wall art, rustic wood accents, and woodland nursery decor.
If you’d like more ideas for finishing touches, my nursery wall décor ideas and real nursery ideas pages are full of creative, real-world examples that pair beautifully with woodland themes.
You can always come back to this DIY deer nursery wall sign tutorial whenever you’re ready to refresh the room or create a second deer for a sibling’s space or a reading corner.
For more handmade nursery décor inspiration, visit my DIY nursery décor ideas page filled with beginner-friendly craft projects.Share Your Finished Deer Nursery Wall Sign
I would absolutely love to see how your DIY deer nursery wall sign turns out. When you’ve finished your sign and hung it on the wall, you’re warmly invited to share photos on my baby nursery pictures page. Woodland and nature-inspired nurseries are always a favorite, and your version might be exactly the inspiration another new mom or dad needs.
Thank you for spending a little time here with me today. I hope this project brings you a calm, cozy moment in the middle of all the nursery decisions — and gives your baby’s room a sweet, timeless focal point that feels like “home” from the very beginning.
When you click on links to various merchants on this site and make a purchase, this may result in this site earning a commission. This does not affect the price you pay.
UBGI Gold Standard 2026
Verified for performance, SEO,
and accessibility compliance.
Photos, decorating ideas, party setups, and reader submissions are shared for inspiration only and are not intended as step-by-step decorating, construction, or DIY instructions.
About Jan | Contact | Baby Room Ideas (Blog) | Site Map | Privacy Policy | Disclosure Policy | Disclaimer | Affiliate Disclosure | Earnings Disclosure | Facebook | Pinterest
I am a participant in the Amazon Services LLC Associates Program, an affiliate advertising program designed to provide a means for us to earn fees by linking to Amazon.
Copyright © 2006-2026. All Rights Reserved.