Free Crochet Halloween Applique Patterns
By Jan Bay
These free crochet Halloween applique patterns give you small flat motifs that bring a lot of cuteness for the effort. You can add them to baby blankets, bags, costumes, banners and other fall projects. The collection includes bats, bat wings, a pumpkin, a ghost, a skull and a very impressive haunted house (if I do say so myself), so you can pick one design or mix several together for a bigger Halloween project.
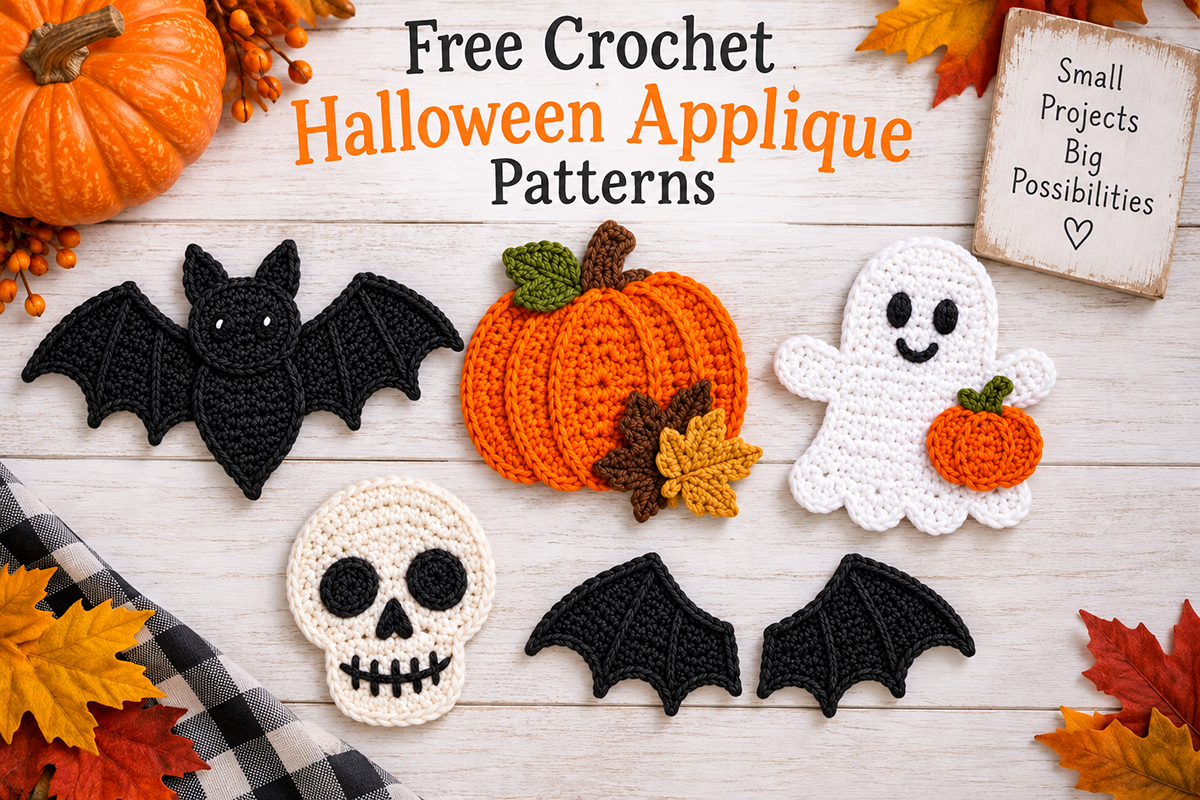
Choose From These Free Crochet Halloween Applique Patterns
Crochet Supplies for The Patterns on This Page
Jump to:
Crochet Bat Applique – make the finished Halloween bat Crochet Bat Wing – use a single wing for costumes and crafts Crochet Pumpkin Applique – ribbed pumpkin with fall leaves Crochet Ghost Applique – make the flat Halloween ghost Crochet Skull Applique – add a spooky skull motif Crochet Haunted House Applique – make the complete haunted house pattern on this page Ways to Use the Appliques – blankets, bags, costumes and decorationsYou can use this page to compare the Halloween appliques before opening the full pattern you want to make. The bat is a complete little Halloween character, the ghost has a friendlier look with its small pumpkin, the skull is the bolder graphic choice, and the ribbed pumpkin works just as well for fall projects that aren't meant to look especially spooky. The bat wings are different from the others because they're a component pattern rather than a complete character. The haunted house is the bonus design in this collection, and its complete pattern is included directly on this page.
If you're combining several motifs on one project, I wouldn't give every design equal space. Pick one or two larger focal appliques, then use the smaller bat or wing shapes as supporting details. That keeps the individual shapes easy to recognize instead of turning the whole project into one busy Halloween collage.
Crochet Bat Applique Pattern
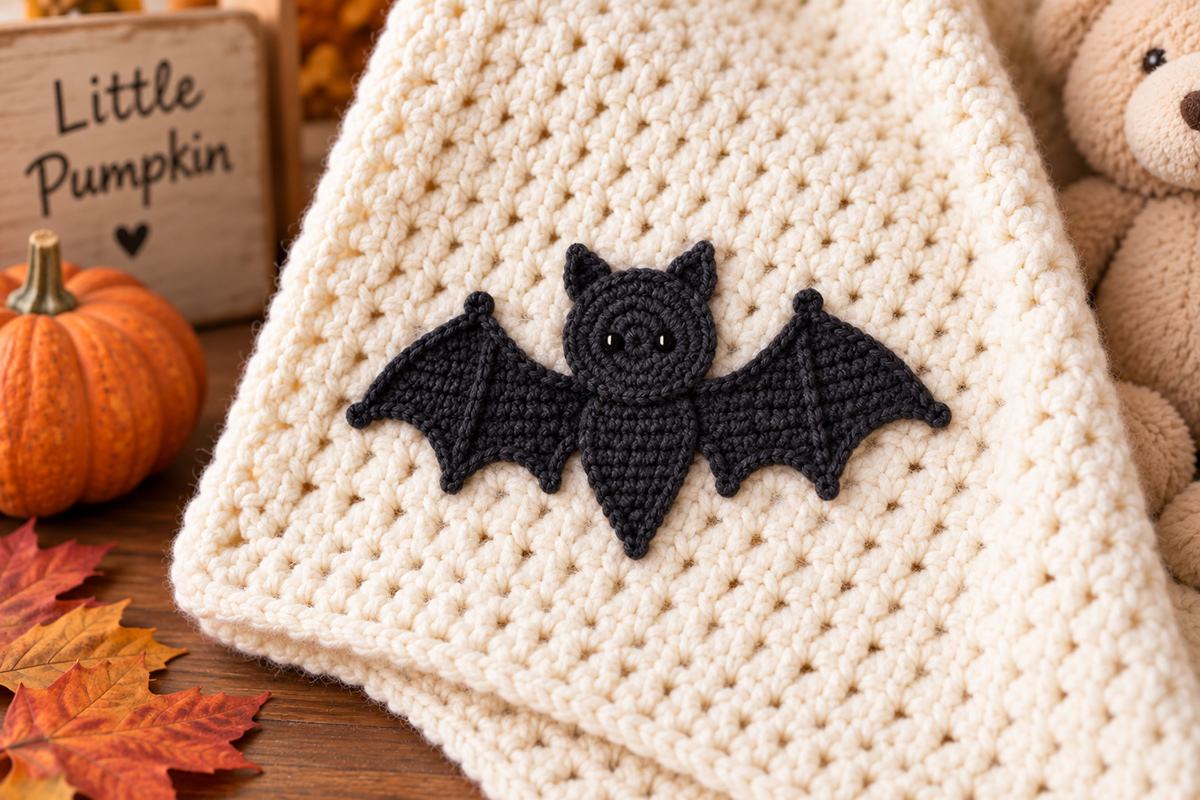
The free crochet bat applique pattern makes a complete flat bat with a rounded head, pointed ears, tapered body and two shaped wings. The finished bat is expected to measure about 4 1/2 to 5 inches across the spread wings and about 4 inches from the ears to the lower point of the body.
I'd choose this one when you want a small Halloween shape that still reads clearly from a distance. The wings give it most of its outline, so black, charcoal or deep plum against a lighter background will show the shape better than putting a dark bat on another very dark fabric.
The bat is made from a head, tapered body and two matching wings. You make the wings from the same instructions, flip one to create the mirrored pair and then sew everything together. The pointed ears are worked directly onto the head, so there aren't two extra tiny ear pieces to keep track of.
Use one bat on a bag or sweatshirt, or make several for a banner or wall hanging. If the project will be handled by a baby or child, sew the projecting wing edges and points securely to the background rather than leaving them loose.
Crochet Bat Wing Pattern in Three Sizes
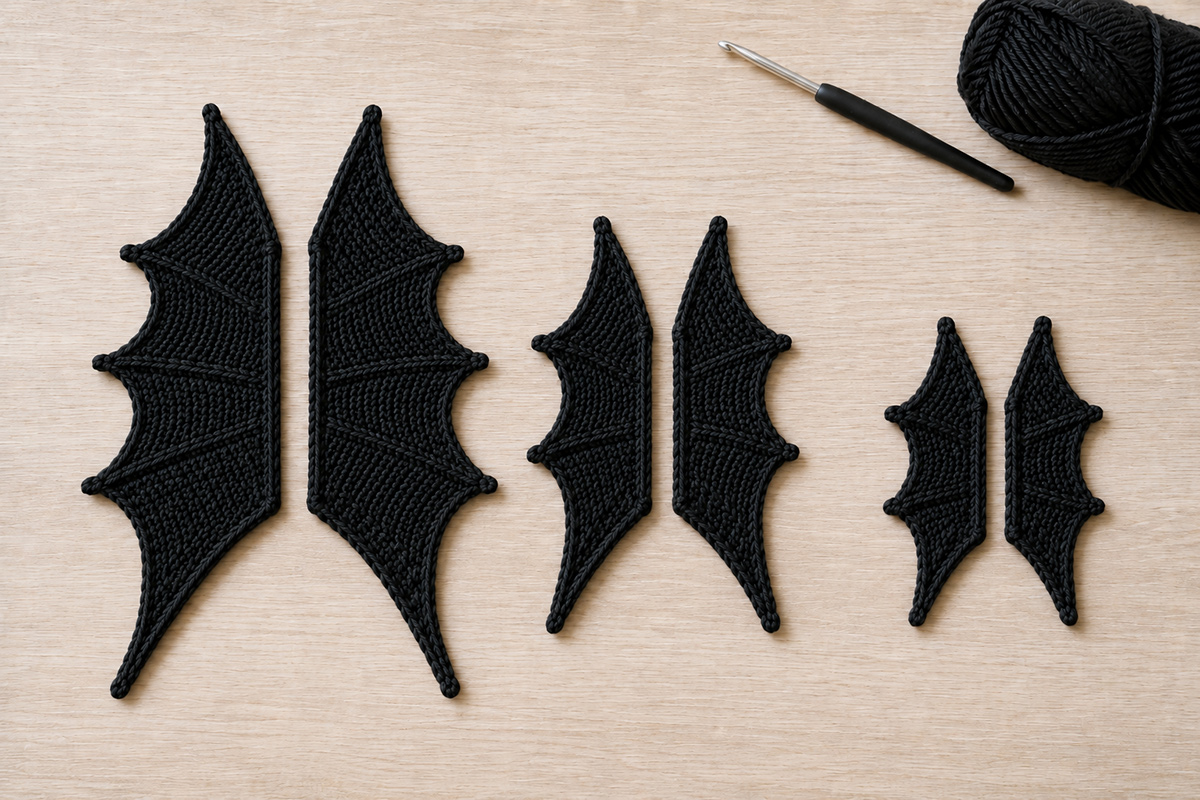
The free crochet bat wings pattern is the one to use when you need the wing shape without starting another complete bat pattern. It includes small, medium and large wings made with the same basic turned-row construction.
The small size works for a flat bat applique. The medium version gives you more wing for a lovey or other character project, and the large version can stand out on a blanket, framed crochet piece or seasonal wall hanging.
These aren't meant to be a complete Halloween motif by themselves unless that's the look you're after. If you simply want a finished little bat to sew onto something, use the complete bat applique above. Come to the wing page when you want to build your own bat, replace wings on another project or choose a larger wing size without enlarging a small pattern by guesswork.
Make two identical wings and flip one before attachment. That gives you the mirrored pair without maintaining separate left-wing and right-wing instructions.
Crochet Pumpkin Applique Pattern with Fall Leaves
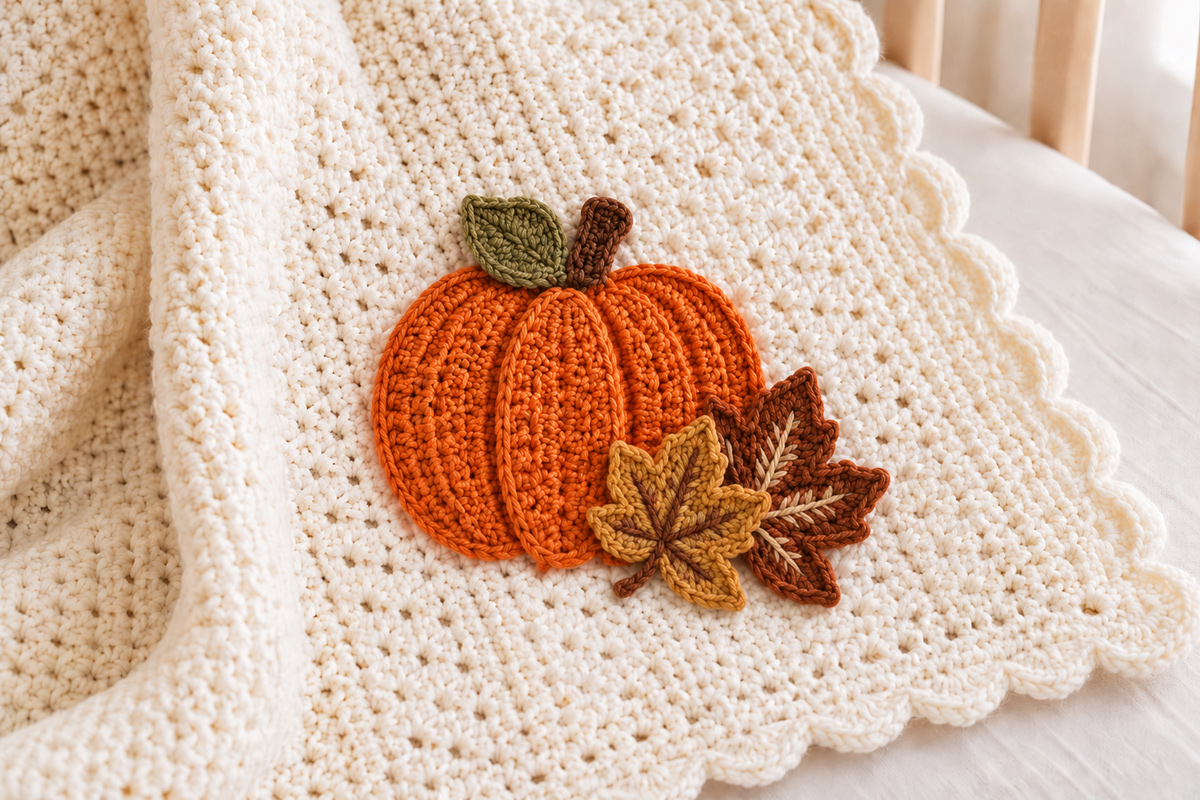
The free crochet pumpkin applique pattern is the most detailed fall design in this collection. Instead of making one plain orange oval, the pumpkin uses two wider side lobes and a narrower center lobe. Their overlapping sc edges create the raised ribbed look.
A short brown stem sits at the top with a small olive leaf on the upper left. Two separate autumn leaves overlap at the lower right, with the darker brown leaf behind and the smaller tan or mustard leaf in front. That asymmetrical leaf arrangement is part of the design, not extra decoration you have to add to every version.
The orange pumpkin body is expected to finish close to 7 inches wide and about 6 to 6 1/2 inches tall. With all three leaves arranged as shown, the complete motif spreads roughly 8 1/2 to 9 1/2 inches across.
I'd use this one when you want the project to work beyond Halloween. Leave both lower leaves in place for the full harvest version, use only one for something simpler, or skip the two bottom leaves and keep the ribbed pumpkin by itself. The basic pumpkin still works without changing its construction.
Crochet Ghost Applique Pattern with a Little Pumpkin
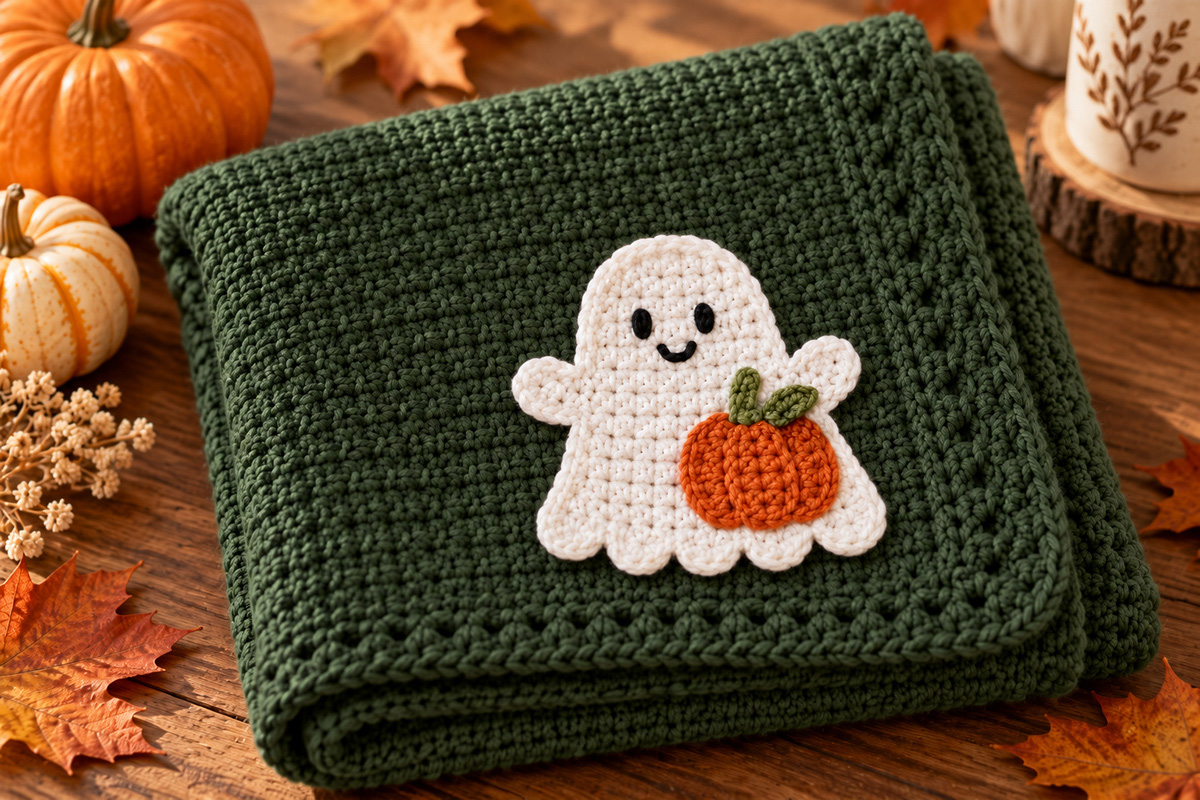
The free crochet ghost applique pattern makes a flat ghost with a rounded head, gently widening body, two short arms and five separate curves along the lower edge. A small orange pumpkin sits over the lower right side instead of leaving the ghost as a plain white shape.
The finished ghost is expected to measure about 5 inches tall and about 5 to 5 1/2 inches across from arm tip to arm tip. The face is embroidered, and the little pumpkin is also crocheted flat so the whole applique can lie against a blanket, shirt, bag or wall hanging.
Pick the ghost when you want Halloween without making the project too dark or severe. The embroidered face and pumpkin give it a friendlier look than the skull, while the five lower waves keep the white body from reading as a simple oval with eyes.
Background color matters with this one. I'd use forest green, charcoal, rust or another medium-to-dark color behind the white ghost. Cream or white can make too much of the outline disappear.
Crochet Skull Applique Pattern
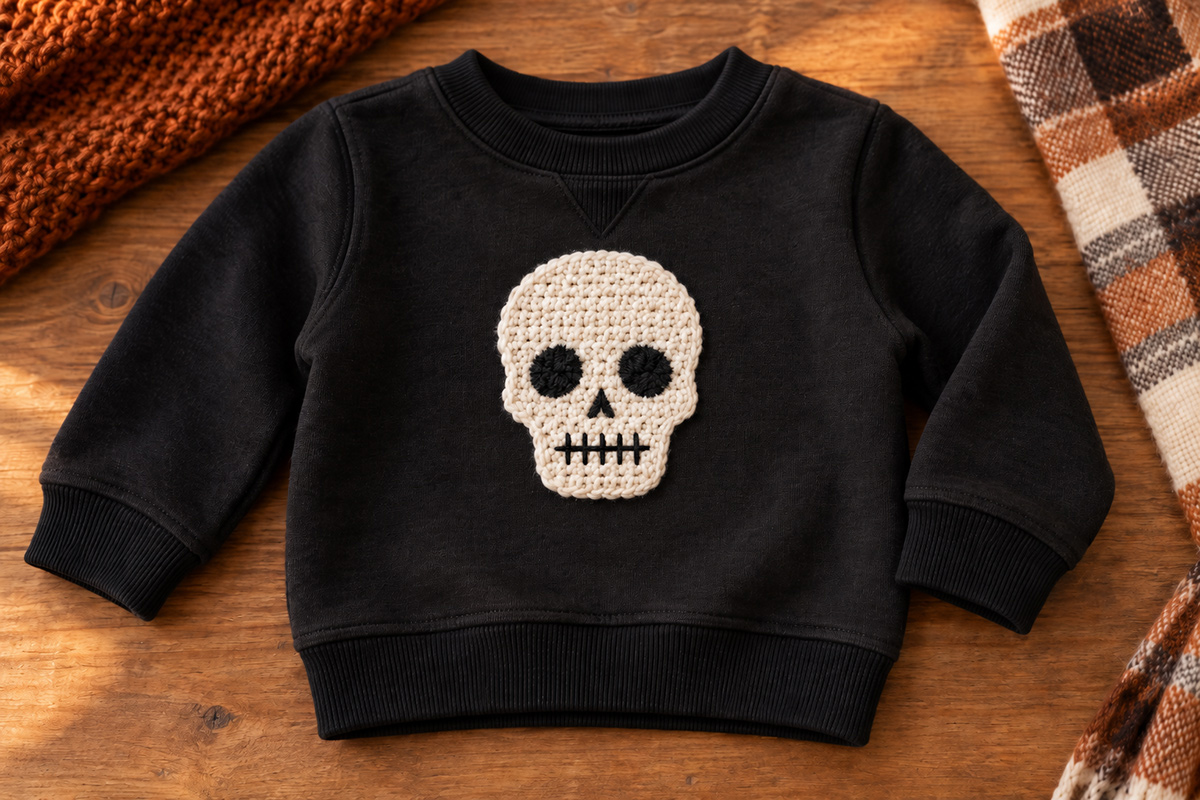
The free crochet skull applique pattern is the bolder choice in this group. It works especially well when you want a Halloween motif for clothing, a tote bag, blanket, wall hanging or a goth-inspired handmade project rather than the softer harvest look of the pumpkin or the friendly expression of the ghost.
I wouldn't surround the skull with a lot of extra detail. Give the outline enough open background around it to stay recognizable. High contrast helps too. A light skull on black, charcoal, deep plum or another dark background will give you a much clearer graphic shape than two similar colors together.
It also makes a useful counterpoint when you're mixing motifs. A pumpkin and ghost can carry most of the color, then one skull adds a sharper Halloween note without making every piece in the project look the same.
Free Crochet Haunted House Applique Pattern
This free crochet haunted house applique pattern makes the most detailed focal design in this Halloween collection. The finished piece combines a charcoal haunted house with three purple roof peaks, glowing orange windows, an arched brown front door, black fence sections, olive shrubbery, two pumpkins, a little bat, a crescent moon and a peeking ghost.
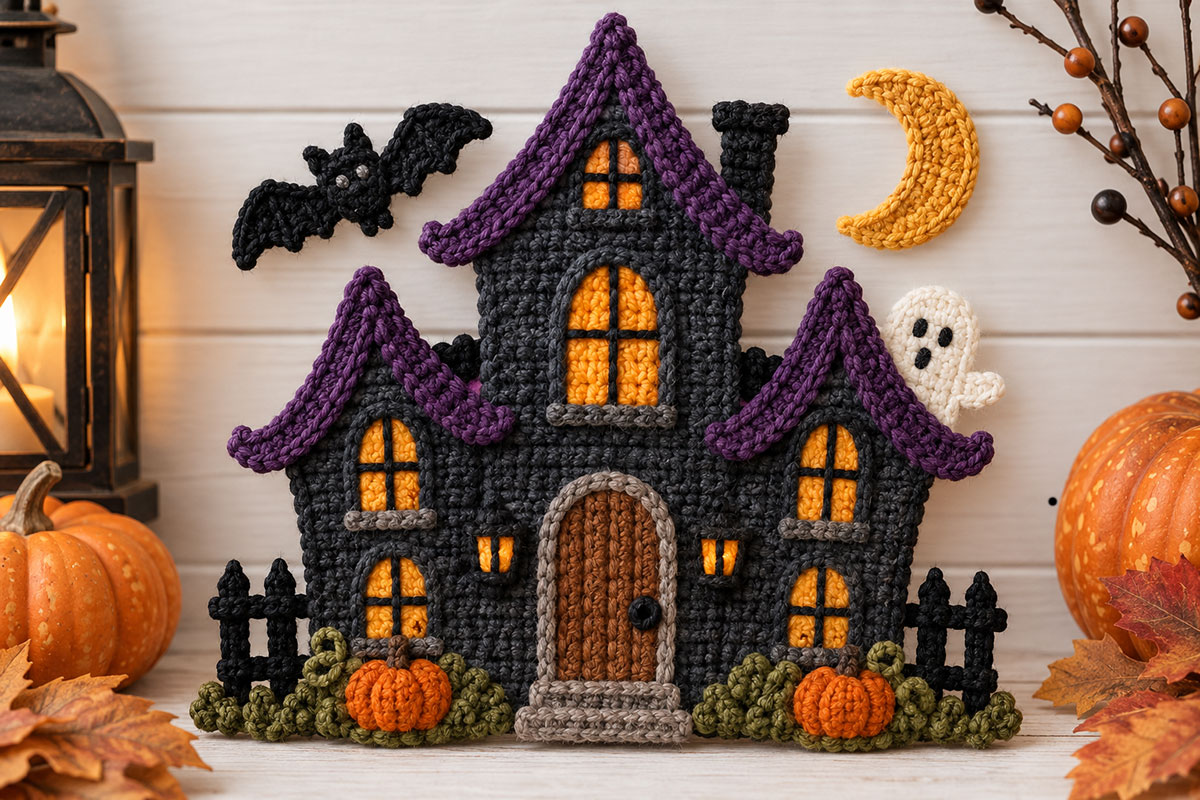
The finished haunted house applique combines three purple roof peaks, glowing windows, a peeking ghost, pumpkins, fence, bat and crescent moon in one layered Halloween design.
Unlike the smaller appliques on this page, this one is meant to act as the main feature of a project. Use it on a blanket, tote bag, wall hanging, banner or seasonal sweatshirt when you want one design to carry most of the Halloween look without needing a whole group of large motifs.
The house is worked as separate flat pieces and then assembled. That keeps the three roof peaks, center tower, side sections, windows and doorway easier to shape and gives you more control over the finished silhouette before everything is sewn together.
Haunted House Applique Materials
- Worsted-weight yarn in charcoal or black for the house body, chimney, fence, bat and window crossbars
- Worsted-weight yarn in deep purple for the six roof strips that form the three roofs
- Worsted-weight yarn in orange or golden orange for the windows and pumpkins
- Worsted-weight yarn in medium brown for the front door
- Worsted-weight yarn in taupe or gray for the door trim, window ledges and front step
- Worsted-weight yarn in olive green for the shrubbery
- Worsted-weight yarn in white for the ghost
- Worsted-weight yarn in mustard or gold for the crescent moon
- Small yarn scraps in light gray for the bat eyes and darker brown for the door-plank details
- 4 mm crochet hook
- Yarn needle
- Scissors
- Blocking mat and pins, optional
Finished Size
At the stated gauge, expect the assembled house to measure approximately 9 1/2 to 10 inches wide. The charcoal center tower is calculated to measure about 9 1/2 inches tall, with the purple roof strips framing the gable and extending only slightly beyond its peak. Expect the tallest center roof point to finish at about 10 inches. The chimney rises above the right-hand roof slope but remains below the center peak. With the fence, shrubbery and pumpkin details in place, the complete ground-level applique will measure approximately 10 to 11 inches across, depending on how much of each fence section overlaps the house. The detached bat and crescent moon can extend beyond those measurements depending on where you place them. These are expected measurements calculated from the stated gauge rather than physically measured sample dimensions.
Abbreviations
- ch – chain
- sl st – slip stitch
- sc – single crochet
- hdc – half double crochet
- dc – double crochet
- st(s) – stitch(es)
- RS – right side
- WS – wrong side
- FO – fasten off
- sc2tog – single crochet 2 stitches together
Gauge
Pattern note: The beginning ch 1 does not count as a stitch throughout this pattern. Work all stitch counts into the actual crochet stitches only.
Gauge is not critical for this applique, but for the finished measurements given here aim for approximately 16 sc and 14 rows = 4 inches. If your stitches are noticeably tighter or looser, the finished house will be smaller or larger.
Size checkpoint: At this gauge, the 18-stitch center body should measure about 4 1/2 inches wide and each 12-stitch side section about 3 inches wide before gable shaping. Each center roof strip should measure approximately 3/4 inch wide by about 4 inches long, and each side roof strip approximately 3/4 inch wide by about 3 3/8 to 3 1/2 inches long. These are calculated checkpoints rather than physically measured sample dimensions.
Assembly orientation: After blocking, choose the neater side of each flat piece as the right side. Keep all right sides facing up while you arrange the house. Sew and weave remaining tails on the wrong side whenever possible.
Piece check before assembly: You should have 30 crocheted pieces: 1 center tower, 2 side house sections, 2 center roof strips, 4 side roof strips, 1 chimney, 1 tall center window, 4 side windows, 1 small upper window, 1 door, 1 front step, 2 door-side windows, 2 fence sections, 3 shrub clusters, 2 pumpkins, 1 crescent moon, 1 bat and 1 ghost. The door trim is worked directly onto the door, and the five window ledges are embroidered with straight stitches after the windows are attached to the house, so neither is counted as a separate crocheted piece.
Center Tower and Main House Body
With charcoal or black yarn, ch 19.
Row 1: Sc in second ch from hook and in each ch across. Turn. (18 sc)
Rows 2–24: Ch 1, sc in each st across. Turn. (18 sc)
Do not fasten off. Begin shaping the center gable.
Row 25: Ch 1, sc2tog, sc across to last 2 sts, sc2tog. Turn. (16 sts)
Row 26: Ch 1, sc2tog, sc across to last 2 sts, sc2tog. Turn. (14 sts)
Row 27: Ch 1, sc2tog, sc across to last 2 sts, sc2tog. Turn. (12 sts)
Row 28: Ch 1, sc2tog, sc across to last 2 sts, sc2tog. Turn. (10 sts)
Row 29: Ch 1, sc2tog, sc across to last 2 sts, sc2tog. Turn. (8 sts)
Row 30: Ch 1, sc2tog, sc across to last 2 sts, sc2tog. Turn. (6 sts)
Row 31: Ch 1, sc2tog, sc across to last 2 sts, sc2tog. Turn. (4 sts)
Row 32: Ch 1, sc2tog twice. Turn. (2 sts)
Row 33: Ch 1, sc2tog. (1 st)
FO, leaving a long tail for assembly. Block the piece so the lower section is rectangular and the gable rises evenly to the center point.
Left House Section
With charcoal or black yarn, ch 13.
Row 1: Sc in second ch from hook and in each ch across. Turn. (12 sc)
Rows 2–16: Ch 1, sc in each st across. Turn. (12 sc)
Begin shaping the side gable.
Row 17: Ch 1, sc2tog, sc across to last 2 sts, sc2tog. Turn. (10 sts)
Row 18: Ch 1, sc in each st across. Turn. (10 sc)
Row 19: Ch 1, sc2tog, sc across to last 2 sts, sc2tog. Turn. (8 sts)
Row 20: Ch 1, sc in each st across. Turn. (8 sc)
Row 21: Ch 1, sc2tog, sc across to last 2 sts, sc2tog. Turn. (6 sts)
Row 22: Ch 1, sc2tog, sc in next 2 sts, sc2tog. Turn. (4 sts)
Row 23: Ch 1, sc2tog twice. Turn. (2 sts)
Row 24: Ch 1, sc2tog. (1 st)
FO, leaving a long tail. Block the piece so the lower 16 rows remain rectangular and the upper section forms a centered charcoal gable.
Right House Section
Repeat the instructions for the Left House Section.
Before sewing, lay the three charcoal sections flat with the tall center tower between the two shorter side sections. Allow approximately 1 to 2 stitches of each side section to tuck behind the center tower. This slight overlap helps the three pieces read as one continuous haunted-house silhouette.
Center Purple Roof Strips – Make 2
With deep purple yarn, ch 4.
Row 1: Sc in second ch from hook and across. Turn. (3 sc)
Rows 2–14: Ch 1, sc in each st across. Turn. (3 sc)
FO, leaving a long tail for sewing.
At the stated gauge, each center roof strip should measure approximately 3/4 inch wide and about 4 inches long. This gives the strip enough length to follow the center gable slope, meet its matching strip at the peak and still extend approximately 1/2 inch beyond the lower gable edge for the turned-up eave.
Side Purple Roof Strips – Make 4
With deep purple yarn, ch 4.
Row 1: Sc in second ch from hook and across. Turn. (3 sc)
Rows 2–12: Ch 1, sc in each st across. Turn. (3 sc)
FO, leaving a long tail for sewing.
At the stated gauge, each side roof strip should measure approximately 3/4 inch wide and about 3 3/8 to 3 1/2 inches long. This gives each strip enough length to follow the side-gable slope and still extend approximately 1/2 inch beyond the lower edge for the turned-up eave. Two strips are used for each side roof.
Roof shaping checkpoint: Keep the strips flat through most of their length. When assembling each roof, allow approximately the outer 1/2 inch of the lower strip ends to sweep slightly upward to reproduce the turned-up eaves in the finished design.
Chimney
With charcoal or black yarn, ch 6.
Row 1: Sc in second ch from hook and in each ch across. Turn. (5 sc)
Rows 2–6: Ch 1, sc in each st across. Turn. (5 sc)
Row 7: Ch 1, 2 sc in first st, sc in next 3 sts, 2 sc in last st. Turn. (7 sc)
Row 8: Ch 1, sc in each st across. (7 sc)
FO, leaving a long tail.
Set the chimney behind the upper-right portion of the center roof so the top rises clearly above the right-hand roof slope while remaining below the center roof peak.
Tall Center Window – Make 1
With orange or golden-orange yarn, ch 7.
Row 1: Sc in second ch from hook and across. Turn. (6 sc)
Rows 2–6: Ch 1, sc in each st across. Turn. (6 sc)
Row 7 – Arched Top: Sl st in first st, sc in next st, hdc in each of next 2 sts, sc in next st, sl st in last st.
FO.
After the window is sewn to the house, use charcoal yarn and a yarn needle to embroider a close outline around the outside edge, following the rounded top. Then embroider one vertical line down the center and two evenly spaced horizontal lines across the window to create six glowing panes arranged in two columns and three rows.
Side Windows – Make 4
With orange or golden-orange yarn, ch 7.
Row 1: Sc in second ch from hook and across. Turn. (6 sc)
Rows 2–4: Ch 1, sc in each st across. Turn. (6 sc)
Row 5 – Arched Top: Sl st in first st, sc in next st, hdc in each of next 2 sts, sc in next st, sl st in last st.
FO.
After each window is sewn to the house, use charcoal yarn and a yarn needle to embroider a close outline around the outside edge, following the rounded top. Then embroider one vertical line and one horizontal line across the window to create four glowing panes.
Small Upper Window – Make 1
With orange yarn, ch 6.
Row 1: Sc in second ch from hook and across. Turn. (5 sc)
Rows 2–3: Ch 1, sc in each st across. Turn. (5 sc)
Row 4 – Arched Top: Sl st in first st, sc in next st, hdc in next st, sc in next st, sl st in last st.
FO.
After the window is sewn to the house, outline the outside edge with charcoal yarn, following the rounded top. Add one charcoal vertical line and one horizontal line to create four panes.
Front Door
With medium brown yarn, ch 9.
Row 1: Sc in second ch from hook and in each ch across. Turn. (8 sc)
Rows 2–8: Ch 1, sc in each st across. Turn. (8 sc)
Row 9: Ch 1, sc in each st across. Turn. (8 sc)
Row 10 – Arch: Sl st in the first st, sc in the next st, hdc in the next st, dc in each of the next 2 sts, hdc in the next st, sc in the next st, sl st in the last st.
FO and weave in the brown yarn end.
Window Ledges
After the tall center window and four side windows have been sewn to the house, use taupe or gray yarn to add a narrow ledge directly beneath each one. With a yarn needle, embroider a short horizontal line of straight stitches along the bottom edge of each window, extending approximately one stitch beyond the orange window on each side. Make 5 ledges total. The small upper window and the two small door-side windows do not need ledges.
Door Trim
With taupe or gray yarn, join at one lower corner of the door. Work 1 sc into the end of each of the 9 door rows up the first side, 1 sc in each of the 8 stitches across the arched top, then 1 sc into the end of each of the 9 rows down the opposite side. (26 trim sc)
Do not work across the bottom edge. FO and weave in the ends.
Front Step
With taupe or gray yarn, ch 11.
Row 1: Sc in second ch from hook and across. Turn. (10 sc)
Rows 2–3: Ch 1, sc across. Turn.
FO, leaving a tail for sewing.
With a slightly darker brown strand, add two or three long vertical surface stitches over the front of the door to suggest narrow wooden planks. With black yarn, embroider a small round door knob on the right side of the door. Do not use a button or bead.
Small Door-Side Windows – Make 2
With orange yarn, ch 4.
Row 1: Sc in second ch from hook and across. Turn. (3 sc)
Rows 2–4: Ch 1, sc across. Turn.
FO.
Add a single charcoal vertical line down the center of each small window.
Black Fence Sections – Make 2
With black yarn, ch 15.
Row 1: Sc in second ch from hook and across. (14 sc)
FO and weave in the foundation-strip ends.
Count the 14 sc from one end and identify stitches 1, 4, 7, 10 and 13 for the five fence posts.
Join black yarn in stitch 1. Ch 7, sl st in the second ch from hook and in each of the remaining 5 ch, then sl st into stitch 1 again.
Sl st across the foundation strip to stitch 4. Ch 7, sl st in the second ch from hook and in each of the remaining 5 ch, then sl st into stitch 4.
Repeat this process at stitches 7, 10 and 13, slip stitching along the foundation strip between posts. After completing the post at stitch 13, FO and weave in the ends.
Using another length of black yarn and a yarn needle, run one horizontal line across the five posts approximately halfway between the foundation strip and the tops of the posts, catching each post securely. This forms the second fence rail visible in the finished design.
When assembled, position one fence section at each lower side of the house, allowing the inner edge to disappear slightly behind the shrubbery.
Olive Shrubbery – Make 3 Clusters
With olive-green yarn, ch 8.
Work the following across the chain: sl st in second ch from hook, sc in next ch, 3 hdc in next ch, sc in next ch, 3 hdc in next ch, sc in next ch, sl st in last ch.
FO, leaving a tail for sewing.
Make three clusters and overlap them slightly along the base of the house.
Small Pumpkins – Make 2
With orange yarn, ch 6.
Row 1: Sc in second ch from hook and across. Turn. (5 sc)
Row 2: Ch 1, 2 sc in first st, sc in next 3 sts, 2 sc in last st. Turn. (7 sts)
Rows 3–4: Ch 1, sc across. Turn.
Row 5: Ch 1, sc2tog, sc in next 3 sts, sc2tog. (5 sts)
FO.
With brown yarn, attach at the top center and ch 3. Sl st back down the chain to form the stem. FO.
Using darker orange or brown yarn, make three shallow vertical surface stitches over each pumpkin to create the ribbed sections visible in the finished design. Keep the stitches loose enough that they define the pumpkin without drawing or puckering the orange fabric.
Crescent Moon
With mustard or gold yarn, ch 7.
Work 2 sc in second ch from hook, hdc in next ch, 2 dc in each of next 2 ch, hdc in next ch, 2 sc in last ch.
Working along the opposite side of the foundation chain, sl st in first ch, sc in next ch, hdc in next 2 ch, sc in next ch, sl st in last ch.
FO.
Gently curve the piece into a crescent while blocking. Secure the inner curve with one or two small stitches if needed to hold the shape.
Small Bat
With black yarn, ch 4.
Row 1: Sc in second ch from hook and across. Turn. (3 sc)
Row 2: Ch 1, 2 sc in first st, sc in next st, 2 sc in last st. Turn. (5 sc)
Row 3: Ch 1, sc in each st across. Turn. (5 sc)
Row 4: Ch 1, sc2tog, sc in next st, sc2tog. (3 sc)
FO. For orientation, Row 1 is the top/head edge and Row 4 is the lower body.
First ear: With the bat RS up, join black yarn in the first stitch along the Row 1 edge. Ch 2, sl st in the second ch from hook, then sl st back into the same body stitch. FO.
Second ear: Repeat at the opposite end of the Row 1 edge.
First wing: Join black yarn along one side of the body near Rows 2–3. Ch 7. Working back toward the body, sl st in the second ch from hook, sc in the next ch, hdc in the next ch, ch 2 and sl st in the second ch from hook to form a small lower wing point, dc in the next foundation ch, ch 2 and sl st in the second ch from hook to form a second lower wing point, hdc in the next foundation ch, sc in the last foundation ch, then sl st back into the side of the bat body. FO.
Second wing: Turn the bat so the opposite side faces you. Join black yarn at the corresponding point and repeat the First Wing instructions.
Block the wings so the outer tips lift slightly while the two small lower points on each wing angle downward, creating the scalloped bat-wing silhouette shown in the finished design.
With a small amount of light gray yarn, embroider two tiny eye stitches near the upper center of the bat between the ears. Keep them very small and flat.
Peeking Ghost
With white yarn, ch 4.
Row 1: Sc in second ch from hook and across. Turn. (3 sc)
Row 2: Ch 1, 2 sc in first st, sc in next st, 2 sc in last st. Turn. (5 sts)
Row 3: Ch 1, 2 sc in first st, sc in next 3 sts, 2 sc in last st. Turn. (7 sts)
Rows 4–6: Ch 1, sc in each st across. Turn. (7 sc)
Row 7: Ch 1, sc2tog, sc in next 3 sts, sc2tog. Turn. (5 sts)
Row 8: Ch 1, sc2tog, sc in next st, sc2tog. (3 sts)
FO, leaving a tail for attachment.
Rows 1–4 form the rounded head end of the ghost; Rows 7–8 form the narrowing lower body that will be hidden behind the house. With the ghost lying RS up and the rounded head at the top, join white yarn along the right-hand edge near Row 5, ch 4, sl st in the second ch from hook and in the next 2 ch, then sl st back into the same edge of the ghost. FO. This forms the small arm that remains visible when the ghost peeks from behind the right side of the house.
With black yarn, embroider two small eyes across Rows 3–4 and one tiny oval mouth below them. Keep all facial details flat and embroidered; do not use beads or plastic eyes.
Haunted House Assembly
Block all pieces before assembly. Lay everything out on a flat surface and compare the arrangement with the finished haunted-house design before sewing anything permanently.
1. Position the left and right charcoal house sections behind the lower sides of the center tower, overlapping each by approximately 1 to 2 stitches. Sew the overlapping edges securely.
2. Frame the center charcoal gable with the two long purple roof strips. Position one strip along the left gable slope and one along the right, allowing their upper ends to overlap slightly at the peak. Let the lower end of each strip extend just beyond the charcoal gable to form the eaves. Sew the strips securely along the gable slopes while leaving the center charcoal triangle exposed. Curve the outer 1/2 inch of each lower end slightly upward before tacking it into its final position.
3. Use two shorter purple roof strips on each side gable. Place one strip along each gable slope with the upper ends meeting or overlapping slightly at the peak. Keep the charcoal triangular wall area visible between the strips. Allow the lower outer ends to extend slightly past the house edges and curve them gently upward before securing them.
4. Slip the chimney behind the upper-right portion of the center roof and sew it in place.
5. Arrange the six main orange windows before sewing. Center the single small upper window in the exposed charcoal center gable between the purple roof strips. Place the taller center window directly below it on the straight center tower. On each side house section, position the upper side window so its arched top sits within the charcoal gable while its lower portion may extend slightly below the point where the gable begins. Place the second side window below it on the rectangular portion of the wall. Check that the left and right window pairs sit at matching heights before sewing them permanently in place. Add the five taupe or gray window ledges after the windows are secured.
6. Center the brown arched door near the bottom of the center tower. Sew it in place, then place the gray step directly below it.
7. Position one small orange window on each side of the doorway.
8. Add the black fence sections along the lower left and right sides of the house.
9. Arrange the olive shrubbery across the lower edge, allowing some leaves to overlap the fence and lower house edges.
10. Place one pumpkin near each side of the doorway, partially overlapping the shrubbery.
11. Position the ghost so most of its body is hidden behind the right side of the house and only the upper portion appears to peek around the edge. Sew only the hidden portion firmly to the back of the house so the visible edge remains clean.
12. Position the black bat above and slightly left of the center roof. Position the gold crescent moon above and slightly right. If the applique is being sewn onto a larger background, attach these two pieces directly to that background rather than connecting them to the house.
Finishing the Haunted House Applique
Weave in all remaining yarn ends on the back. Check the roof points, chimney, fence posts, pumpkin stems, bat wings and ghost edge for any areas that could curl or catch.
If the applique will be used on a blanket, bag or garment, sew around the complete outer edge of the house and tack down every projecting detail. For a framed wall piece or other decoration that will not be handled often, you can leave a few roof and fence points slightly raised for dimension.
Give the finished applique a light final block if needed. Shape the three roof peaks carefully, straighten the center tower and make sure the bottom edge sits level before allowing it to dry completely.
Before attaching or using the finished applique, remove all blocking pins and check the back for loose yarn ends. If the applique will be used on a baby or child's item, keep every embellishment soft, flat and securely sewn in place; do not add buttons, beads or other detachable pieces.
If this applique is added to a baby blanket, keep the blanket out of an infant sleep space and use it only when appropriate for supervised awake-time, display or an older child.
The completed house should read as one layered Halloween scene: the tall charcoal center tower framed by two shorter wings, three deep-purple roof peaks, warm orange windows, the arched doorway below, and the smaller bat, moon, ghost, pumpkins, fence and greenery completing the design.
Ways to Use Crochet Halloween Appliques
You don't need to use all six designs every time. For a blanket or wall hanging, I'd start by choosing one main motif, then add one or two smaller supporting shapes if the project still needs them. A haunted house with a couple of bats is enough. So is a pumpkin with a ghost nearby. You can stop there.
For a banner, repeating the same two or three colors will do more to make the pieces look like a set than forcing every motif into every section. Black or charcoal bats, white ghosts, orange pumpkins and a limited amount of olive, tan or rust give you plenty to work with.
On clothing and bags, place the applique while the item is lying completely flat. Keep motifs away from zippers, snaps, neck openings and folds that have to bend repeatedly. Once you're happy with the position, sew the outside edges down with matching yarn or sturdy coordinating thread. Tack down points, stems, wings and other projecting pieces if the item will be handled often.
For baby-oriented projects, I would keep the embellishments flat and sewn on. Skip loose buttons, beads, bells and other small hard pieces, and make sure every yarn end and projecting edge is secure. If you add an applique to a baby blanket, keep that blanket out of an infant's sleep space. The U.S. Consumer Product Safety Commission safe sleep guidance recommends keeping the sleep space bare except for a fitted sheet.
If you want designs you can use beyond Halloween, my free crochet applique patterns collection brings the animal, Christmas, Halloween and smaller decorative motifs together.
Explore More Free Crochet Baby Patterns
Free Halloween Crochet Patterns
Crochet Turkey Appliqué Pattern
When you click on links to various merchants on this site and make a purchase, this may result in this site earning a commission. This does not affect the price you pay.

UBGI Gold Standard 2026
Reviewed under the site's
editorial checklist.
Photos, decorating ideas, party setups and reader submissions are shared for inspiration unless a page is specifically presented as a pattern, tutorial, reference guide or step-by-step project. Follow the instructions, measurements, safety guidance and manufacturer directions provided for the particular project or product.
About Jan | Contact | Baby Nursery Ideas (Blog) | Site Map | Privacy Policy | Disclosure Policy | Disclaimer | Affiliate Disclosure | Earnings Disclosure | Facebook | Pinterest
I am a participant in the Amazon Services LLC Associates Program, an affiliate advertising program designed to provide a means for us to earn fees by linking to Amazon. As an Amazon Associate I earn from qualifying purchases.
Copyright © 2006-2026. All Rights Reserved.